Furniture / Tables & Desks
Installation Guide for Hokku Designs Lighting Fixture
Step-by-step installation guide for your Hokku Designs lighting fixture. Includes wiring instructions, component assembly, and bulb installation steps.
Quick answers from the manual
Quick answer
- This document provides step-by-step instructions for installing and assembling the Hokku Designs lighting fixture. p. 1
Key actions
- Secure mounting bracket (1) to the junction box using screw (2). p. 1
- Connect main wires and lamp body wires using twist-on connector (3). p. 1
- Fasten ceiling canopy (4) to mounting bracket screw (1) with decorative nut (5). p. 1
- Install bulb (6) (bulb not included). p. 1
- Attach metal washer and rubber washer (7). p. 1
- Install glass lampshade (8). p. 1
- Mount rubber washer, metal washer, and nut (9). p. 1
- Attach decorative cover (10). p. 1
Where to find it in the PDF
- Installation and assembly instructions p. 1
Table of contents
Quick Installation Guide
This guide provides the necessary steps to install your Hokku Designs lighting fixture. Please ensure the power is turned off at the circuit breaker before beginning any installation work.
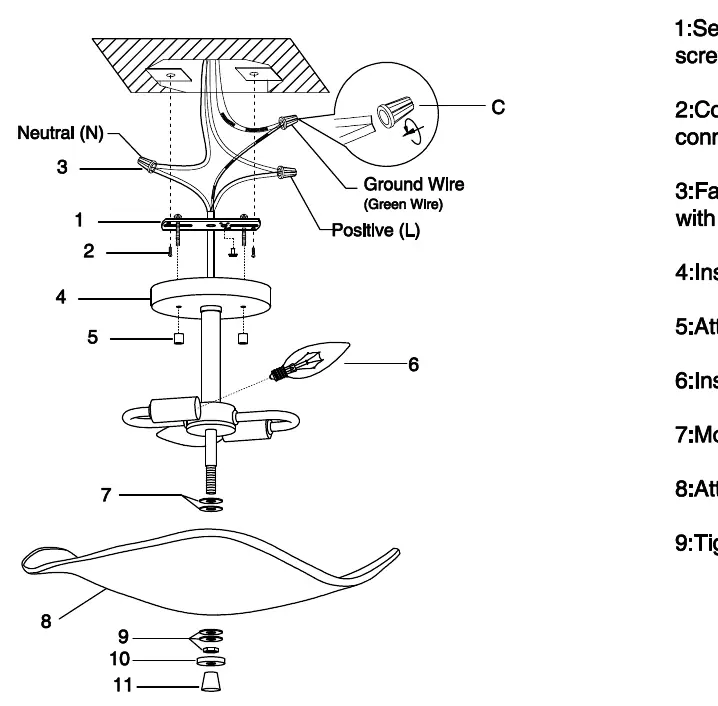
- Secure the mounting bracket (1) to the junction box using the provided screw (2).
- Connect the main wires and lamp body wires using the twist-on connector (3). Ensure the Neutral (N), Ground (Green), and Positive (L) wires are properly matched.
- Fasten the ceiling canopy (4) to the mounting bracket screw (1) using the decorative nut (5).
- Install the light bulb (6). Note that the bulb is not included with the fixture.
- Attach the metal washer and rubber washer (7).
- Install the glass lampshade (8).
- Mount the rubber washer, metal washer, and nut (9) to secure the shade.
- Attach the decorative cover (10).
- Tighten the decorative finial (11) to complete the assembly.
Safety and Wiring
Always ensure the electrical power is disconnected before starting the installation. The wiring process requires connecting the main supply wires to the lamp body wires using the provided twist-on connector. If you are unsure about electrical wiring, please consult a qualified electrician.
Components
The assembly consists of the following parts as identified in the diagram:
- 1: Mounting bracket
- 2: Screw
- 3: Twist-on connector
- 4: Ceiling canopy
- 5: Decorative nut
- 6: Light bulb (not included)
- 7: Metal and rubber washers
- 8: Glass lampshade
- 9: Rubber washer, metal washer, and nut
- 10: Decorative cover
- 11: Decorative finial
Practical help
Common problems
Bulb not included
You must purchase a compatible light bulb separately before starting the installation.
Wiring uncertainty
Ensure the Neutral (N), Ground (Green), and Positive (L) wires are correctly connected using the provided twist-on connector. If unsure, consult a professional electrician.
Before use
- Turn off power at the circuit breaker.
- Verify all parts (1-11) are present.
- Purchase a compatible light bulb.
- Ensure the junction box is secure and ready for mounting.
Images and diagrams
- The diagram illustrates the assembly sequence from the ceiling junction box down to the decorative finial.
- Parts are numbered 1 through 11 to guide the assembly order.
Model compatibility
- Bulb is not included with the fixture.

Manual page author
Emily Carter
User documentation editor
Prepares concise manual descriptions and highlights the most useful setup, operation, and maintenance information for readers.