Home / Seasonal Decorations
User Manual for Home Accents Holiday 22PG90181 Artificial Christmas Tree
Quick guide for the Home Accents Holiday 22PG90181 artificial Christmas tree. Includes assembly instructions, branch shaping, lamp replacement, and troubleshooting steps.
Quick answers from the manual
Quick answer
- To assemble the tree, snap the stand into an x-shape, insert the tree sections, and connect the power adapter. If the lights do not work, check all section connections, replace any loose or broken bulbs, and ensure the foot pedal is switched on. p. 1, 2
Key actions
- Assemble the stand by snapping legs into an x-shape and tightening eyebolts. p. 1
- Shape branches from bottom to top by fanning them out in a star shape. p. 1
- Replace bulbs by lifting the lock tab and pulling the lamp base out. p. 1
First start
- Remove protective caps from the tree bottom, insert the pole into the stand, and connect the light strings. p. 1
Show 3 more answers Show less
Problems and fixes
The tree does not light
Ensure all tree sections are plugged into each other and the wall outlet. If equipped with a foot pedal, press the On/Off button.
p. 2
Bulbs flickering or not working
Search for loose, broken, or missing bulbs and replace them with the provided spares.
p. 2Maintenance and reset
- Repair loose hinges by placing the branch into the bracket slot and securing with a new hinge pin and washer. p. 2
Where to find it in the PDF
- Assembly and Safety p. 1
- Operation, Maintenance, and Troubleshooting p. 2
Table of contents
Manual images
Click an image to enlargeQuick guide from the manual
This manual provides instructions for the Home Accents Holiday 22PG90181 artificial Christmas tree. The tree features a Quick Set design for easy assembly and LED lighting. Always inspect the product for damaged wires or loose connections before use. If the tree fails to light, check all section connections, the power adapter, and the foot pedal switch.
Assembly
Assembling the tree stand:
- Pull apart the legs of the stand until they snap into an x-shape.
- Place the stand on a level surface.
- Insert the bottom section of the tree into the stand.
- Insert and turn the eyebolts into the stand and tighten until the tree pole is firmly secured.
- To close the stand, remove the eyebolts, press the metal button, and fold the legs together.
Assembling the tree:
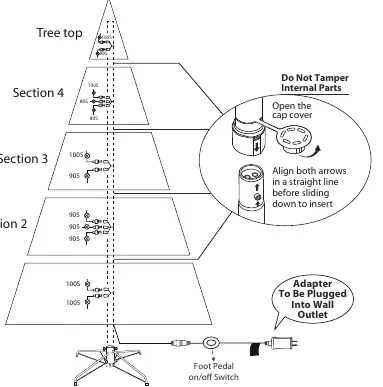
- Remove protective caps from the tree bottom and insert the pole into the stand.
- Continue inserting the upper tree sections into the lower sections until the tree top is attached.
- Ensure all wires are free of branch hinges during assembly.
- Connect the light strings together and plug the adapter into a wall outlet.
- If equipped with a foot pedal, step on the On/Off button to turn on the lights.
Shaping the branches
Proper shaping is essential for a full look:
- Work from the bottom of the tree to the top.
- Fan out branches in a star shape, starting with branches farthest from the pole.
- Continue until the entire tree is shaped.
- When finished, slightly upsweep all branch tips for a uniform look.
Maintenance
Lamp replacement:
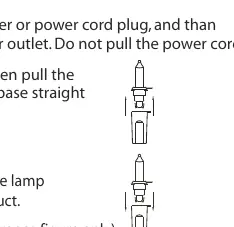
- Unplug the power adapter from the wall outlet.
- Lift the lamp lock tab.
- Pull the lamp and plastic lamp base straight out of the lamp-holder.
- Replace with a new spare lamp provided with the product.
Repairing loose hinges:
- Place the branch into the slot of the bracket.
- Insert a new hinge pin through the holes of the bracket and secure with a washer.
Storage
- Before disassembling, unplug the tree and remove all ornaments.
- Gently lift the tree top straight up to remove it from the center section.
- Fold all branches towards the pole.
- Repeat for center and bottom sections.
- Cover the protective cap on the poles to avoid damaging internal parts.
- Store in a cool, dry location protected from sunlight.
Manufacturer information
Home Accents Holiday
Practical help
Common problems
The tree does not light
Ensure all tree sections are plugged into each other and the adapter is plugged into the wall. If the tree has a foot pedal, ensure it is switched on.
Lights are flickering
Check for loose, broken, or missing bulbs and replace them with the provided spare bulbs.
Tree looks sparse
Ensure all branches are properly shaped by fanning them out in a star shape from the bottom to the top.
Before use
- Inspect product for cut, damaged, or frayed wire insulation.
- Check for cracks in lampholders or enclosures.
- Ensure no exposed copper wire is visible.
- Verify all tree sections are securely connected.
- Place the stand on a level surface.
Show more Show less
Images and diagrams
- Stand assembly: Shows pulling legs into an x-shape and tightening eyebolts.
- Branch shaping: Illustrates fanning branches out in a star shape and upsweeping tips.
- Lamp replacement: Shows lifting the lock tab and pulling the lamp base out.
Model compatibility
- Use only the power adapter provided with this product.
- Do not use seasonal products outdoors unless marked suitable for indoor and outdoor use.

Manual page author
Michael Turner
Technical manual editor