Garden / Seasonal Decorations
User Manual for Home Accents Holiday 22GM80770 Iridescent Ribbon Angel Holiday Yard Decoration
Quick guide for the Home Accents Holiday 22GM80770 Iridescent Ribbon Angel. Includes assembly steps, safety warnings, fuse and lamp replacement, and troubleshooting tips.
Quick answers from the manual
Quick answer
- The Home Accents Holiday Iridescent Ribbon Angel is assembled by connecting the body sections, base, head, and accessories using provided plastic ties, nuts, and bolts. It requires a 3 Amp, 125V fuse and specific 4.5V or 3.0V lamps. p. 3, 4, 5
Key actions
- Assemble the decoration p. 3, 4
- Replace a fuse p. 5, 6
- Replace a lamp p. 5, 6
First start
- Unpack and verify parts p. 2
- Assemble body and base p. 3
Show 4 more answers Show less
Problems and fixes
Item not operating
Check power source and ensure plug is connected.
p. 6Maintenance and reset
- Fuse replacement p. 5, 6
Technical specifications
| Parameter | Value | Meaning | Pages |
|---|---|---|---|
| Fuse | 3 Amp, 125 Volt | Required fuse rating. | p. 5, 6 |
| Lamps | 4.5V, 0.09W or 3.0V, 0.072W | Required lamp specifications. | p. 5 |
Where to find it in the PDF
- Safety Instructions p. 1
- Parts List p. 2
- Assembly Instructions p. 3, 4
- User Servicing p. 5, 6
Table of contents
Manual images
Click an image to enlargeQuick Guide
The Home Accents Holiday Iridescent Ribbon Angel is a seasonal decoration designed for both indoor and outdoor use. Assembly takes approximately 10-15 minutes. Always ensure the product is unplugged before assembly, disassembly, or maintenance. If using outdoors, connect to a Ground Fault Circuit Interrupting (GFCI) outlet.
Safety Instructions
- Electrical Safety: This is an electrical product, not a toy. Keep away from children.
- Outdoor Use: Use only if marked for indoor/outdoor use. Connect to a GFCI outlet.
- Placement: Do not mount near gas/electric heaters, fireplaces, or candles. Do not secure wiring with staples or nails.
- Operation: Do not leave unattended for extended periods. Unplug when leaving the house or retiring for the night.
- Maintenance: Do not cover with cloth or fabric during use. Do not place against carpeting or furniture.
Parts List
Ensure all parts are present before assembly:
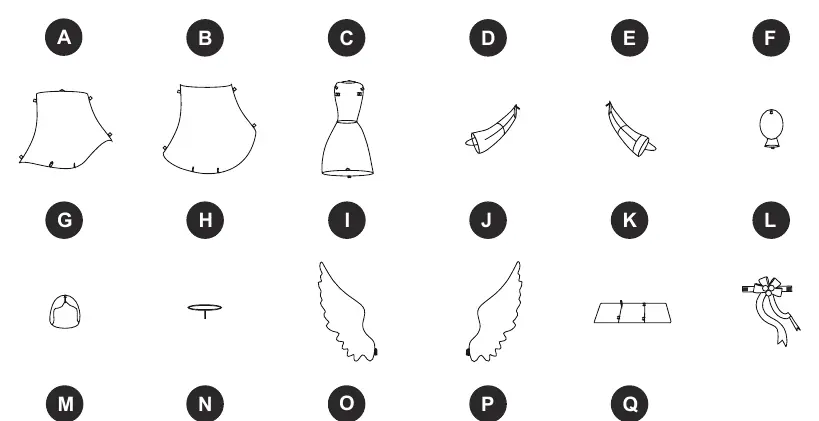
- A: Back of the Lower Body
- B: Front of the Lower Body
- C: Upper Body
- D: Left Hand
- E: Right Hand
- F: Head
- G: Hair
- H: Halo
- I: Left Wing
- J: Right Wing
- K: Base
- L: Streamer
- M: Nuts and Bolts (2)
- N: Yard Stakes (6)
- O: Plastic Ties (18)
- P: Extra Lamps (3)
- Q: Extra Fuse 3A, 125V (2)
Assembly Instructions
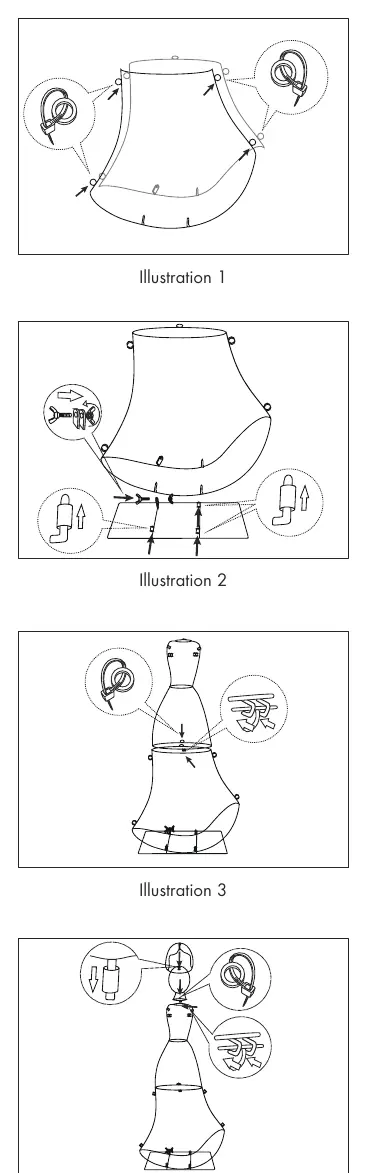
- Secure the lower body (A, B) together using plastic ties (O).
- Insert the hook on the lower body (A, B) into the tube on the base (K). Secure with nuts and bolts (M).
- Secure the upper body (C) onto the lower body (A, B) by inserting the mounting clip at the front. Secure with plastic ties (O).
- Install the head (F) to the top of the upper body (C) through the front mounting clip. Secure with plastic ties. Insert the rod on the hair (G) into the tube on the head (F).
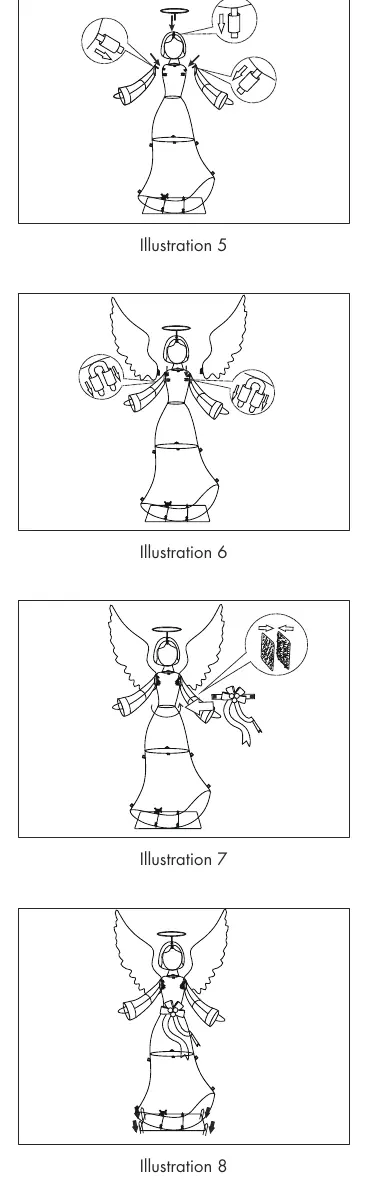
- Place the rod of the halo (H) into the tube on the hair (G). Insert the rod on both hands (D, E) into the corresponding holes on each side of the body (C).
- Insert the hooks on the wings (I, J) into the corresponding sockets behind the upper body (C).
- Wrap the bow ribbon (L) around the waist of the upper body (C) and secure firmly with the Velcro.
- Secure the item firmly to the ground using the yard stakes (N).
User Servicing
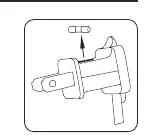
Fuse Replacement
If the fuse blows, unplug the product. Slide open the fuse access cover on top of the attachment plug. Replace only with a 3 Amp, 125 Volt fuse.
Lamp Replacement
Unplug the product. Pull the lamp and plastic base straight out of the lampholder. Replace with 4.5 Volt, 0.09 Watt or 3.0 Volt, 0.072 Watt steady lamps. If the new base does not fit, remove the base of the burned-out lamp, thread the leads of the new lamp through the old base, and re-insert.
Troubleshooting and FAQs
If the item is not operating, check the power source and ensure the cord is plugged in. The product is designed for light weather conditions; in high winds, relocate to a sheltered area. For storage, keep in a cool, dry location protected from sunlight.
Storage
Carefully remove the product from its display location to avoid strain on conductors and wires. Store in a cool, dry location, preferably in the original box.
Manufacturer information
Home Accents Holiday
Practical help
Common problems
Item not operating
Check if the power source is disabled or the cord is unplugged.
Fuse blown
Unplug the product and replace the fuse in the plug with a 3 Amp, 125 Volt fuse.
Lamp not working
Replace with provided spare lamps (4.5V/0.09W or 3.0V/0.072W).
Before use
- Inspect product for cut, damaged, or frayed wire insulation.
- Check for cracks in lampholders or enclosures.
- Ensure all parts (A-Q) are present.
- Verify the tree or ground surface is stable.
- Ensure a GFCI outlet is used for outdoor applications.
Show more Show less
Specs in practice
- Assembly Time
- Approximately 10-15 minutes.
Images and diagrams
- Illustration 1: Securing lower body with plastic ties.
- Illustration 2: Attaching lower body to base with nuts and bolts.
- Illustration 3: Attaching upper body to lower body.
- Illustration 4: Installing head and hair.
- Illustration 5: Installing halo and hands.
Model compatibility
- Suitable for indoor and outdoor use.
- Do not use on live trees with brown needles or those that break easily.
- Not intended for permanent installation.

Manual page author
David Miller
Documentation analyst