Home / Seasonal Decorations
User Manual for Home Accents Holiday 21GM12589 Iridescent Ribbon Snowman Yard Decoration
Quick guide for assembling and maintaining your Home Accents Holiday 21GM12589 Iridescent Ribbon Snowman. Includes step-by-step assembly instructions, fuse and lamp replacement procedures, and safety guidelines.
Quick answers from the manual
Quick answer
- The 21GM12589 Iridescent Ribbon Snowman is a seasonal decoration that requires assembly. It uses 3A, 125V fuses and specific 4.5V or 3.0V lamps. It is suitable for indoor and outdoor use. p. 2, 3, 5
Key actions
- Assemble the snowman p. 3, 4
- Replace the fuse p. 5, 6
- Replace a lamp p. 5, 6
First start
- Assemble the snowman horizontally on its side, then stand it up after all pieces are connected. p. 3
Show 4 more answers Show less
Problems and fixes
Item not operating
Check power source and ensure the cord is plugged in. Check the fuse.
p. 6Maintenance and reset
- Replace fuse only with 3 Amp Max, 125 Volt fuse. p. 5
Technical specifications
| Parameter | Value | Meaning | Pages |
|---|---|---|---|
| Fuse | 3 Amp, 125V | Overload protection | p. 5 |
| Lamp | 4.5V/0.09W or 3.0V/0.072W | Steady lamps | p. 5 |
Where to find it in the PDF
- Safety Instructions p. 1
- Parts List p. 2
- Assembly Instructions p. 3, 4
- Servicing and Troubleshooting p. 5, 6
Table of contents
Manual images
Click an image to enlargeQuick guide from the manual
This document provides instructions for the assembly, operation, and maintenance of the Home Accents Holiday Iridescent Ribbon Snowman (Model 21GM12589). The product is designed for seasonal use and is suitable for both indoor and outdoor applications. Always ensure the product is unplugged before assembly or maintenance. Do not leave the product unattended for extended periods.
Parts list
- A: Back of the Lower Body
- B: Front of the Lower Body
- C: Back of the Upper Body with Head
- D: Front of the Upper Body with Head
- E: Front of the Hat
- F: Back of the Hat
- G: Left Hand
- H: Right Hand
- I: Base
- J: Bow
- K: Ribbon
- L: Nuts and Bolts
- M: Yard Stakes
- N: Plastic Ties
- O: Extra Lamps
- P: Extra Fuse (3A, 125V)
Assembly instructions
It is recommended to assemble the snowman horizontally on its side and stand it up after all pieces are connected.
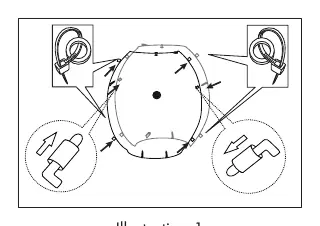
- Insert the front (B) and back (A) of the lower body into their corresponding tubes. Secure both parts together using plastic ties (N).
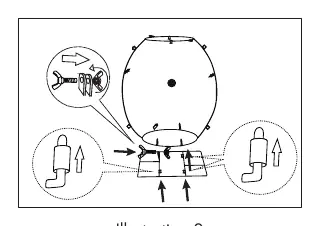
- Insert the hooks at the bottom of the lower body (A, B) into the tubes of the base (I). Secure with nuts and bolts (L).
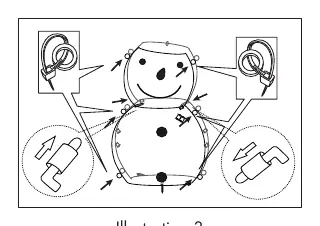
- Insert the hooks of the upper body parts (C, D) into their corresponding tubes. Secure both parts together with plastic ties (N).
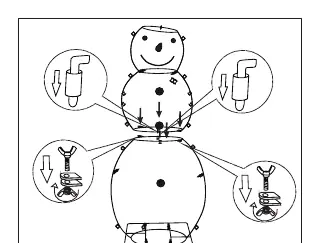
- Insert the rod of the assembled upper body (C, D) into the tubes of the assembled lower body (A, B). Secure with nuts and bolts (L).
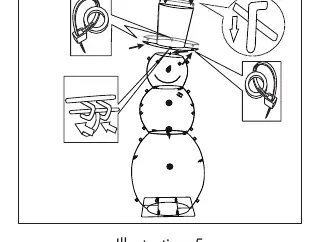
- Hang the hook on the back section of the hat (F) on the front section of the hat (E). Secure with plastic ties (N). Attach the front of the hat (E) to the snowman's head by inserting the mounting clip at the front. Secure with plastic ties (K).
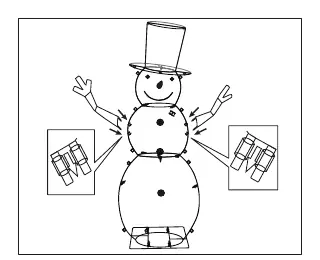
- Attach the left (G) and right (H) arms to both sides of the upper body (C, D) by inserting the rods into the corresponding holes.
- Hang the bow (J) on the ribbon (K) using the hook on the bow. Attach the ribbon (K) to the neck by inserting the rod into the hole.
- Secure the item firmly to the ground using the yard stakes (M).
User servicing instructions
Fuse replacement
If the product stops working, check the fuse. Replace only with a 3 Amp Max, 125 Volt fuse. Slide open the fuse access cover on top of the attachment plug, remove the old fuse, insert the new one, and close the cover.
Lamp replacement
Replace lamps only with the spare lamps provided. Pull the lamp and plastic base straight out of the lampholder. If the new lamp base does not fit, remove the base of the burned-out lamp by straightening the leads, thread the new lamp leads through the holes in the old base, and bend the leads up to touch the contacts.
Storage
When not in use, store the product in a cool, dry location protected from sunlight. You may use the original box for storage.
Manufacturer information
Home Accents Holiday
Practical help
Common problems
Item not operating
Check if the power source is disabled or the cord is unplugged. Check the fuse in the plug.
Lamp not working
Replace the non-working lamp with one of the spare lamps provided.
Product unstable in wind
Ensure the product is secured with yard stakes. If winds are high, move the product to a sheltered area.
Before use
- Inspect the product for cut, damaged, or frayed wire insulation.
- Check for cracks in lampholders or enclosures.
- Ensure all parts are present according to the contents list.
- Verify the fuse is intact.
- Ensure the tree (if used) is well-maintained and stable.
Show more Show less
Images and diagrams
- Illustrations 1-4: Step-by-step assembly of the body sections and base.
- Illustration 5: Assembly of the hat and attachment to the head.
- Illustration 6: Attachment of the arms.
- Illustration 7: Attachment of the bow and ribbon.
- Illustration 8: Securing the unit to the ground with stakes.
Model compatibility
- Suitable for indoor and outdoor use.
- Not intended for permanent installation.
- Do not mount near gas or electric heaters, fireplaces, or candles.

Manual page author
David Miller
Documentation analyst