Lighting / Fixtures
User Manual for Home Decorators Collection 1-Light Mini Pendant
Quick guide for the Home Decorators Collection 1-Light Mini Pendant. Includes installation steps, wiring instructions, safety warnings, and troubleshooting tips.
Table of contents
Manual images
Click an image to enlargeQuick guide from the manual
This guide provides essential instructions for installing and maintaining your 1-Light Mini Pendant. Before beginning, ensure you have all parts and tools required. Always turn off the electricity at the main circuit breaker before starting any installation or maintenance work.
Safety Information
- Warning: Turn off electricity at the main circuit breaker panel before beginning installation.
- Warning: Risk of fire. Use 90° C supply conductors. Consult a qualified electrician to ensure the correct branch circuit conductor.
- Caution: All glass is fragile. Handle glass shades and bulbs with care.
- Chemical Warning: This product can expose you to chemicals including lead, which is known to the state of California to cause cancer and birth defects.
Pre-installation
Before starting, ensure all parts are included. If any part is missing or damaged, do not attempt to assemble or install the product. Place the fixture on a soft, non-abrasive surface like carpet or cardboard to avoid damage.
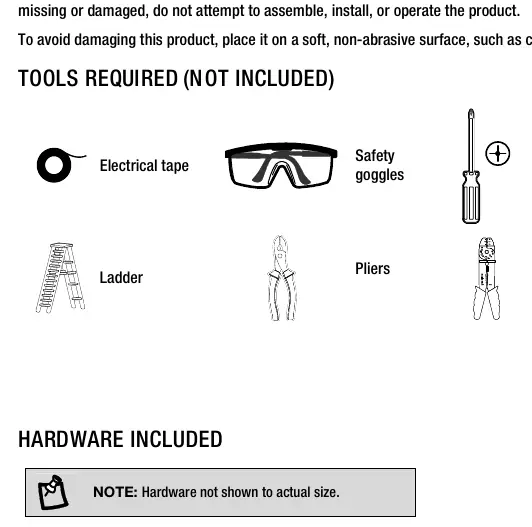
Tools Required (Not Included): Electrical tape, safety goggles, Phillips screwdriver, level, ladder, pliers, wire stripper, wire cutters.
Installation
1. Preparing the mounting bracket
Insert the mounting screws (CC) into the round mounting plate (AA) and secure them with the hex nuts (DD).
2. Installing the mounting plate assembly
Install the round mounting plate (AA) to the outlet box using outlet box screws (not provided). Ensure the mounting screws (CC) protrude away from the outlet box.
3. Assembling the fixture
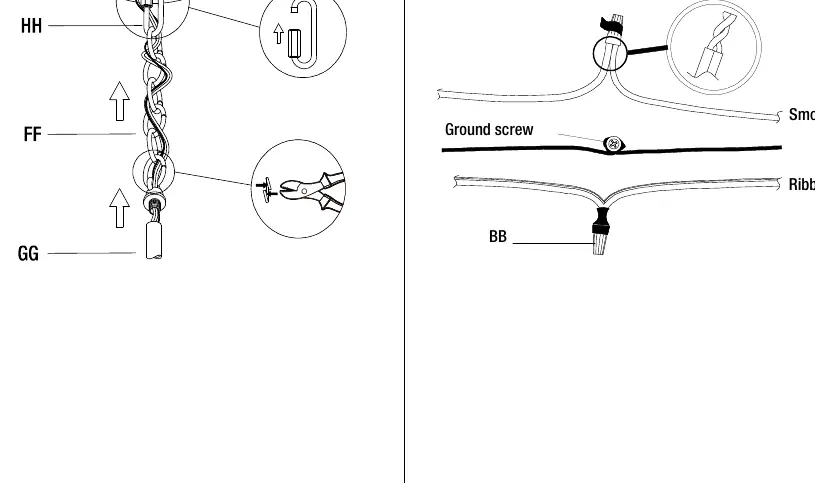
Thread the wires from the fixture (B) through the stems (GG). Screw the stem (GG) onto the fixture and pull the wiring up through the stem assembly tightly.
4. Preparing the wires and canopy/chain assembly
Shorten the chain length and wires if desired. Weave the wires through the chain (FF), chain loop, and canopy (A). Open the chain link at the bottom of the chain (FF) and attach it to the loop on the fixture stem (GG). Use the quick connect link (HH) to attach the chain to the canopy (A).
5. Connecting the wires
Strip 3/8 in. of insulation from the fixture wire ends. Using wire nuts (BB), connect the ribbed fixture wire to the white (neutral) supply wire and the smooth fixture wire to the black (live) supply wire. Connect the ground wire from the junction box and the fixture to the ground screw on the mounting plate (AA). Wrap wire nuts with electrical tape and push all connections into the outlet box.
6. Installing the fixture to the ceiling
Secure the fixture to the ceiling using the two cylinder nuts (EE). Tighten them securely.
7. Installing the glass shade
Unscrew the socket ring (D) from the fixture. Install the glass shade (C) and reinstall the socket ring (D) to secure it. Do not overtighten.
8. Installing the light bulb
Install a bulb (not included) into the fixture socket. This fixture uses a 60-watt MAX, incandescent, medium-base, SBCFL, or SBLED bulb.
Care and Maintenance
Wipe the fixture with a damp, soft cloth. Do not use abrasive cleaners or cleaners containing alcohol. When replacing bulbs, ensure you do not exceed the 60-watt maximum.
Troubleshooting
If the light will not turn on, check if the bulb is burned out, the power is off, the wiring is faulty, or the switch is defective. If the fuse blows or the circuit breaker trips, there may be crossed wires or a grounding issue; discontinue use and check connections or contact a qualified electrician.
Manufacturer information
Home Decorators Collection
Practical help
Common problems
The light will not turn on
Check if the bulb is burned out, ensure the power supply is on, check for faulty wiring, or test/replace the switch.
Fuse blows or circuit breaker trips
There may be crossed wires or the power wire is grounding out. Discontinue use and check wire connections or contact a qualified electrician.
Before use
- Turn off electricity at the main circuit breaker panel.
- Verify all parts are included (mounting plate, wire nuts, stems, etc.).
- Ensure you have the required tools: ladder, pliers, wire stripper, wire cutters, screwdriver, level, safety goggles, electrical tape.
- Place the fixture on a soft surface to prevent damage during assembly.
Specs in practice
- Supply Conductors
- Must be rated for 90° C.
Images and diagrams
- Wiring diagram: Connect ribbed fixture wire to white (neutral) supply wire; connect smooth fixture wire to black (live) supply wire.
- Grounding: Connect ground wires from both the junction box and the fixture to the ground screw on the mounting plate.
Model compatibility
- Requires a standard electrical junction box.
- If using special control devices, follow instructions carefully to ensure N.E.C. compliance.

Manual page author
Emily Carter
User documentation editor
Prepares concise manual descriptions and highlights the most useful setup, operation, and maintenance information for readers.