Lighting / Fixtures
User Manual for Home Decorators Collection 1-Light Wall Sconce HD7839C
Quick guide for the Home Decorators Collection 1-Light Wall Sconce HD7839C. Includes installation steps, wiring instructions, bulb requirements, and troubleshooting.
Table of contents
Manual images
Click an image to enlargeQuick guide from the manual
This document provides installation and maintenance instructions for the Home Decorators Collection 1-Light Wall Sconce (Model HD7839C). Before beginning, ensure you have all necessary tools and that the power is disconnected at the circuit breaker.
Safety Information
- Danger: Before starting installation or removing a previous fixture, disconnect power by turning off the circuit breaker or removing the fuse.
- Use a voltage tester to ensure wires are not live before touching them.
- Use tools with insulated handles and ladders made of wood or fiberglass.
- Consult a qualified electrician if you have any electrical questions.
Pre-Installation
Tools Required: Phillips screwdriver, pliers, safety goggles, electrical tape.
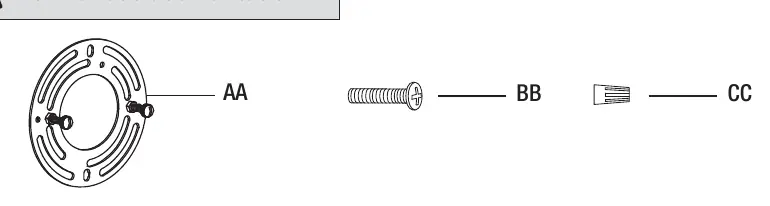
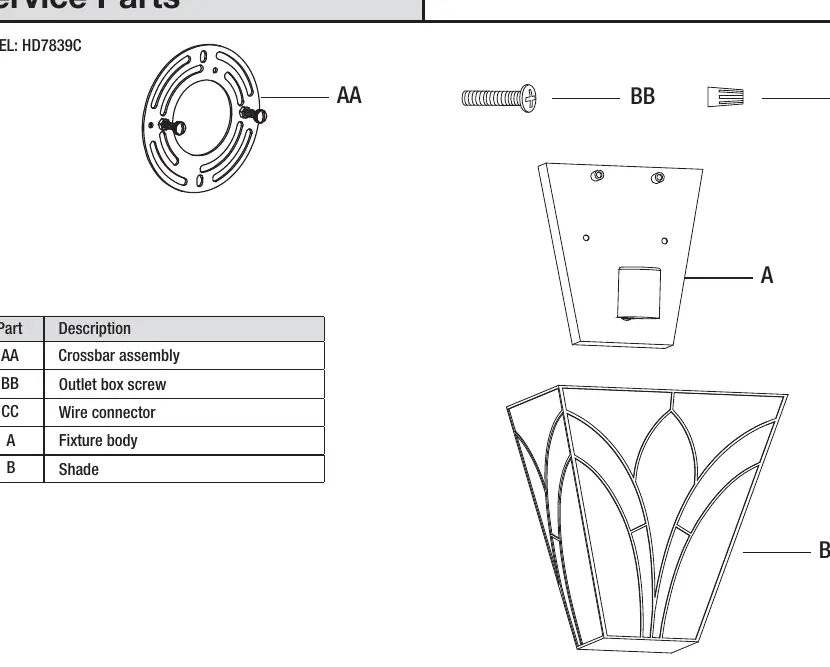
Hardware Included: Crossbar assembly (AA), outlet box screws (BB), wire connectors (CC).
Bulb Requirements: This product requires one 60W maximum medium base (E26) type A bulb or one 9W maximum medium base (E26) self-ballasted LED bulb (sold separately).
Installation
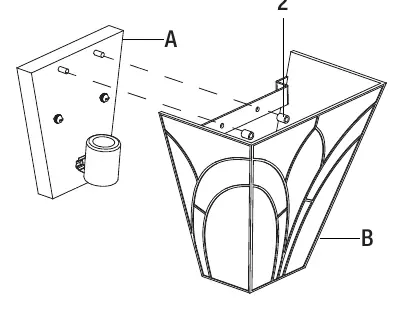
- Preparing the crossbar assembly: Unscrew the two mounting balls from the fixture body and remove the crossbar assembly.
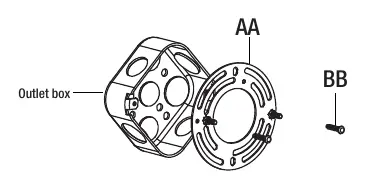
- Installing the crossbar assembly: Secure the crossbar assembly to the outlet box using the outlet box screws. Ensure the preassembled mounting screws protrude outward.
- Testing the backplate: Fit the backplate to the crossbar assembly. If they do not align, adjust the length of the mounting screws on the crossbar assembly by unscrewing the hex nuts.
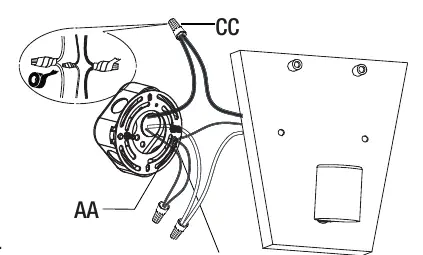
- Making the electrical connections: Wrap the supply ground wire around the green ground screw on the crossbar. Connect the fixture ground wire to the supply ground wire using a wire connector. Connect the white supply wire to the white fixture wire, and the black (or red) supply wire to the black fixture wire using wire connectors. Wrap connections with electrical tape and insert wires into the outlet box.
- Attaching the fixture body: Reattach the backplate to the crossbar assembly and secure it with the mounting balls.
- Installing the shade: Unscrew the lock balls from the fixture body, place the shade over the bolts, and secure it with the lock balls.
- Installing the light bulb: Install the correct bulb (not included) based on the fixture markings.
Care and Cleaning
Do not use chemicals, solvents, or harsh abrasives. Use only a dry, soft cloth to dust or wipe the fixture. To clean, disconnect power and use a dry or slightly dampened cloth to wipe the exterior surface.
Troubleshooting
If the light will not turn on, check if the bulb is burned out, ensure the power supply is on, test the switch, or check the wiring connections. If the fuse blows or the circuit breaker trips, discontinue use and check for crossed wires or grounding issues.
Manufacturer information
Home Decorators Collection
Practical help
Common problems
The light(s) will not turn on
Replace the light bulb, ensure the power supply is turned on, test or replace the switch, or check the wiring connections.
The fuse blows or the circuit breaker trips when the light is turned on
Discontinue use of the light, check the wire connections, or contact a qualified electrician.
Before use
- Turn off power at the circuit breaker or fuse box.
- Use a voltage tester to ensure wires are not live.
- Inspect wire insulation for cuts, abrasions, or exposed copper.
- Ensure you have a Phillips screwdriver, pliers, safety goggles, and electrical tape.
- Verify you have an E26 base bulb (60W max incandescent or 9W max LED).
Specs in practice
- Max Wattage (Incandescent)
- 60W
- Max Wattage (LED)
- 9W
Images and diagrams
- The crossbar assembly (AA) is mounted to the outlet box using screws (BB).
- Wiring connections are secured using wire connectors (CC) and electrical tape.
- The fixture body (A) is secured to the crossbar using mounting balls (1).
Model compatibility
- Requires E26 base bulb.
- Do not use harsh chemical cleaners or solvents.

Manual page author
Michael Turner
Technical manual editor
Reviews PDF manuals for structure, safety notes, and practical product details so readers can find the right information quickly.