HVAC / Heaters & Fireplaces
User Manual for Home Decorators Collection Woodbank 52 Inch Ceiling Fan
Quick guide for the Home Decorators Collection Woodbank 52 Inch Ceiling Fan (Model 11052AICNDO). Includes installation steps, wiring instructions, remote control pairing, and troubleshooting.
Table of contents
Manual images
Click an image to enlargeQuick guide from the manual
This ceiling fan requires a standard UL-listed outlet box capable of supporting 35 lbs. Ensure power is turned off at the circuit breaker before beginning installation. The fan includes a remote control that comes pre-programmed, but if you install multiple fans, you must follow the pairing process to ensure independent control. The fan features a DC motor, which may cause the fan to oscillate back and forth during the initial calibration cycle; this is normal operation.
Safety Information
- Turn off electricity at the circuit breaker or fuse box before starting.
- The outlet box must be UL-listed and marked for fan support of 35 lbs (15.9 kg) or less.
- Do not use solid-state fan speed control devices.
- The fan must be mounted with a minimum of 7 ft (2.1 m) clearance from the blades to the floor.
- Do not bend blade brackets during installation or cleaning.
Installation
Mounting the Fan
Secure the mounting bracket to the ceiling outlet box using the provided screws and washers. If installing on a sloped ceiling, ensure the angle does not exceed 18 degrees.
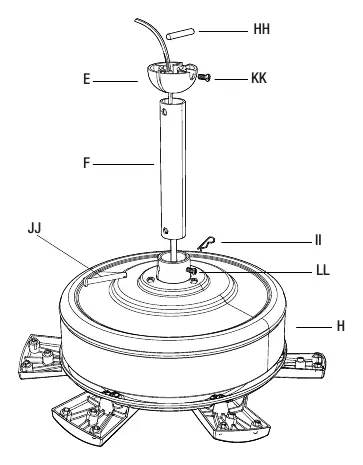
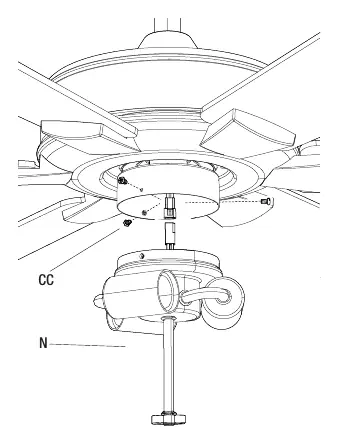
Downrod Assembly
Loosen the set screws on the motor coupling. Remove the hitch pin, lock pin, and hanger ball from the downrod. Feed the wires through the downrod, thread the downrod into the motor coupling, and re-secure with the pins and set screws.
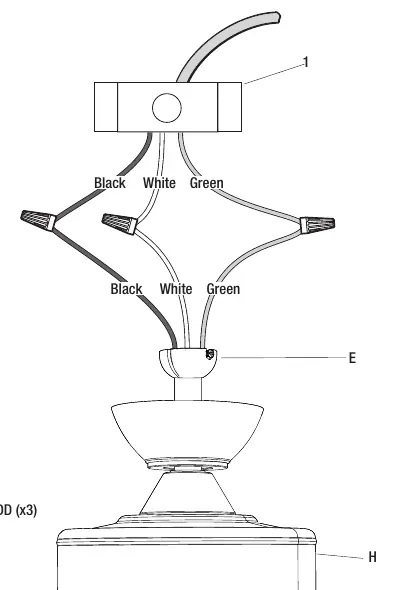
Wiring Connections
Connect the wires from the ceiling to the fan motor assembly:
- Black (Hot) to Black wire.
- White (Neutral) to White wire.
- Green/Bare (Ground) to the ground wire.
Secure connections with wire nuts and wrap with electrical tape. Tuck wires carefully into the outlet box.
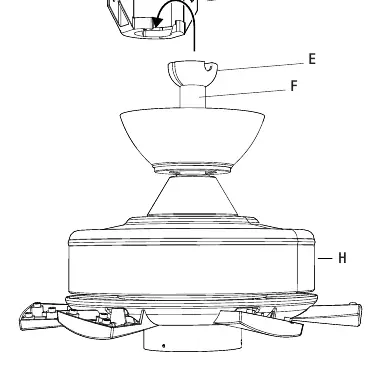
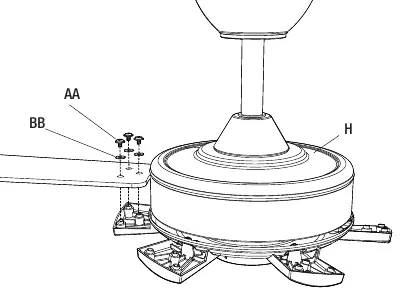
Final Assembly
Attach the canopy to the mounting bracket. Install the fan blades using the provided screws and fiber washers. Attach the light kit to the motor assembly, install the LED bulbs, and secure the metal cage.
Operation
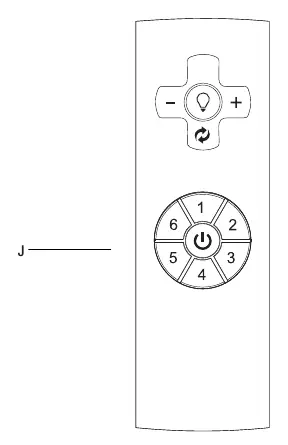
Remote Control
Install the 12V battery into the remote. The fan is pre-programmed. To pair multiple fans independently:
- Turn off power to all fans.
- Restore power to only one fan.
- Within 30 seconds, press and hold the power button for 5 seconds until a beep is heard.
- Repeat for each fan.
Fan Functions
- Fan Button: Turns the fan on or off.
- Speed Buttons (1-6): Adjusts fan speed.
- Light Button: Turns the light on or off; use + and - to adjust brightness.
- Reverse Button: Changes airflow direction (counterclockwise for cooling, clockwise for heating).
Care and Cleaning
- Check support connections and blade attachments twice a year.
- Clean periodically with a soft brush or lint-free cloth.
- Do not use water or detergents.
- Do not apply oil to the motor; it has permanently-lubricated sealed ball bearings.
Manufacturer information
Home Decorators Collection
Practical help
Common problems
Fan will not start
Check main and branch circuit fuses or breakers. Verify wire connections. Reset the transmitter using the learning process.
Fan sounds noisy
Ensure all motor housing screws are snug. Check blade arm screws. Allow a 24-hour break-in period. Ensure the canopy does not touch the ceiling.
Fan wobbles
Check that all blade and blade arm screws are secure. Measure the distance from the ceiling to the tip of each blade to ensure they are level.
Remote control not working
Reset the transmitter by following the learning process. Do not use with wall-mounted variable speed controls.
Before use
- Turn off power at the circuit breaker.
- Ensure the outlet box is UL-listed for fan support (35 lbs).
- Check that all setscrews are tightened.
- Install the 12V battery in the remote control.
- Verify the fan has 7 ft of clearance from the floor.
Images and diagrams
- Wiring diagram shows proper connection of black, white, and green wires using wire nuts.
- Assembly diagrams illustrate the sequence of attaching the downrod, canopy, blades, and light kit.
Model compatibility
- Do not use with solid-state fan speed control devices.
- Requires a UL-listed outlet box marked for fan support.

Manual page author
Emily Carter
User documentation editor
Prepares concise manual descriptions and highlights the most useful setup, operation, and maintenance information for readers.