Plumbing / Sinks Faucets
Installation and Maintenance Manual for Magic Home Undermount Kitchen Sink
A comprehensive guide for installing and maintaining your Magic Home Undermount Kitchen Sink. Includes step-by-step installation procedures, tool requirements, and essential care tips to prevent rust and scratches.
Table of contents
Manual images
Click an image to enlargeQuick guide from the manual
This document provides installation and maintenance instructions for the Magic Home Undermount Kitchen Sink. It is strongly recommended that the product be installed by a licensed plumber to ensure compliance with local building and plumbing codes. Always inspect the sink for damage before beginning installation.
Safety precautions
- Due to the weight and sharp edges of the sink, exercise caution when handling, moving, or lifting the box or the sink.
- Use safety gloves and protective gear for eyes and ears.
- Get assistance when lifting or mounting the sink.
- Do not attempt to handle or install this product if you are medically unfit or if it poses a risk of bodily injury.
Tools required
Ensure you have the following tools before starting:
- Safety glasses
- Marker
- Silicone adhesive sealant
- Tape measure
- Jigsaw
- Rags
- Wood braces
- Level
- Screws
- Bladed screwdriver
Installation steps

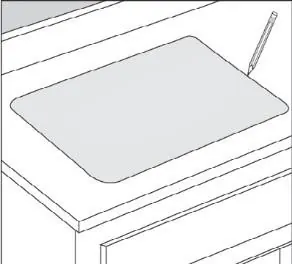
- Position Cutout Template: Check the cut-out template against the actual sink to ensure a proper size, then place the template in the desired location on the countertop and trace it with a pencil.
- Cut the Opening: Cut the opening in the countertop by carefully following the traced line using an appropriate saw for your countertop material.
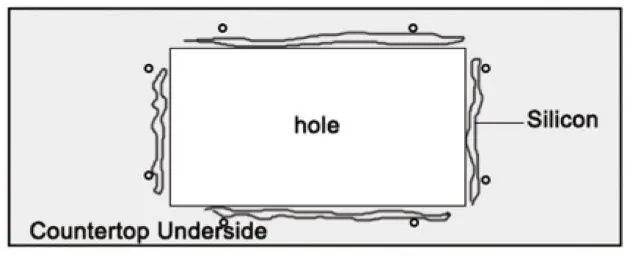
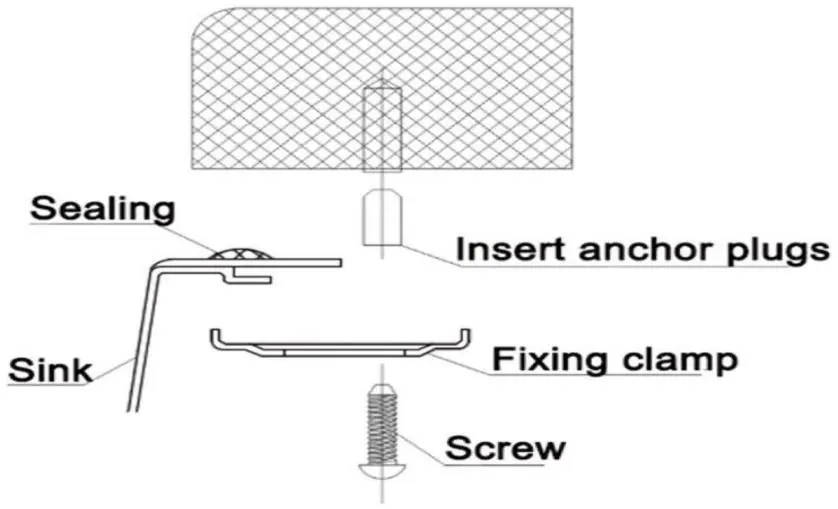
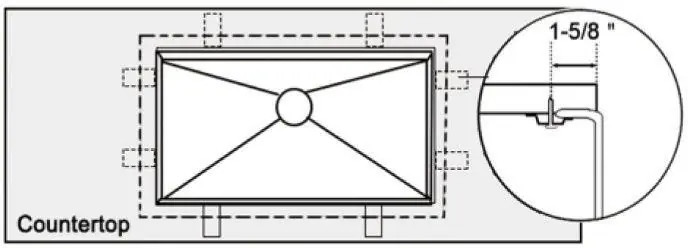
- Drill Holes: Turn the countertop over and drill 3/8" diameter x 1/2" deep holes in the countertop. Mounting holes should be 1/2" from the edge of the sink. Insert anchors into the drilled holes and tap lightly with a hammer until flush.
- Secure Sink: Apply a bead of silicone or preferred adhesive around the rim of the sink or the countertop underside. Check the alignment of the sink to the cutout, place the sink over the hole, and press firmly.
- Attach Mounting Hardware: Attach the mounting hardware to secure the bowl. Remove excess sealant from the inside lip and allow the sealant to set for 30 to 60 minutes.
- Install Plumbing Fixtures: Connect the drain to the sink, connect the trap to the drain, and connect water supply lines to the faucet according to the manufacturer's instructions. Run water into the sink and check for leaks.
Maintenance and care
To keep your stainless steel sink in good condition:
- Rust Prevention: Clean the sink immediately after installation to remove welding cement or oil residue. Clean after every use. If rust appears, use a scouring pad to remove it.
- Scratch Removal: For minor scratches, use a sponge with toothpaste to polish. For moderate scratches, use a scouring pad. For serious scratches, purchase a stainless steel polisher.
- Hard Water Stains: Clean daily using a soft towel and warm water. Mixing in some washer-fluid is advisable. Always wipe the sink dry after use.
Do's and don'ts
- Do: Rinse the sink after using cleaning agents, rub in the direction of the grain, and keep the sink dry to prevent mineral buildup.
- Don't: Leave water spots, utensils, or steel cookware in the sink for long periods. Do not leave cleaning agents or bleach sitting in the sink. Do not use steel wool or scouring pads against the grain. Do not use the inside of the sink as a cutting surface.
Manufacturer information
The Home Depot
Practical help
Common problems
Rust spots on new sink
Often caused by welding cement or oil residue. Clean the sink immediately after installation and after every use. Use a scouring pad to remove existing rust.
Scratch marks
Use a sponge with toothpaste for minor scratches. Use a scouring pad for moderate scratches. Use a dedicated stainless steel polisher for serious scratches.
Hard water stains
Clean daily with a soft towel and warm water. Wipe the sink dry after every use to prevent mineral deposits.
Before use
- Inspect the sink for any noticeable damage before installation.
- Check that all matching products are included in the package.
- Consult your cabinet dealer before ordering custom cabinets for the sink.
- Ensure you have all necessary tools (jigsaw, silicone, etc.).
- Verify that the installation complies with applicable plumbing and building codes.
Images and diagrams
- Installation types: Illustrates three different mounting configurations for the sink relative to the countertop.
- Mounting hardware: Shows the assembly sequence of the anchor plug, fixing clamp, and screw.
Model compatibility
- Certified & Listed by cUPC for use in the USA & Canada.

Manual page author
Michael Turner
Technical manual editor
Reviews PDF manuals for structure, safety notes, and practical product details so readers can find the right information quickly.