Home Appliances / Refrigerators
Hoover 150EELWN Wine Cooler User Manual
Quick guide for the Hoover 150EELWN wine cooler. Includes installation, handle assembly, Wi-Fi setup, temperature settings, maintenance, and troubleshooting.
Table of contents
Manual images
Click an image to enlargeQuick guide from the manual
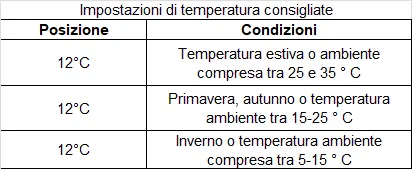
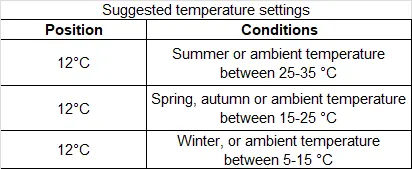
This manual provides essential instructions for the Hoover 150EELWN wine cooler. Key information includes safety warnings regarding the R600a refrigerant, proper installation requirements, Wi-Fi connectivity setup, and recommended temperature settings for different wine types.
Installation
Place the appliance on a floor strong enough to support it when fully loaded. Level the unit by adjusting the front legs. Ensure at least 5 inches of space between the back and sides of the appliance to allow for proper air circulation to cool the compressor. Keep the unit away from direct sunlight and heat sources like stoves or radiators. Before connecting to power, let the unit stand upright for approximately 2 hours to allow the compressor oil to settle.
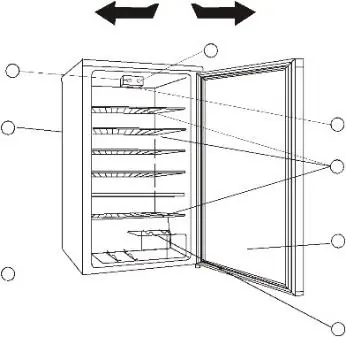
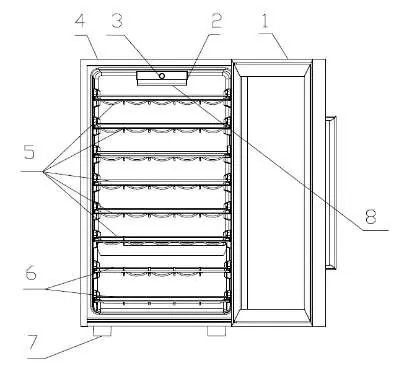
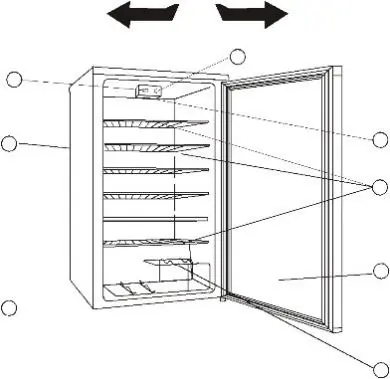
External Handle Assembly
If your model includes an external handle, follow these steps:
- Prepare the product on a flat floor.
- Take out the external handle and 4 screws.
- Use a magnetic cross screwdriver to fix the external handle on the 4 pre-screw holes.
- Check and make sure all screws are fixed well.
Operating Your Wine Cooler
The user interface consists of 4 buttons (On/Off, Program, Temp C, and a side mechanical switch), a white digital LCD, and 4 white LEDs. The appliance restores the last set program and temperature upon each power-on. At first start-up, it defaults to "Red Wine" at 16°C.
- On/Off: Switches the appliance on or off.
- Program: Cycles through programs: Red Wine, White Wine, Champagne, and Wi-Fi.
- Temp C: Adjusts temperature after selecting a program.
- Light: Toggles the internal light.
Wi-Fi Management
The appliance supports remote control via the Hoover Wizard App. To enroll: press the "Program" button until the Wi-Fi program is selected. The LED will flash. After 5 seconds, the easy enrollment procedure begins (display shows "EE"). You can switch to standard enrollment ("SE") by pressing the "Program" button within 5 minutes. If successful, the Wi-Fi LED will remain lit.
Cleaning and Maintenance
Unplug the unit before cleaning. Wash the interior with a solution of warm water and baking soda (approx. 2 tablespoons per liter). Clean shelves and trays with a mild detergent. Periodically wipe the bottom of the storage area to remove accumulated condensation. For long absences, remove all bottles, unplug the unit, clean it, and leave the door slightly open to prevent mold and odors.
Troubleshooting
If the unit does not operate, check if it is plugged in or if a circuit breaker has tripped. If it is not cold enough, verify the temperature setting, ensure the door is not opened too frequently, and check that the door gasket seals properly. Rattling noises are often normal refrigerant flow sounds.
Manufacturer information
Hoover
Practical help
Common problems
Wine cooler does not operate
Check if it is plugged in or if the circuit breaker has tripped/fuse is blown.
Wine cooler is not cold enough
Check temperature control settings, ensure the door is not opened too often, check door gasket seal, and ensure proper clearance around the unit.
Compressor turns on and off frequently
Ensure the room is not too hot, do not add too many bottles at once, check door seal, and ensure proper clearance.
Excessive noise
Rattling or gurgling sounds are often normal refrigerant flow. Ensure the unit is level.
Before use
- Remove all exterior and interior packaging.
- Check that all components and accessories are present.
- Let the unit stand upright for 2 hours before connecting to power.
- Clean the interior surface with lukewarm water and a soft cloth.
Show more Show less
Specs in practice
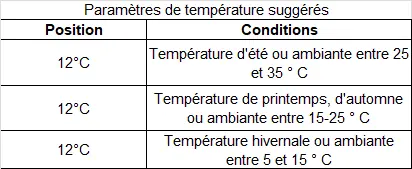
- Dry/White Wines
- Recommended temperature range: 10-15°C
- Sparkling Wines
- Recommended temperature range: 7.2-9.5°C
Images and diagrams
- 1. Glass Door
- 2. Lamp Switch
- 3. User Interface
- 5/6. Chrome/Wooden Rack
Model compatibility
- Wi-Fi enabled for remote control via Hoover Wizard App.
- Not suitable for freezing foodstuffs.
- Not intended for built-in installation.

Manual page author
David Miller
Documentation analyst