Home Appliances / Refrigerators
Hoover Ground Command 20-Gallon Wet/Dry Vac User Manual
Comprehensive user manual for the Hoover Ground Command 20-Gallon Wet/Dry Vac. Includes safety instructions, wet and dry operation procedures, maintenance tips, troubleshooting guide, and detailed parts schematics.
Quick answers from the manual
Quick answer
- The Hoover Ground Command is a commercial wet/dry vacuum. For dry use, install the cloth dust bag. For wet use, remove the dust bag and ensure the tank is empty. The unit features a ball float shut-off to protect the motor when the tank is full. p. 4, 5
Key actions
- Drain the tank (Wet Use) p. 5
- Empty the dust bag p. 5
First start
- Verify voltage p. 4
Show 3 more answers Show less
Problems and fixes
Loss of Vacuum
Check for full bag, clogged hose, or damaged tank rim.
p. 6Maintenance and reset
- Cleaning p. 4
Where to find it in the PDF
- Safety Instructions p. 3
- Operation p. 5
- Troubleshooting p. 6
- Schematic Drawing p. 7
Table of contents
Manual images
Click an image to enlargeQuick Guide
The Hoover Ground Command 20-Gallon Wet/Dry Vac is designed for commercial cleaning. Before use, ensure the voltage matches your power supply. For dry cleaning, the cloth dust bag must be installed. For wet cleaning, the dust bag must be removed, and the tank must be empty. Always disconnect the power cord before performing any maintenance or troubleshooting.
Safety Instructions
Warning: To reduce the risk of fire, electric shock, or injury, follow these precautions:
- Do not use outdoors.
- Do not leave the machine plugged in when not in use.
- Do not use with a damaged cord or plug.
- Do not pick up flammable or combustible liquids (e.g., gasoline) or burning/smoking materials (e.g., cigarettes, hot ashes).
- Keep hair, loose clothing, and fingers away from openings and moving parts.
- Do not operate without filters installed.
- Do not oil the motor; it is permanently lubricated.
Operation
Dry Use
- Ensure the plug is disconnected.
- Remove the top of the vacuum and install the cloth filter dust bag.
- Secure the top back onto the tank using the latches.
- Connect the hose and tools, then plug in the machine.
- Switch to the ON position.
- Check the bag frequently; dispose of debris when 4/5 full.
Wet Use
- Ensure the tank is empty and the plug is disconnected.
- Remove the dust filter bag.
- Secure the top back onto the tank.
- Connect the plug and switch to the ON position.
- Use the included squeegee tool for wet cleanup.
- To empty the tank, turn off the machine, disconnect the plug, and use the disposal hose to drain liquid into a suitable drain.
Attention: The vacuum features a ball float shut-off. If you hear a change in sound or notice decreased airflow, the tank is full and the float has activated to protect the motor.
Maintenance
Treat the vacuum as a precision product. Avoid dropping or bumping the unit. After each use, wipe the vacuum body, accessories, and power cord with a slightly damp cloth. Store the power cord around the molded-in cord wrap.
Troubleshooting
If the machine loses suction, check for a full dust bag, clogged hose/wand, or a damaged tank rim. If the motor does not run, check the power connection, fuse/circuit breaker, or if the tank is full of liquid. If dust or water blows from the exhaust, check the filter bag installation or if the tank is full.
Parts and Schematics
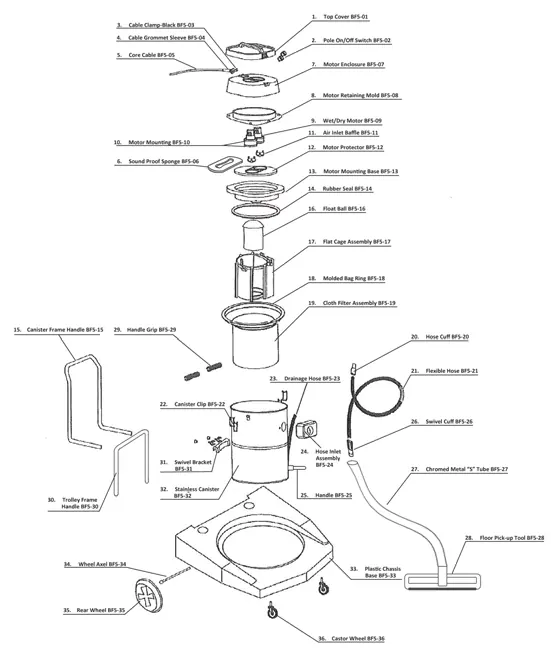
The manual includes a detailed schematic drawing of the vacuum assembly, identifying parts such as the motor, float ball, filter assembly, and trolley frame. A separate schematic is provided for the optional squeegee attachment.
Manufacturer information
Hoover
Practical help
Common problems
Loss of suction
Check if the dust bag is full, the hose/wand is clogged, the tank rim is damaged, or the float is stuck.
Motor not running
Check the power connection, ensure the switch is in the correct position, reset the circuit breaker/fuse, or empty the tank if full of liquid.
Dust blowing from vacuum
Ensure the dust filter bag is installed correctly, not torn, or full.
Water blowing from vacuum
The tank is full of liquid and needs to be drained, or sudsy liquid is being picked up (add defoamer).
Before use
- Ensure the voltage and frequency match the rating plate.
- For dry use: Install the cloth filter dust bag.
- For wet use: Remove the cloth filter dust bag.
- Ensure the tank is empty before starting.
- Check that all latches are securely fastened.
Show more Show less
Images and diagrams
- The schematic drawing illustrates the assembly of the motor, filter cage, float ball, and canister components.
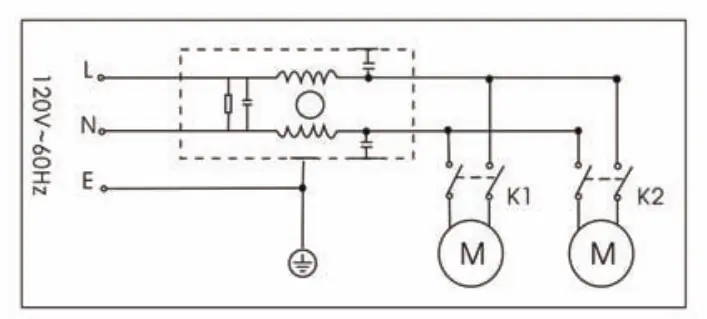
- The wiring diagram shows the electrical connections for the motor and switches.
Model compatibility
- Designed for commercial use.
- Not intended for use by young children or infirm persons.
- Do not use to pick up flammable or combustible liquids.

Manual page author
Emily Carter
User documentation editor