Industrial / Vacuum Cleaners
User Manual for Hoover ONEPWR 20V Telescoping Cordless Scrubber
Get the most out of your Hoover ONEPWR 20V Telescoping Cordless Scrubber with this comprehensive user guide. Learn about assembly, battery installation, brush selection, operation, and maintenance.
Quick answers from the manual
Quick answer
- The Hoover ONEPWR 20V Telescoping Cordless Scrubber is a battery-powered cleaning tool with a 6-position pivoting head and adjustable telescoping shaft. It is IPX8 waterproof rated and requires user assembly. p. 2
Key actions
- Install battery p. 2
- Adjust telescoping shaft p. 3
- Adjust pivoting head p. 3
First start
- Select brush, adjust tool, install battery, and press on/off button. p. 3
Show 3 more answers Show less
Maintenance and reset
- Remove battery before cleaning or maintenance. p. 3
Technical specifications
| Parameter | Value | Meaning | Pages |
|---|---|---|---|
| Motor | 20 V DC | Power source | p. 2 |
| No Load Speed | approx. 210 RPM | Rotation speed | p. 2 |
| Waterproof Rating | IPX8 | Immersion protection | p. 2 |
Where to find it in the PDF
- Safety Instructions p. 1
- Assembly and Features p. 2
- Operation and Maintenance p. 3
- Warranty and Accessories p. 4
Table of contents
Manual images
Click an image to enlargeQuick guide from the manual
The Hoover ONEPWR 20V Telescoping Cordless Scrubber is designed for cleaning exterior and interior surfaces. It is a battery-operated tool featuring a 6-position pivoting head and a telescoping shaft for extended reach. Always remove the battery pack before performing any assembly, adjustments, or maintenance to prevent accidental starting.
Assembly and Setup
The product requires assembly upon unpacking. Ensure all parts listed in the manual are present. If any parts are damaged or missing, contact customer support at 1-800-944-9200.
Installing the Battery Pack
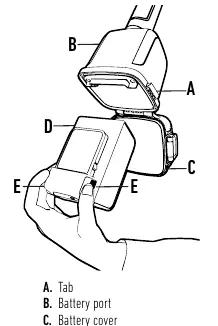
- Unlock the tabs and open the battery cover.
- Insert the battery pack into the battery port.
- Ensure the latches on each side of the battery pack snap into place.
- Close the battery cover and lock the tab.
Installing/Removing Brush Accessories
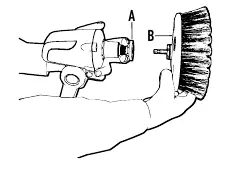
- Remove the battery pack before changing brushes.
- Align the Hex bit on the brush with the hex-shaped opening on the motor head.
- Hold the receiver collar back, insert the brush hex bit, and release the collar until it clicks.
- To remove, pull and hold the receiver collar back while pushing the hex bit out.
Operation
Before starting, select the appropriate brush accessory based on the surface type. Always test the brush on an inconspicuous area first.
Adjusting the Tool
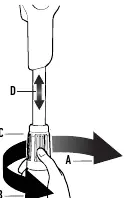
- Telescoping Shaft: Loosen the coupler by turning it counterclockwise, slide the shaft to the desired length, and tighten the coupler clockwise.
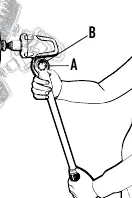
- Pivoting Head: Push the pivot button and adjust the motor head until it snaps into one of the six available positions.
Using the Scrubber
- Hold the scrubber with your right hand on the rear handle and your left hand on the front grip.
- Keep the rear handle at approximately hip height for comfort.
- Fully depress the on/off button to start the motor.
- Move the unit forward and back over the surface. Do not press down hard or keep the unit in one place for too long to avoid surface damage.
- When finished, turn off the motor, wait for the brush to stop, and remove the battery.
Maintenance
General Maintenance: Avoid using solvents when cleaning plastic parts. Use a clean cloth to remove dirt, dust, oil, or grease. Do not allow brake fluids, gasoline, or petroleum-based products to contact plastic parts.
Brush Care: Rinse the brush accessory before use and at regular intervals. Clean thoroughly after use, allow to dry, and store without bending the bristles.
Brush Accessory Selection Guide
- Soft Bristle (White) AH84100: Light Duty Cleaning
- Medium Bristle (Red) AH84200: General Purpose Cleaning
- Hard Bristle (Black) AH84300: Heavy Duty Cleaning
Manufacturer information
Hoover
Practical help
Common problems
Unit does not start
Ensure the battery pack is fully charged and properly installed with latches snapped into place.
Brush not spinning
Check that the motor is on and the brush accessory is correctly locked into the receiver.
Surface damage during cleaning
Do not press down on the unit or keep it in one place for an extended period. Test the brush on an inconspicuous area first.
Before use
- Ensure the battery pack is charged
- Select the correct brush accessory for the surface
- Check that the brush is installed correctly
- Wear eye protection with side shields
- Adjust the telescoping shaft and pivoting head to a comfortable position
Show more Show less
Images and diagrams
- The features diagram identifies the brush attachment, connector, pivoting head, telescoping shaft, coupler, rear handle, on/off button, battery cover, rear handle pole, and pivot button.
- The battery installation diagram shows the tab, battery port, battery cover, battery pack, and latches.
Model compatibility
- Every ONEPWR battery works with every ONEPWR product.
- Use only Hoover cleaning products intended for use with this machine.
- Use only accessories recommended by the manufacturer.

Manual page author
David Miller
Documentation analyst