Home Appliances / Refrigerators
User Manual for Hoover H-GO 300 HYDRO Robot Vacuum Cleaner and Mop
Comprehensive user manual for the Hoover H-GO 300 HYDRO robot vacuum and mop. Includes setup instructions, cleaning modes, maintenance procedures, and troubleshooting tips.
Quick answers from the manual
Quick answer
- The Hoover H-GO 300 HYDRO is a 2-in-1 robot vacuum and mop. Charge it for 8 hours before the first use. Use the remote control to set schedules, cleaning modes (Auto, Parallel, Spot, Edge, Manual), and power levels. p. 5, 6, 7
Key actions
- Charging the robot p. 5, 6
- Using the mopping function p. 7
- Cleaning the filters p. 8
First start
- Charge for 8 hours before first use. p. 5
- Install side brushes. p. 5
Show 3 more answers Show less
Problems and fixes
Robot does not work
Check if switched on, clean dust container/filter, check charge.
p. 9Maintenance and reset
- Empty dust container after vacuuming. p. 8
Where to find it in the PDF
- Safety Instructions p. 2
- Getting to know your cleaner p. 4
- Maintenance p. 8
Table of contents
Manual images
Click an image to enlargeQuick guide from the manual
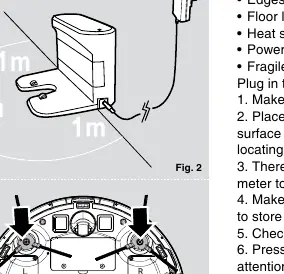
The Hoover H-GO 300 HYDRO is a 2-in-1 robot vacuum and mop. Before first use, charge the device for at least 8 hours. Ensure the charging station is placed against a wall on a non-reflective floor with 2 meters of clearance in front and 1 meter on each side. Always remove obstacles like cables, fragile objects, and floor-length curtains before starting a cleaning cycle.
Getting to know your cleaner
The robot features a front bumper, dust container, and various sensors. The remote control allows you to set the time, schedule cleaning, adjust suction power, and select cleaning modes. The robot includes side brushes (labeled L and R) and a water tank for mopping.
Preparation and charging
To prepare the robot, install the side brushes until they click into place. Connect the charging station to the mains power adaptor. During normal use, the robot takes 4-5 hours to recharge. When the battery is low, the robot automatically returns to the charging station.
Cleaning modes
The robot offers several cleaning modes selectable via the remote control:
- Auto: Automatically chooses the best cleaning mode.
- Parallel: Systematic cleaning pattern.
- Spot: Intensive cleaning of a confined area in a circular path.
- Edge: Cleans along walls and around furniture.
- Manual: Controlled using the arrow buttons on the remote.
Mopping function
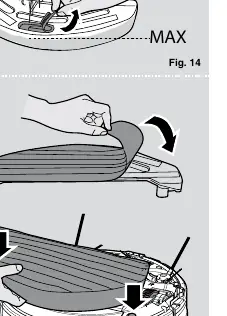
To use the mopping function, fill the water tank with water (and optional cleaning agent), attach the mopping cloth, and click the tank into the bottom of the robot. Warning: Water may drip as soon as the tank is inserted, so start cleaning immediately. Remove the tank when charging or not in use.
Maintenance
Regular maintenance is essential for performance:
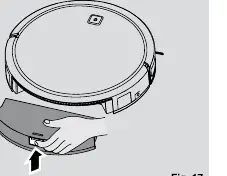
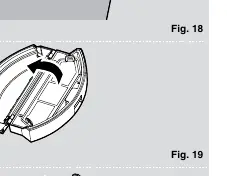
- Dust Container: Empty after every use.
- Filters: Clean the pre-motor and sponge filters every 5 dust container empties. Do not wash.
- Sensors: Clean the anti-fall sensors on the underside with a soft brush.
- Brushes and Wheels: Regularly remove hair and debris from the agitator, side brushes, and drive wheels.
Manufacturer information
Hoover
Practical help
Common problems
Robot does not work
Check if the robot is switched on, the dust container and filter are clean, and the battery is charged.
Weak cleaning power
Turn off the robot, empty the dust container, and clean the filter, motor, floor brushes, sensors, and drive wheels.
Robot is trapped
The robot will attempt to free itself, but you may need to assist it manually.
Robot does not automatically charge
Ensure there are no barriers between the robot and the charging station.
Before use
- Charge the robot for 8 hours before the first use.
- Remove obstacles like cables, fragile objects, and floor-length curtains.
- Place the charging station against a wall on a non-reflective floor.
- Ensure 2 meters of clearance in front and 1 meter on each side of the charging station.
- Install the side brushes (labeled L and R) until they click into place.
Show more Show less
Specs in practice
- Normal Power
- Standard suction mode for everyday cleaning.
- Anti-Fall Sensors
- Sensors on the underside that prevent the robot from falling down stairs (minimum 8cm height required).
Images and diagrams
- Fig 2: Charging station placement requirements (2m front, 1m side).
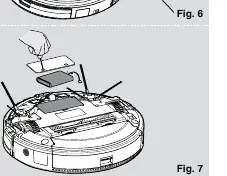
- Fig 7: Battery removal and replacement procedure.
- Fig 17-18: Dust container removal and emptying.
- Fig 21: Cleaning the anti-fall sensors.
Model compatibility
- Use only genuine Hoover spares and accessories.
- Do not use the robot to clean stairs.
- Do not use the robot on highly reflective or very dark surfaces (e.g., polished ceramics) as sensors may fail.

Manual page author
Emily Carter
User documentation editor