Electronics / Sim Racing Equipment
Instruction Manual for HORI 2055-50MKUS Kart Racing Wheel Pro Deluxe
Quick guide for the HORI 2055-50MKUS Kart Racing Wheel Pro Deluxe. Learn how to connect, mount, remap buttons, adjust sensitivity, and configure steering settings for Nintendo Switch and PC.
Quick answers from the manual
Quick answer
- The HORI 2055-50MKUS is a racing wheel for Nintendo Switch and PC. Connect it via USB, rotate the wheel fully in both directions to calibrate, and use the ASSIGN button to remap controls or adjust sensitivity and dead zones. p. 2
Key actions
- Remap buttons p. 5
- Adjust Sensitivity p. 6
- Reset to default p. 8
First start
- Connect the modular plug, connect USB to console/PC, rotate steering wheel to max position in both directions. p. 2
Show 4 more answers Show less
Problems and fixes
Controller not recognized
Reconnect or restart the Nintendo Switch or PC system.
p. 2Maintenance and reset
- Reset all settings to default p. 8
Technical specifications
| Parameter | Value | Meaning | Pages |
|---|---|---|---|
| Steering Diameter | 280mm | Size of the steering wheel. | p. 8 |
| Steering Weight | 1400g | Weight of the steering unit. | p. 8 |
| Foot Pedals Weight | 700g | Weight of the foot pedals. | p. 8 |
| Cable Length (Steering) | 3m | Length of the steering unit cable. | p. 8 |
| Cable Length (Pedals) | 1.5m | Length of the pedal cable. | p. 8 |
Where to find it in the PDF
- How to Connect p. 2
- How to Mount p. 4
- Assign Mode p. 5
- Adjustable Sensitivity p. 6
Table of contents
Manual images
Click an image to enlargeQuick guide from the manual
The HORI 2055-50MKUS is a racing wheel controller designed for Nintendo Switch and PC (Xinput). To begin, connect the modular plug to the steering unit, then connect the USB cable to your console or PC. Important: After connecting, you must rotate the steering wheel to its maximum rotation position in both directions once to calibrate it. Ensure your Nintendo Switch system software is updated to the latest version.
Device Layout
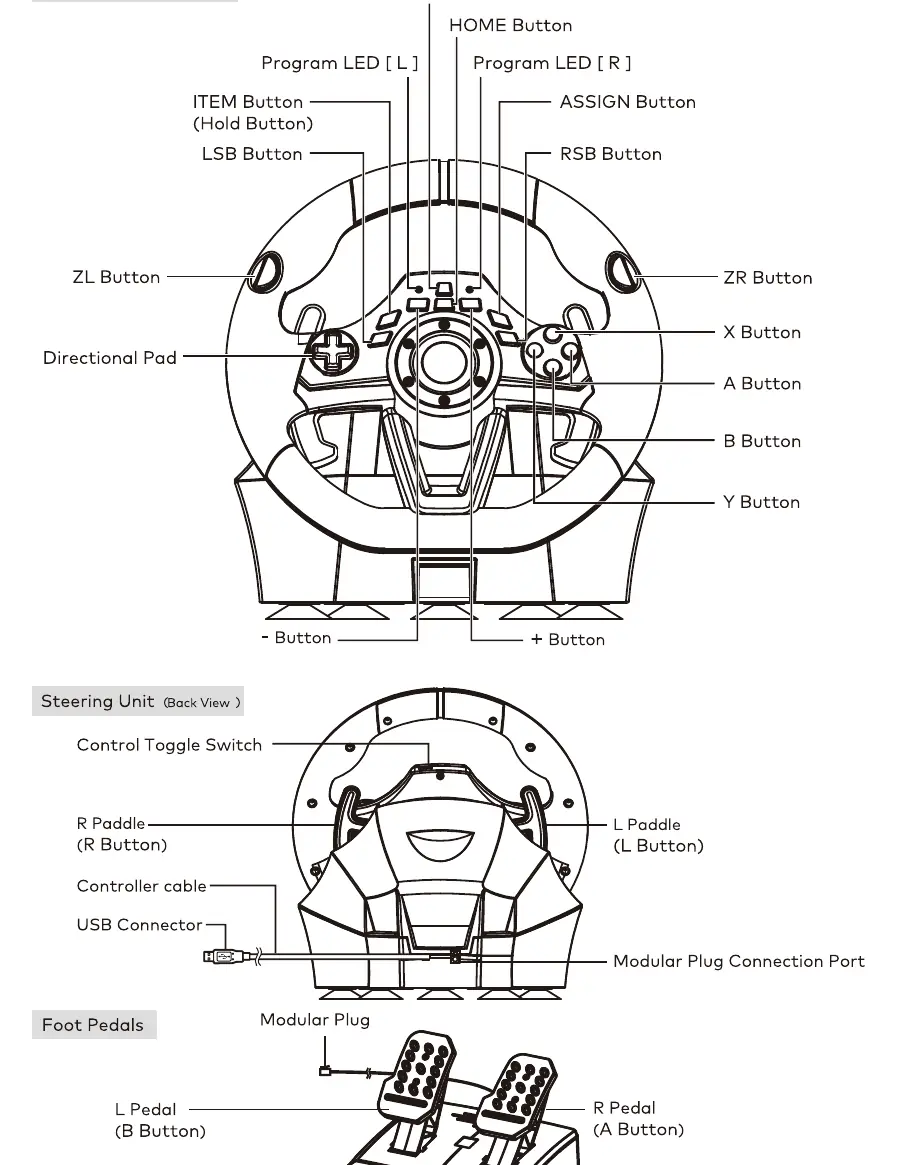
The steering unit features various inputs including the D-pad, A/B/X/Y buttons, L/R paddles, and specialized buttons like ASSIGN, ITEM (Hold), and Control Toggle Switch. The back of the unit contains the modular plug connection port and the controller cable. The foot pedals connect to the steering unit via the modular plug.
Mounting Instructions
There are two methods to secure the steering unit:
- Option 1: Suction Cup: Remove all dust and dirt from your tabletop. Attach the five suction cups to the steering unit base and press firmly onto the surface.
- Option 2: Clamp: Tighten the clamp screw into the steering wheel base and secure the unit to a flat, hard surface like a table.
Do not combine both methods, and avoid attaching to glass or fragile furniture.
Button Configuration
Control Toggle Switch: Use the switch on the back to toggle between Directional Pad, Left Stick, or Right Stick controls.
Button Hold Function: Press and hold the ITEM button for 1 second to enable the hold function (Red LED turns on). Press once to disable. This is useful for games like Mario Kart to maintain a held item.
Assign Mode: You can remap buttons:
- Press the ASSIGN button for 3 seconds (Green LED flashes slowly).
- Press the button you wish to program.
- Press the button you wish to assign to that function (Green LED turns on).
To reset individual buttons, repeat the process. To reset all buttons, press ASSIGN for 3 seconds, then press the HOME button.
Steering Adjustments
Quick Handling Mode: Switch between 270-degree and 180-degree steering output. Press ASSIGN + ZR for 180 degrees (Blue LED) or ASSIGN + ZL for 270 degrees (Green LED).
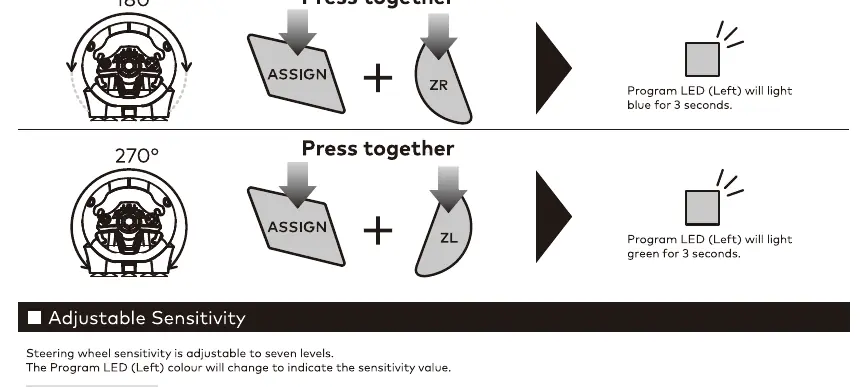
Sensitivity and Dead Zone: Both can be adjusted to 7 levels. To adjust, press ASSIGN for 3 seconds, press the '+' button, set the toggle switch to LS (for sensitivity) or DP (for dead zone), use the D-pad to increase/decrease, and press ASSIGN to save.
Specifications
The steering unit has a 280mm diameter, 270-degree angle of rotation, and weighs 1400g. The foot pedals weigh 700g. The steering cable is 3m long, and the pedal cable is 1.5m long.
Practical help
Common problems
Controller not recognized or not working
Ensure the modular plug is connected correctly and rotate the steering wheel to the maximum position in both directions after connecting.
Button Hold function not working
Ensure the ITEM button is assigned to the ITEM function.
Settings (Sensitivity/Dead Zone) not saving
Ensure you complete the full sequence: Press ASSIGN, press +, set toggle switch, adjust with D-pad, and press ASSIGN to finish.
Before use
- Check that the modular plug is correctly oriented.
- Rotate the steering wheel to the maximum position in both directions after connecting.
- Verify Nintendo Switch system software is updated.
- Ensure the surface for mounting is clean and flat.
Show more Show less
Specs in practice
- Quick Handling Mode
- Switches max steering output between 270 degrees and 180 degrees.
Images and diagrams
- Control Toggle Switch: Switches between Directional Pad, Left Stick, and Right Stick controls.
- Assign Mode: Allows remapping of buttons using the ASSIGN button.
Model compatibility
- Compatible with Nintendo Switch and PC (Xinput).
- Does not support DirectInput.
- May not function for titles that require motion control.

Manual page author
Emily Carter
User documentation editor