Computers / Laptops
Maintenance and Service Guide for OMEN by HP 16.1 inch Gaming Laptop PC
Comprehensive maintenance and service guide for the OMEN by HP 16.1 inch Gaming Laptop PC. Includes detailed component identification, spare parts catalog, removal and replacement procedures, BIOS setup, diagnostics, and system recovery...
Table of contents
Manual images
Click an image to enlargeQuick Guide from the Manual
This guide provides essential maintenance and service information for the OMEN by HP 16.1 inch Gaming Laptop PC (Model series 16-x0xxx). It is intended for authorized service providers and users performing customer self-repair. Always follow safety precautions, such as shutting down the computer and disconnecting power, before attempting any disassembly.
Product Description
The OMEN 16.1 inch Gaming Laptop features various configurations, including AMD Ryzen processors and NVIDIA GeForce RTX graphics. Key components include high-refresh-rate displays, DDR5 memory, and M.2 solid-state drives. The device is available in both aluminum and plastic chassis variants, which may affect spare part compatibility.
Getting to Know Your Computer
The manual details the location and function of all external ports and internal components. This includes USB Type-C and Type-A ports, HDMI, RJ-45 network jacks, and audio combo jacks. It also explains the function of special keys, the OMEN Gaming Hub for performance customization, and status lights for power, battery, and network activity.
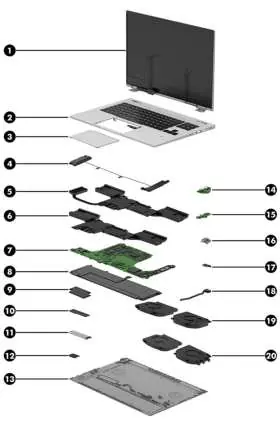
Illustrated Parts Catalog
This section provides a comprehensive list of spare parts, including display assemblies, top covers with keyboards, touchpads, speakers, heat sinks, system boards, batteries, and WLAN modules. Always verify the specific part number based on your model's configuration (e.g., plastic vs. aluminum, graphics card wattage) before ordering replacements.
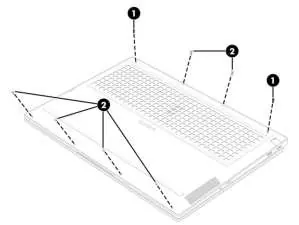
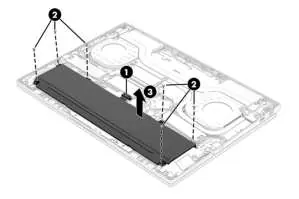
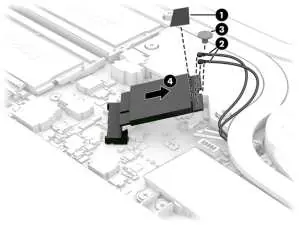
Removal and Replacement Procedures
The guide distinguishes between Customer Self-Repair (CSR) parts and those requiring an authorized service provider. Procedures are provided for:
- Preparation: Safety steps including shutting down and disconnecting power.
- Bottom Cover: Removal steps for accessing internal components.
- Battery: Safety warnings and removal instructions.
- Solid-State Drive (SSD) and Memory: Step-by-step removal and installation.
- WLAN Module: Antenna handling and module replacement.
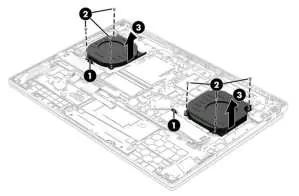
- Fans and Heat Sink: Cleaning and replacement procedures.
- System Board: Detailed steps for removal, including disconnecting various cables.
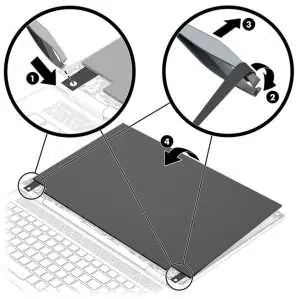
- Display Assembly: Instructions for bezel, panel, and camera module replacement.
Using Setup Utility (BIOS)
The Setup Utility allows you to configure hardware settings and startup sequences. You can access it by turning on the computer and pressing f10. The guide covers updating the BIOS, determining the current version, and preparing for updates.
Using HP PC Hardware Diagnostics
HP provides built-in diagnostic tools to identify hardware failures. These include HP PC Hardware Diagnostics Windows and UEFI. The guide explains how to access these tools, interpret failure ID codes, and perform system tests if the operating system fails to load.
Backing Up, Recovering, and Restoring
If the system encounters issues, you can use Windows tools or HP-specific recovery solutions. The guide covers creating recovery media, using the HP Cloud Recovery Download Tool, performing a system restore, and changing the boot order to facilitate recovery.
Specifications
Detailed technical specifications are provided for the computer, including dimensions, weight, input power requirements, operating temperature ranges, and display characteristics (resolution, refresh rate, brightness).
Manufacturer information
HP Inc.
Practical help
Common problems
Computer overheating or fan noise
Ensure vents are not obstructed by soft surfaces like pillows or rugs. Use the computer on a hard, flat surface.
Battery not charging
Check that the AC adapter is properly connected. If the light is blinking amber, the battery level is low; if off, the battery is not charging.
System not booting from recovery media
Access the Startup menu (press esc then f9) to change the boot order and select the USB flash drive or optical drive.
Before use
- Shut down the computer completely.
- Disconnect the power cord from the AC outlet.
- Disconnect all external devices.
- Work in a static-safe environment to prevent electrostatic discharge (ESD) damage.
- Use a magnetic Phillips P1 screwdriver and a nonconductive pry tool.
Images and diagrams
- Exploded view diagrams show the relative position of all major internal components.
- Detailed removal steps include numbered sequences for screw removal and cable disconnection.
- Thermal material application diagrams show where to apply thermal grease and gel when replacing the heat sink.
Model compatibility
- Spare parts are often specific to either plastic or aluminum chassis models.
- Graphics card wattage (60W vs 80W) determines the specific heat sink and fan kit required.
- System board part numbers vary based on the processor, graphics card, and operating system.

Manual page author
Michael Turner
Technical manual editor
Reviews PDF manuals for structure, safety notes, and practical product details so readers can find the right information quickly.