Computers / Laptops
Maintenance and Service Guide for HP OmniBook 5 16-inch Laptop
Comprehensive maintenance and service guide for the HP OmniBook 5 16-inch laptop. Includes component identification, disassembly procedures, troubleshooting steps, and technical specifications.
Table of contents
Manual images
Click an image to enlargeQuick guide from the manual
This guide provides essential maintenance and service information for the HP OmniBook 5 16-inch laptop. It covers component identification, disassembly and replacement procedures, troubleshooting methodologies, and technical specifications. Always disconnect power and remove the battery before performing any internal maintenance to prevent electrical shock or damage to the device.
Product Description
The HP OmniBook 5 16-inch laptop features various configurations, including models with AMD Ryzen or Intel Core processors. Key components include high-resolution displays (OLED/FHD), DDR5 memory, and PCIe NVMe solid-state drives. The device includes integrated security features like TPM 2.0 and camera privacy covers.
Components
The manual provides detailed diagrams and descriptions for identifying components on the right and left sides of the laptop, the display assembly, the keyboard area, and the bottom of the chassis. This includes ports (USB, HDMI, Thunderbolt), status lights, and special function keys.
Illustrated Parts Catalog
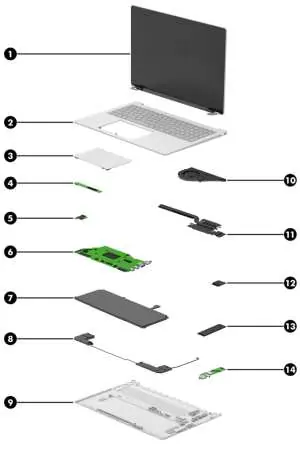
This section lists major computer components and their corresponding spare part numbers. It includes parts such as the display assembly, top cover with keyboard, system board, battery, speakers, fan, heat sink, WLAN module, and solid-state drives. Note that HP continually updates parts, so verify current information via the HP PartSurfer website.
Removal and Replacement Procedures
Procedures are divided into Customer Self-Repair (CSR) parts and those accessible only by authorized service providers. Before beginning, ensure the computer is turned off, disconnected from power, and all external devices are removed. Use appropriate tools, including tweezers, a nonconductive pry tool, and a magnetic Phillips P1 screwdriver. Follow electrostatic discharge (ESD) precautions to prevent damage to sensitive electronic components.
Troubleshooting Guide
This section focuses on logical steps to resolve issues. It covers power-on issues, POST errors, display anomalies, performance problems, and mechanical issues. It includes diagnostic tools like HP PC Hardware Diagnostics (UEFI), HP BIOS Configuration Utility, and Windows Debugging Tools. Blinking light codes are provided to help identify hardware failures during startup.
Setup Utility (BIOS)
The Setup Utility (BIOS) controls communication between input and output devices. It allows for system configuration, BIOS updates, and security settings. Access the utility by turning on or restarting the computer and pressing f10.
Backing Up, Resetting, and Recovering
Instructions are provided for backing up data, performing a factory reset, and recovering the operating system. This includes using the Chromebook Recovery Utility or Windows-based recovery tools to restore the system to its original factory state.
Specifications
Detailed technical specifications are provided, including physical dimensions, weight, input power requirements, operating temperature ranges, relative humidity limits, and maximum altitude. Display and solid-state drive specifications are also listed.
Battery Maintenance
Information regarding battery swelling or deformation is included. If battery swelling is suspected, discontinue use and contact HP support. Use HP Adaptive Battery Optimizer or HP Battery Health Manager to help mitigate factors that contribute to battery swelling.
Manufacturer information
HP Inc.
Practical help
Common problems
No power
Perform a hard reset, verify the AC adapter, and check the battery status.
No video
Perform a hard reset, test with an external monitor, and check display cable connections.
Battery not charging
Verify the AC adapter, check the battery status light, and run HP PC Hardware Diagnostics.
Slow performance
Check for overheating, ensure the hard drive has sufficient free space, and run disk defragmentation (HDD only).
Before use
- Ensure the workspace is clean and static-free.
- Disconnect power and remove the battery before disassembly.
- Use appropriate tools (tweezers, nonconductive pry tool, Phillips P1 screwdriver).
- Back up critical data before troubleshooting storage.
- Review ESD precautions before touching internal components.
Specs in practice
- Operating voltage
- 19.5 V DC (various amperages/wattages depending on the adapter).
- Operating temperature
- 5°C to 35°C (41°F to 95°F).
- Relative humidity
- 10% to 90% (noncondensing).
Images and diagrams
- Illustrated parts catalog shows major components and their locations.
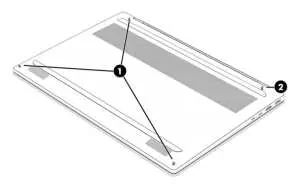
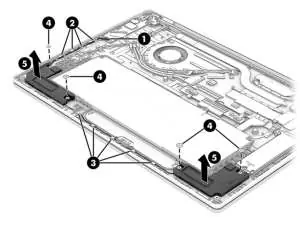
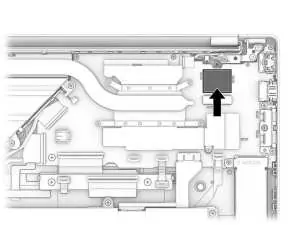
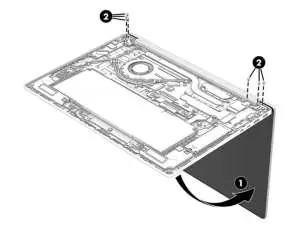
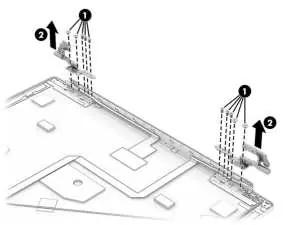
- Removal procedures include step-by-step diagrams for battery, fan, SSD, and display assembly.
- Troubleshooting section includes diagrams for cable management and connector types.
Model compatibility
- Only use authorized spare parts.
- Some components (like the display assembly) are only available as subcomponents.
- Battery replacement requires a revive kit.

Manual page author
Michael Turner
Technical manual editor
Reviews PDF manuals for structure, safety notes, and practical product details so readers can find the right information quickly.