Lighting / Fixtures
Installation Guide for Hunter Hartland 12-Light Chandelier
Step-by-step installation guide for the Hunter Hartland 12-Light Chandelier. Includes wiring instructions, assembly steps, and maintenance tips for models 13059, 13060, and 13061.
Table of contents
Manual images
Click an image to enlargeQuick guide from the manual
This document provides installation instructions for the Hunter Hartland 12-Light Chandelier. Before starting, ensure you have the necessary tools: a ladder, pliers, wire strippers, and a screwdriver. Safety Warning: Always disconnect power at the circuit breaker before beginning installation. If you are unfamiliar with electrical wiring, consult a qualified electrician.
Preparation for installation
Carefully remove all contents from the carton. Shut off the power at the circuit breaker and remove the old fixture and mounting bracket. Prepare the new mounting bracket (A) by attaching the threaded post (F) with a washer (D) and hex nut (E). Adjust the position of the threaded post (F) so that the canopy (H) will sit flush against the ceiling when installed.
Assembling the fixture
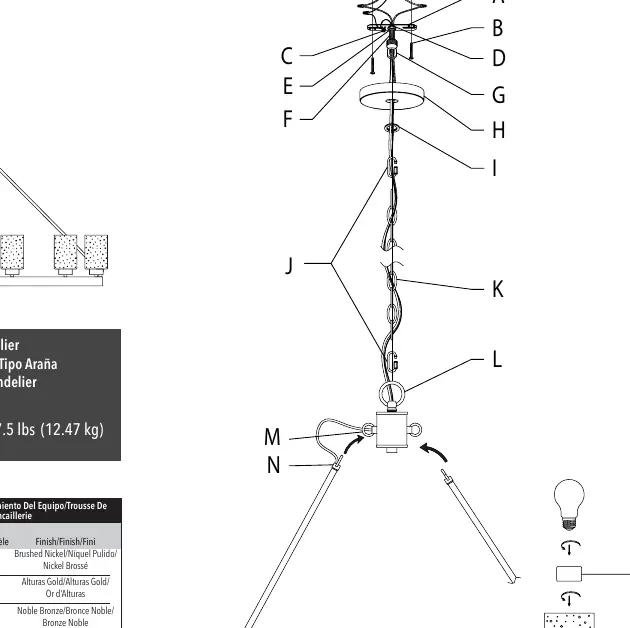
Lift the wiring hub (V) and lock the rod hooks (N) (P) into the loops (R) (M). Keep the weight of the fixture on the wiring hub while installing the four rods to prevent disconnection. Thread the wires through and attach the ring (L) to the hub. Determine the required chain length, use pliers to remove excess links, and attach quick-connect links (J) to the chain (K). Feed the fixture wires through the chain and attach the chain to the canopy loop (G).
Connecting the wires
Connect the fixture wires to the power supply wires from the junction box:
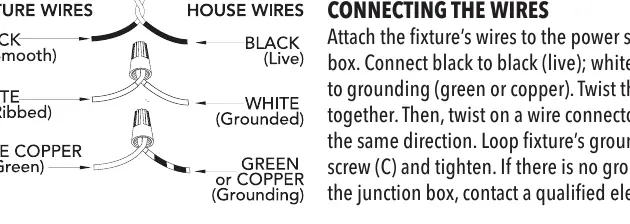
- Black to Black: Live wire.
- White to White: Neutral wire.
- Green/Copper to Grounding: Ground wire.
Twist the wire pairs together and secure them with a wire connector. Ensure all twists are in the same direction. Loop the fixture's ground wire around the grounding screw (C) and tighten.
Finishing the installation
Place the canopy (H) flush against the ceiling and secure it by tightening the canopy loop ring (I) onto the canopy loop (G). Slide the glass (T) over the socket (U) and secure it with the socket ring (S). Install light bulbs (not included) according to the fixture's specifications, ensuring you do not exceed the recommended wattage. Turn on the power to test the fixture.
Cleaning tips
Treat the fixture gently. For regular cleaning, turn off the light and wipe the fixture with a clean, lint-free cotton or microfiber cloth. Never spray cleaner directly onto the fixture.
Practical help
Common problems
Ground wire is missing from the junction box
Stop installation immediately and consult a qualified electrician.
Canopy does not sit flush with the ceiling
Adjust the position of the threaded post (F) on the mounting bracket (A) by loosening the hex nut (E) until the canopy covers at least half of the exterior threads on the canopy loop (G).
Hooks or rods disconnecting during assembly
Keep the weight of the fixture on the wiring hub (V) while installing the four rods.
Before use
- Turn off power at the circuit breaker.
- Ensure a ground wire is present in the junction box.
- Have a ladder, pliers, wire strippers, and a screwdriver ready.
- Verify the junction box can support the fixture weight of 27.5 lbs.
- Check that you have all parts listed in the hardware kit.
Specs in practice
- Fixture Weight
- 27.5 lbs (12.47 kg). Ensure the ceiling junction box is rated to support this weight.
Images and diagrams
- The wiring diagram illustrates the correct connection of black (live), white (neutral), and green/copper (ground) wires using wire connectors.
- The assembly diagram shows the sequence of the wiring hub, rods, chain, and canopy components.
Model compatibility
- Installation must be in accordance with national and local electrical codes (ANSI/NFPA 70).

Manual page author
Michael Turner
Technical manual editor
Reviews PDF manuals for structure, safety notes, and practical product details so readers can find the right information quickly.