Electronics / Two-Way Radios
User Manual for Hunter F7 140/155MHz Two-Way Radio
Quick guide and user manual for the Hunter F7 140/155MHz two-way radio. Includes setup, charging, operation, squelch settings, and technical specifications.
Table of contents
Manual images
Click an image to enlargeQuick guide from the manual
The Hunter F7 is a two-way radio designed for reliable communication. The package includes the radio, a rechargeable battery, a charging cup with a power adapter, two antennas (Norwegian 140MHz and Swedish 155MHz), and a belt clip. Ensure you use only original Hunter accessories to maintain warranty and performance.
Device Overview
The radio features the following controls:
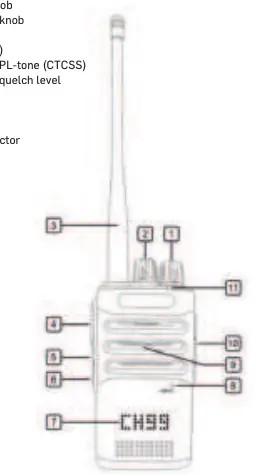
- On/off/volume knob: Power the device and adjust volume.
- Channel/function knob: Select channels or functions.
- Transmit key (PTT): Press to transmit.
- Squelch On/Off/level: Adjust background noise suppression.
- Accessory connector: For external speaker/microphone (3.5mm earpiece, 2.5mm mic/PTT).
- LED indicator: Shows status (Green: receiving/open squelch, Red: transmitting, Flashing Red: low battery).
Installation
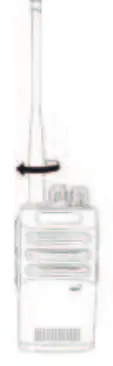
Antenna
Screw the antenna onto the connector until it is tight against the radio. Do not overtighten. Use the appropriate antenna (140MHz or 155MHz) based on the channels you are using for optimal performance.
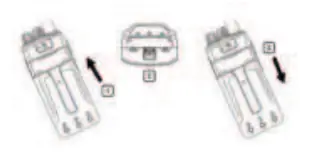
Battery
Place the battery against the back of the radio and push up until it clicks. To remove, press the battery lock on the lower part of the radio and slide the battery out.
Belt clip
Unscrew the screw from the back of the radio, position the belt clip, and re-insert the screw to secure it.
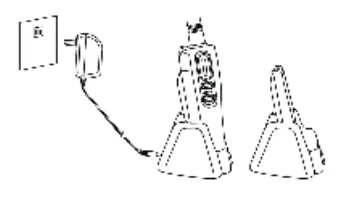
Charging
Connect the power adapter to the charging cup and plug it into a 230V AC outlet. Place the battery or the radio with the battery attached into the charging cup. The indicator will light up red during charging and turn green when fully charged. If the battery is completely discharged, it will pulse charge for approximately 3 minutes before normal charging begins.
Operation
Transmitting and receiving
Ensure the channel is free before transmitting. Press the PTT key, hold the radio vertically 5–10 cm from your mouth, and speak in a normal tone. The radio has a 60-second transmit limit to prevent accidental continuous transmission.
Squelch and PL-tones
The squelch removes background noise. You can adjust the squelch level (Sq 0–9) by pressing the squelch key for 2 seconds and using the channel knob. PL-tones (CTCSS) can be enabled per channel to avoid interference from other radio traffic. Select the channel, press the PL-tone key for 2 seconds, and choose the desired tone (67.0–254.1) or OFF.
Technical Specifications
- Frequency range: 136–174 MHz
- Output power: 5W
- Battery: 7.4V / 2600mAh Li-Ion
- Environmental resistance: IP54
- Operating time: >18 hours (5% transmit, 5% receive, 90% standby)
Practical help
Common problems
Radio will not transmit
Ensure the antenna is properly connected and the channel is not busy.
Low battery warning
The LED flashes red and an empty battery symbol appears. Recharge the battery immediately.
Interference from other radio traffic
Enable PL-tones (CTCSS) on your channel to filter out unwanted signals.
Battery not charging
Ensure the radio is switched off during charging. If the indicator does not stop flashing red after the initial pulse charge, the battery may be defective.
Before use
- Ensure the antenna is screwed on correctly.
- Charge the battery fully before first use.
- Check local regulations for channel usage in your country.
- Ensure the accessory cover is closed if not in use.
- Verify the correct antenna (140MHz or 155MHz) is attached for your region.
Specs in practice
- 5-5-90% Duty Cycle
- Standard operating time calculation based on 5% transmit, 5% receive, and 90% standby.
Images and diagrams
- 1. On/off/volume knob
- 2. Channel/function knob
- 4. Transmit key (PTT)
- 5. Battery capacity/PL-tone
- 6. Squelch On/Off/level
Model compatibility
- Use only original Hunter accessories.
- Supplied with two antennas: Norwegian 140MHz and Swedish 155MHz.
- Charger is intended for indoor use only.

Manual page author
Michael Turner
Technical manual editor
Reviews PDF manuals for structure, safety notes, and practical product details so readers can find the right information quickly.