Industrial / Fuel Dispensing Equipment
Installation and Maintenance Manual for Husky Conventional EZ Lever Nozzles
Quick guide for installing, maintaining, and troubleshooting Husky Conventional EZ Lever Nozzles. Includes inspection schedules, spout replacement, and safety warnings.
Table of contents
Quick Guide from the Manual
This document provides essential installation, maintenance, and operation instructions for Husky Conventional EZ Lever Nozzles. These nozzles are designed exclusively for motor fuel dispensing facilities. Always adhere to local, state, and federal regulations. If a drive-off occurs, immediately turn off the dispenser, relieve line pressure, and inspect the spout shear groove, sensing port, and nozzle for leaks or damage before returning to service.
Installation Instructions
Follow these steps to install the nozzle correctly:
- Turn off the dispenser and relieve line pressure.
- Apply pipe thread sealant approved for gasoline to the male threads of the hose section. Do not use Teflon tape.
- Tighten the nozzle approximately 1 to 2 turns past hand-tight. Do not overtighten.
- Pressurize the system and visually check for leaks.
- Test the nozzle for proper automatic shut-off between 5 - 10 gpm (18.9 - 37.9 Lpm).
Operation Instructions
- Activate the dispenser.
- Insert the spout into the fill pipe opening.
- Lower the hose end of the nozzle so the spout spring catches the inside of the fill pipe.
- Raise the lever to begin fueling.
- The nozzle will shut off automatically when the tank is full.
- Wait 15 seconds for remaining fuel to drain from the spout.
- Remove the nozzle from the fill pipe by raising the hose end.
- Return the nozzle to the nozzle boot.
Testing, Maintenance, and Inspection
Regular maintenance is required to ensure safe operation. All activities must be logged using the product's serial number.
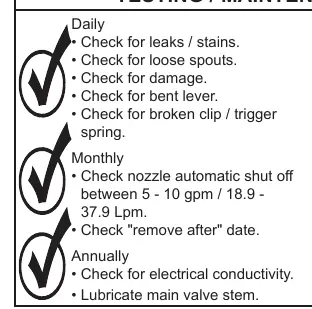
- Daily: Check for leaks, stains, loose spouts, damage, bent levers, or broken clip/trigger springs.
- Monthly: Check that the automatic shut-off functions between 5 - 10 gpm (18.9 - 37.9 Lpm) and verify the "remove after" date.
- Annually: Check for electrical conductivity and lubricate the main valve stem.
Spout Replacement
- Remove the spout lock nut and the old spout.
- Remove and discard the old spout seal.
- Place a new spout seal in the groove.
- Insert the new spout into the body, ensuring the vent tube is correctly positioned in the port.
- Tighten the spout lock nut firmly (approximately 35 - 60 lbf·ft / 47 - 81 N·m). Do not overtighten.
Guard Replacement
Various guards (Nozzle Guard, Waffle Splash Guard, POPD Guard) can be replaced by following these general steps:
- Turn off the dispenser and relieve line pressure.
- Remove the nozzle from the hose.
- Remove the old guard (cut if necessary).
- Install the new guard over the spout and pull back to cover the nozzle body.
- Re-install the nozzle to the hose and test for automatic shut-off.
Manufacturer information
Husky
Practical help
Common problems
Nozzle keeps shutting off or won't dispense
Ensure dispenser is activated, slow down flow rate using the clip, clean spout tip, clean/replace filter, inspect Safe-T-Break, or check dispenser pressure (min 19 psi / 1.3 bar).
Nozzle won't shut off
Check that flow rate is at least 3 gpm / 11.4 Lpm. Remove nozzle and drain hose.
Nozzle leaks
Check for loose spout, inspect hose connection, and check for cracks in nozzle or hose threads.
Low flow rate
Remove Flo-Equalizer (if equipped), verify dispenser is not in slow flow mode, and check for system leaks.
Before use
- Turn off dispenser and relieve line pressure before installation.
- Use gasoline-approved pipe thread sealant (no Teflon tape).
- Tighten 1-2 turns past hand-tight; do not overtighten.
- Pressurize system and check for leaks.
- Test automatic shut-off functionality (5-10 gpm).
Specs in practice
- Flow Rate (1A)
- 20 gpm (unleaded) / 25 gpm (diesel) without Flo-Equalizer.
- Body Material
- Die cast aluminum.
Model compatibility
- Designed for motor fuel dispensing facilities only.
- Do not use Teflon tape on threads.
- Requires minimum 3 gpm flow rate for shut-off.
- Flo-Equalizer output may exceed 10 gpm if debris obstructs internal components.

Manual page author
Emily Carter
User documentation editor
Prepares concise manual descriptions and highlights the most useful setup, operation, and maintenance information for readers.