Tools / Tool Storage
User Guide for Husky 27 in. 11-Drawer Chest and Cabinet
Comprehensive user guide for the Husky 27 in. 11-Drawer Chest and Cabinet. Includes assembly instructions, safety warnings, drawer operation, maintenance procedures, and a detailed parts list.
Table of contents
Manual images
Click an image to enlargeQuick guide from the manual
This guide provides essential instructions for the assembly and safe operation of your Husky 27 in. 11-Drawer Chest and Cabinet. Before beginning, ensure you have a 10 mm and 13 mm wrench or socket. Assemble the unit near its final intended location, as it is heavy and difficult to move once fully assembled. Always load the cabinet from the bottom to the top to prevent tipping hazards.
Safety Information
- Moving: Always push the unit, never pull it. Use the brakes when the unit is stationary to prevent rolling.
- Stability: Do not stand on the unit. Load from bottom to top to maintain stability.
- Operation: Lock drawers before moving the unit. Be careful when opening more than one drawer at a time.
- Restrictions: Do not attach or mount this product to a vehicle; doing so voids the warranty. Do not tow with power equipment.
- Handle Usage: The side handle is for moving the unit on casters only; do not use it for vertical lifting.
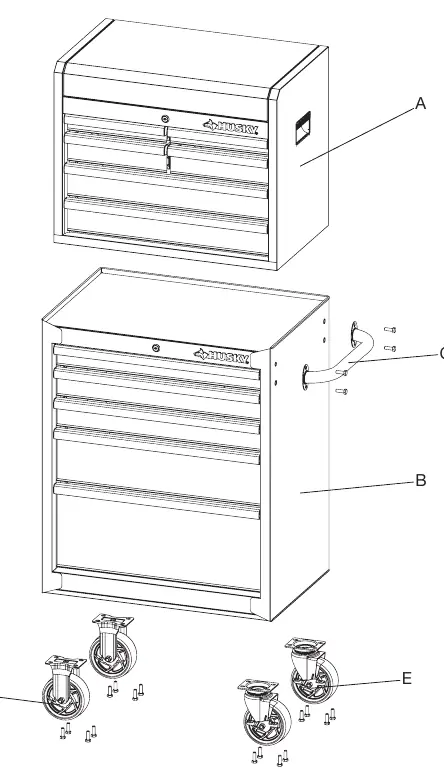
Assembly
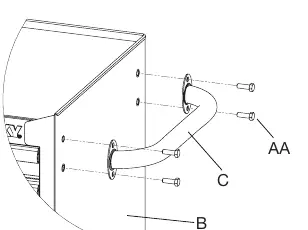
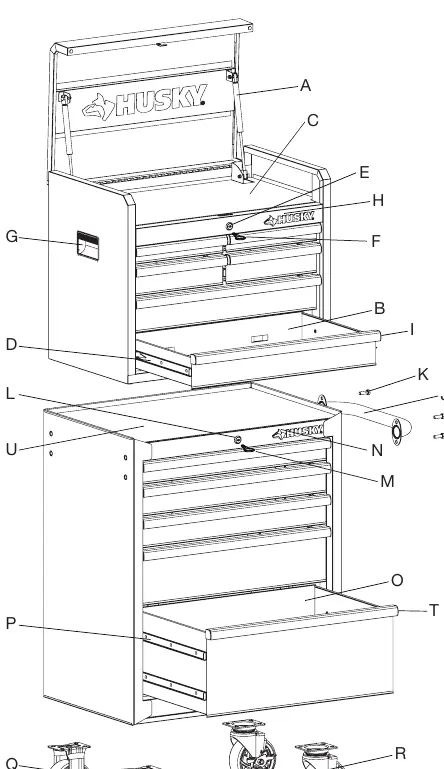
Attaching the cabinet handle
Position the cabinet handle (C) over the holes on the cabinet (B). Secure it using the provided bolts (AA) and tighten with the supplied wrench (BB). The holes in the cabinet are tapped and do not require nuts.
Attaching the casters
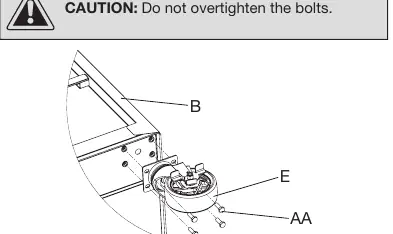
- Lock the drawers and lay the cabinet (B) on its top, using packaging material to protect the finish.
- Attach the swivel casters (E) to the unit on the same side as the handle, inserting bolts (AA) through the casters into the cabinet.
- Repeat the process for the fixed casters (D) on the opposite side.
- Tighten all bolts with the supplied wrench (BB) or a 13 mm wrench/socket. Do not overtighten.
- Return the cabinet to its upright position.
Operation
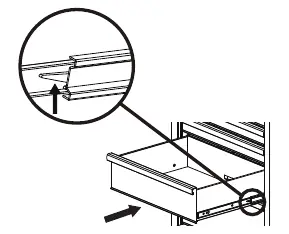
Removing the drawers
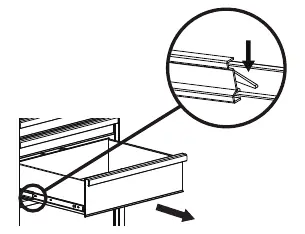
- Fully extend the empty drawer.
- Push up on one release lever while pulling down on the other release lever.
- Pull the drawer outward until it is released from the slide.
Re-inserting the drawers
- Extend the drawer slides.
- Insert the brackets on each side of the drawer into the slots in the slides, ensuring they are properly positioned.
- Once inserted, close the drawer completely to set the slides.
Maintenance
- Casters: Grease the casters annually using high-quality bearing grease.
- Slides: Lubricate the slides semi-annually with high-quality bearing grease.
- Cleaning: Periodically clean drawer fronts and trim with mild detergent and water. Use auto wax to preserve the finish and protect against scratches. Remove grease and oil with a standard nonflammable cleaning fluid.
Service Parts
For assistance with replacement parts, please call 1-888-43-HUSKY. The manual includes a detailed breakdown of all parts, including gas struts, drawer liners, slides, locks, keys, handles, and casters.
Manufacturer information
Husky
Practical help
Common problems
Unit is unstable or tips over
Ensure the unit is on a level surface and that you are loading the cabinet from the bottom to the top.
Drawers open while moving
Always lock the drawers before moving the unit.
Handle feels loose
Check the tightness of the handle bolts (AA) using a 10 mm wrench or socket.
Before use
- Verify all parts are present using the parts list.
- Ensure you have a 10 mm and 13 mm wrench or socket.
- Assemble the unit near its final location.
- Ensure the floor surface is level.
- Lock all drawers before attempting to move the unit.
Specs in practice
- Maximum weight per chest drawer
- 100 lb.
- Maximum weight per cabinet drawer
- 100 lb.
- Casters support up to
- 1500 lb.
Images and diagrams
- The assembly diagram illustrates the correct placement of swivel casters (E) on the handle side and fixed casters (D) on the opposite side.
- The drawer operation diagram shows the release levers that must be manipulated to remove or re-insert drawers.
Model compatibility
- Do not attach or mount this product to a vehicle; this will void the warranty.
- Do not use the side handle for vertical lifting.

Manual page author
Michael Turner
Technical manual editor
Reviews PDF manuals for structure, safety notes, and practical product details so readers can find the right information quickly.