Garden / Snow Blowers
Operator's Manual for Husqvarna 12527SB Snow Thrower
This operator's manual provides essential instructions for the Husqvarna 12527SB snow thrower, including assembly, safe operation, maintenance schedules, and troubleshooting procedures to ensure optimal performance.
Table of contents
Manual images
Click an image to enlargeQuick Guide from the Manual
This manual covers the assembly, operation, and maintenance of the Husqvarna 12527SB snow thrower. Before operating, ensure you are familiar with all controls and safety rules. Always wear safety glasses and appropriate winter clothing. Never use your hands to clear a clogged discharge chute; always use the provided clean-out tool.
Assembly and Pre-Operation
Your snow thrower requires some assembly upon arrival. Follow these steps:
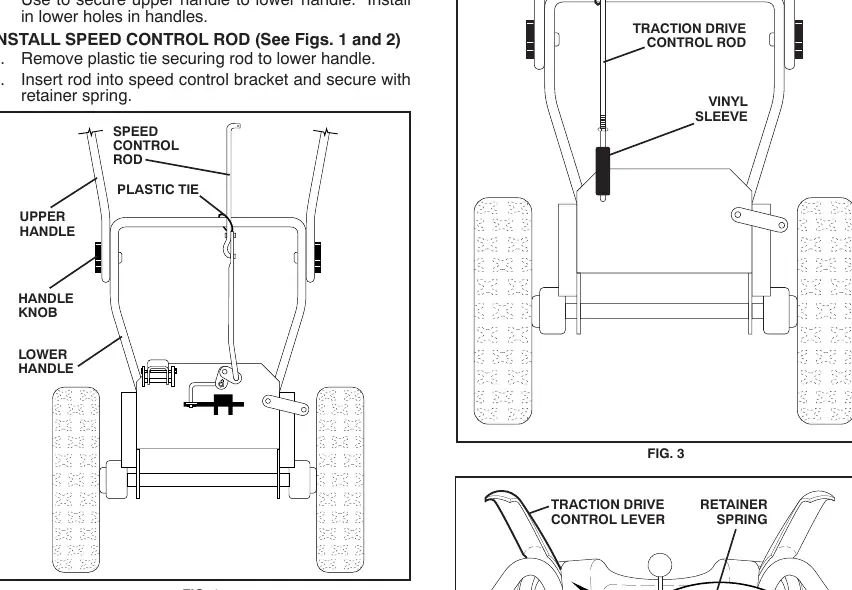
- Handle Assembly: Raise the upper handle to the operating position and tighten the handle knobs.
- Control Rods: Install the speed control rod, traction drive control rod, and auger control rod according to the diagrams provided in the manual. Secure them with the included retainer springs.
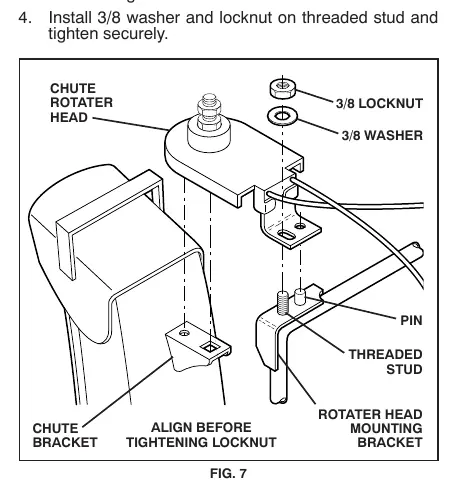
- Discharge Chute: Place the discharge chute assembly on the chute base, align the chute rotator head with the chute bracket, and secure it with the washer and locknut.
- Chute Deflector: Install the remote control cable bracket and cable eyelet to the chute deflector using the provided hardware.
- Tire Pressure: Check and adjust tire pressure to 14-17 PSI for optimal performance.
Operation
Before starting, ensure the fuel shut-off valve is in the OPEN position. The engine is equipped with a recoil starter.
Starting the Engine
- Cold Start: Insert the safety ignition key, set the ON/OFF switch to ON, rotate the choke to FULL, and prime the engine (4 times if below 15°F, 2 times if between 15° and 50°F). Pull the recoil starter handle quickly. Once started, move the choke to OFF.
- Warm Start: Follow the same steps but keep the choke in the OFF position and do not prime.
Using Controls
- Traction Drive: Squeeze the traction drive control lever to engage forward or reverse motion.
- Auger: Squeeze the auger control lever to engage the auger and throw snow.
- Steering: Use the LH and RH turn triggers on the underside of the handles to assist in steering.
- Discharge Control: Use the discharge chute control lever to change the direction of snow throw and the deflector remote control lever to adjust the distance.
Maintenance
Regular maintenance is crucial for the longevity of your snow thrower.
- Engine Oil: Check the oil level before each use. Change the oil after the first 25 hours of operation or at least once a year. Use high-quality detergent oil (API SG-SL).
- Belts: Check belts for wear every 50 hours. Replace with OEM belts if they slip or show signs of deterioration.
- Skid Plates: Adjust skid plates to set the clearance between the scraper bar and the ground. Use the highest position for paved surfaces and lower positions for uneven or gravel surfaces.
- Shear Bolts: Inspect shear bolts regularly. If the auger or impeller does not turn, check if the shear bolts have broken and replace them with original equipment parts.
Storage
If storing for 30 days or more, empty the fuel tank by running the engine until the fuel lines and carburetor are empty. Clean the unit thoroughly, lubricate moving parts, and store in a clean, dry area. Never store with fuel in the tank inside a building with ignition sources.
Manufacturer information
Husqvarna
Practical help
Common problems
Engine does not start
Check if the fuel shut-off valve is OPEN, the safety ignition key is inserted, the ON/OFF switch is ON, the choke is set to FULL, and the spark plug wire is connected. Ensure the fuel tank is not empty.
Loss of power
Check for a loose spark plug wire, reduce the speed and width of the swath, or clean/replace the muffler if dirty.
Excessive vibration
Check for loose fasteners or damaged augers/impeller. Tighten all fasteners and replace damaged parts.
Loss of traction
Check if the drive belt is worn or off the pulley. Reinstall or replace the belt.
Before use
- Check engine oil level.
- Check for loose fasteners.
- Check controls to ensure they are functioning properly.
- Ensure fuel shut-off valve is in the OPEN position.
- Check tire pressure (14-17 PSI).
Specs in practice
- Gasoline Capacity
- 0.5 Gallons (1.9 Liters), use Unleaded Regular only.
- Spark Plug Gap
- 0.030 inch (0.762 mm).
Images and diagrams
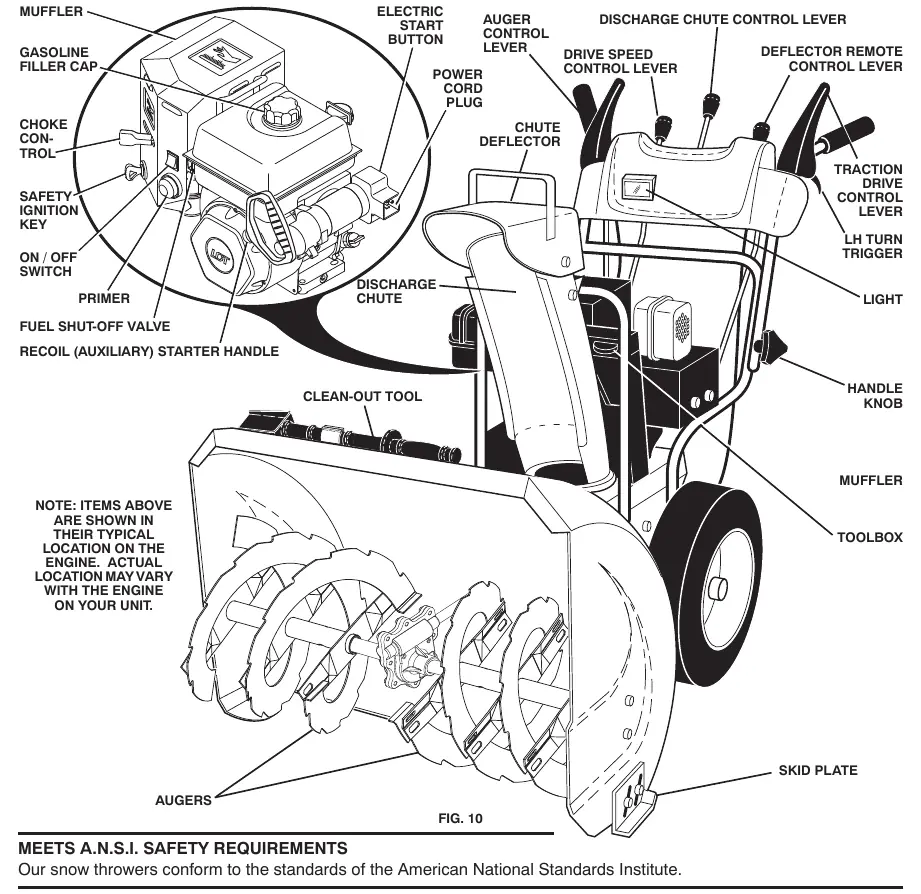
- Fig 10: Overview of controls and engine components.
- Fig 18: Skid plate and scraper bar adjustment.
- Fig 20: Auger and impeller shear bolt replacement.
Model compatibility
- Use only Original Equipment Manufacturer (OEM) parts.
- Do not use alcohol-blended fuels (gasohol, ethanol, methanol) without proper storage precautions.

Manual page author
Michael Turner
Technical manual editor
Reviews PDF manuals for structure, safety notes, and practical product details so readers can find the right information quickly.