Computers / Laptops
User Manual for Inbox Zero 10391CFCB-GL Office Computer Desk
Quick guide for the Inbox Zero 10391CFCB-GL office computer desk. Includes assembly instructions, parts list, safety guidelines, and maintenance tips for your L-shaped workstation.
Table of contents
Manual images
Click an image to enlargeQuick guide from the manual
This manual provides assembly and safety instructions for the Inbox Zero 10391CFCB-GL office computer desk. Before beginning, ensure you have a spacious area for assembly and wear gloves to protect against sharp edges. Do not fully tighten screws until all parts are aligned. If any parts are missing or damaged upon opening, stop assembly immediately.
Safety guidelines
- Children: Keep all small parts out of reach of children during assembly to prevent swallowing or inhalation hazards. Do not allow children to climb or play on the product.
- Assembly: Assemble in a spacious area. Do not place the product directly on the ground to avoid damage. Wear gloves to avoid cuts.
- Usage: Use the product on a level, sturdy surface. Do not exceed the maximum load capacity.
- Maintenance: Regularly check the tightness of screws. If liquids are spilled, wipe clean immediately with a dry towel.
Parts list
Before starting, verify all components are present:
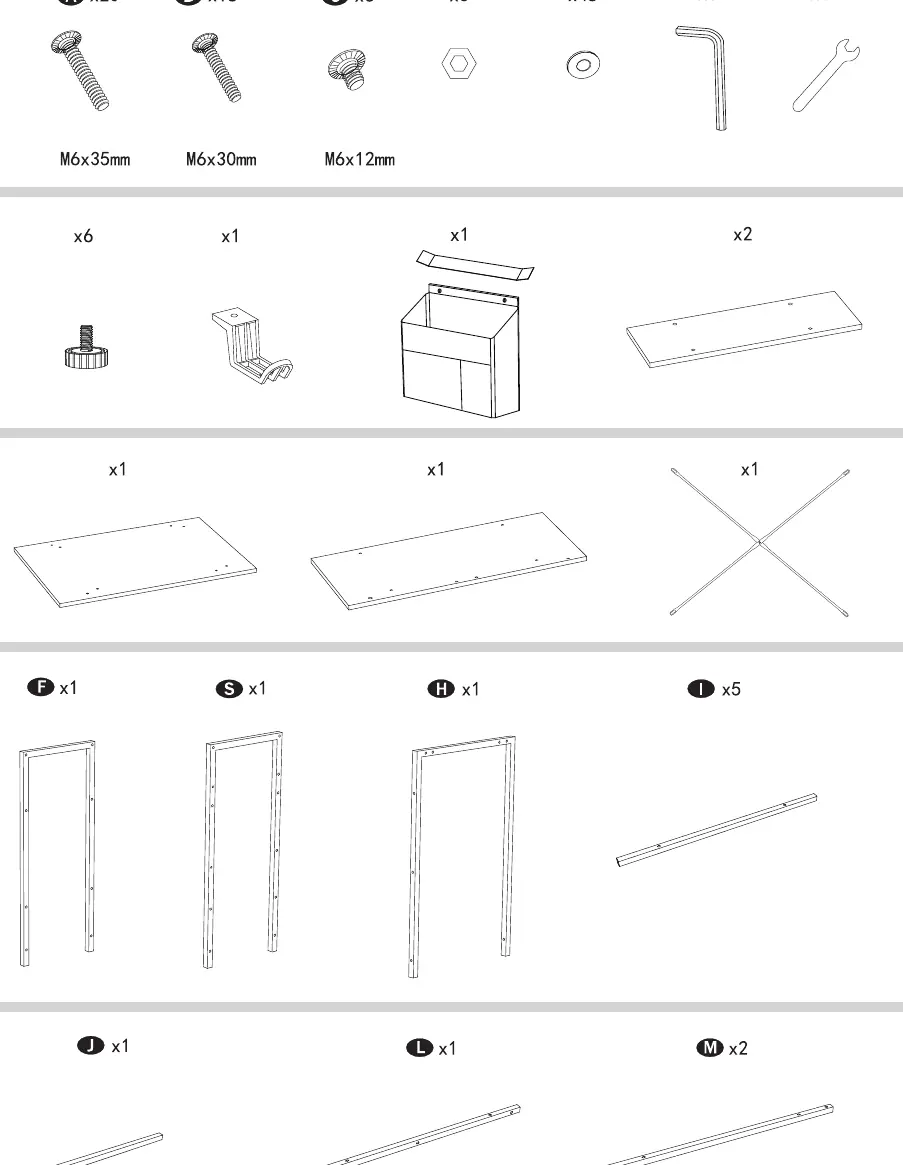
- Screws: M6x35mm (A), M6x30mm (B), M6x12mm (C).
- Tools: Hex key and wrench included.
- Structure: Various metal frames (F, S, H, I, J, L, M) and wooden panels.
- Accessories: Side pocket, adjustable feet, and cross-braces.
Assembly instructions
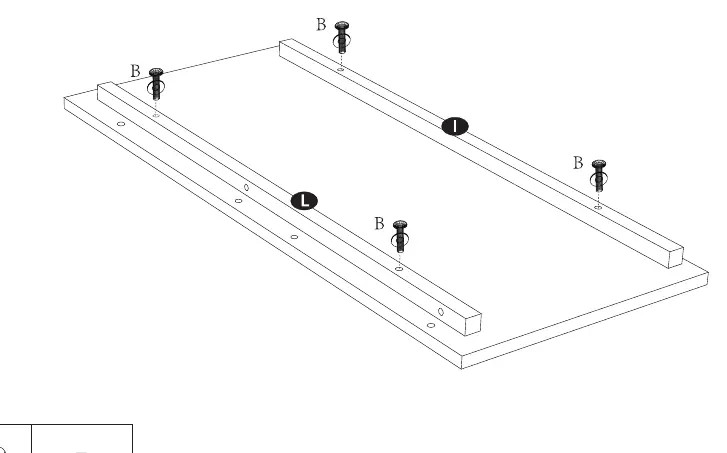
- Step 1: Attach support bars (I) and (L) to the desktop panel using M6x30mm screws (B).
- Step 2: Connect the side frames (F) and (S) to the base structure using M6x35mm screws (A).
- Step 3-4: Continue assembling the frame structure using the provided metal bars (M) and screws (B).
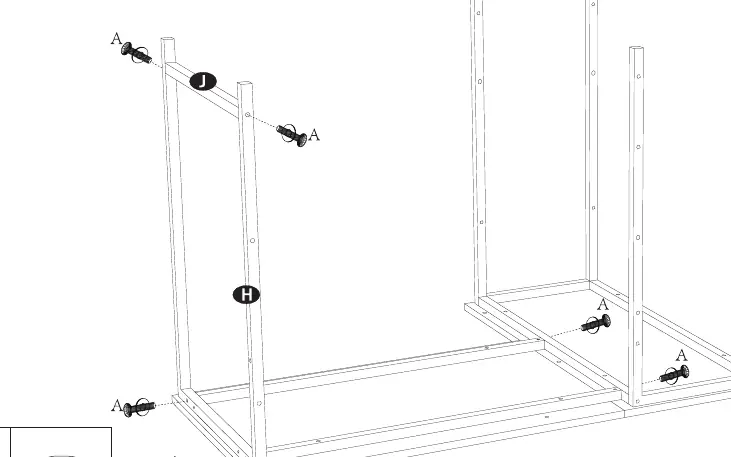
- Step 5-6: Attach the remaining frame components (H, J) and install the adjustable feet.
- Step 7: Secure the shelves to the frame using M6x30mm screws (B).
- Step 8: Install the cross-braces on the back of the desk using M6x12mm screws (C) and nuts.
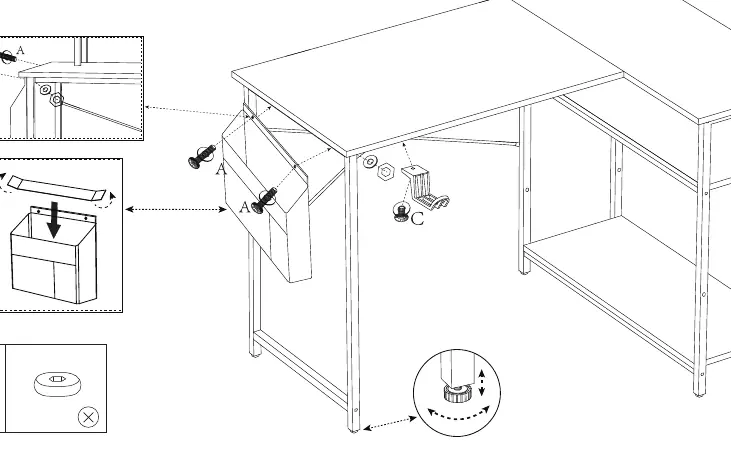
- Step 9: Attach the side pocket and any remaining accessories using M6x35mm screws (A) and M6x12mm screws (C).
- Step 10: Final check of all connections and ensure the desk is stable.
Maintenance
To maintain the integrity of the desk, periodically check that all screws are tight. If the desk becomes wobbly, adjust the leveling feet at the base of the legs. Clean the surface with a dry cloth; avoid using harsh chemicals or abrasive materials.
Practical help
Common problems
Parts missing or damaged
Stop assembly immediately upon opening the package and contact customer support.
Desk is unstable or wobbly
Check that all screws are tightened properly and adjust the leveling feet at the bottom of the legs.
Difficulty aligning screws
Loosely align all screws with the pre-drilled holes first, then tighten them individually once all are in place.
Before use
- Verify all parts against the parts list on page 7.
- Ensure you have a spacious area for assembly.
- Wear gloves to avoid cuts from sharp edges.
- Check that you have the included hex key and wrench.
- Ensure the floor surface is level.
Images and diagrams
- Page 7: Identification of all screws, tools, and structural panels.
- Page 8-9: Initial frame assembly steps.
- Page 10-11: Attaching shelves and leveling feet.
- Page 12: Final assembly including side pocket and cross-braces.
Model compatibility
- For indoor use only.
- Do not exceed maximum load capacity.
- Keep away from high-temperature objects and direct sunlight.

Manual page author
David Miller
Documentation analyst
Organizes user manual content into clear summaries, with attention to model details, product context, and everyday usability.