Power / Power Distribution Units
User Manual for iTechworld 12/24V 40Amp MPPT Solar Charge Controller
Quick guide for the iTechworld 12/24V 40Amp MPPT Solar Charge Controller. Includes installation, wiring diagrams, menu navigation, battery settings, and troubleshooting steps.
Table of contents
Manual images
Click an image to enlargeQuick guide from the manual
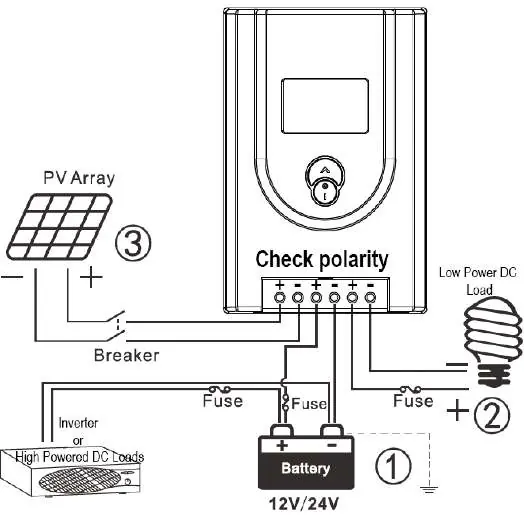
This solar charge controller is designed to optimize solar and battery systems. For safe and efficient operation, always follow the correct installation sequence: connect the battery first to allow the controller to recognize the system voltage, then connect the load, and finally the solar array. When disconnecting, reverse this order (Solar, Load, Battery). Ensure all wiring is done by a certified technician and that external fuses are installed as close to the battery as possible.
Installation and Wiring
The controller should be mounted vertically in a dry location with adequate ventilation. Allow at least 15cm of space above and below the unit and 5cm on the sides.
- Wiring: Use flexible, multi-stranded copper wire with a current rating of at least 50A.
- Fuses: External fuses are required. A battery fuse must be installed within 15cm of the battery.
- Polarity: Ensure correct polarity for all connections. The controller is a common positive device.
- Load Output: Do not exceed 40A on the load output. Large loads like inverters should be connected directly to the battery.
Unit Operation and Settings
The controller features an LCD screen for monitoring and programming. Use buttons A and B to navigate menus and change parameters.
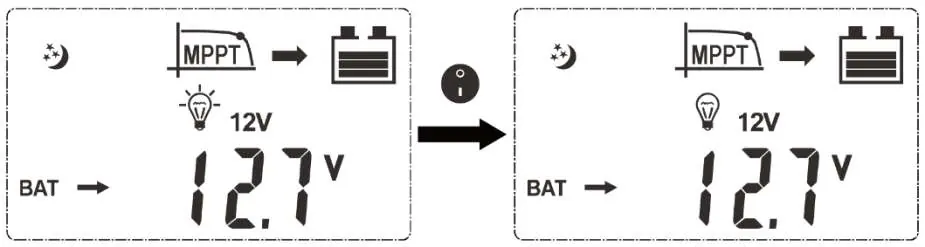
- Menu Navigation: Short press buttons A or B to cycle through parameters like ambient temperature, charge current, and accumulated AH.
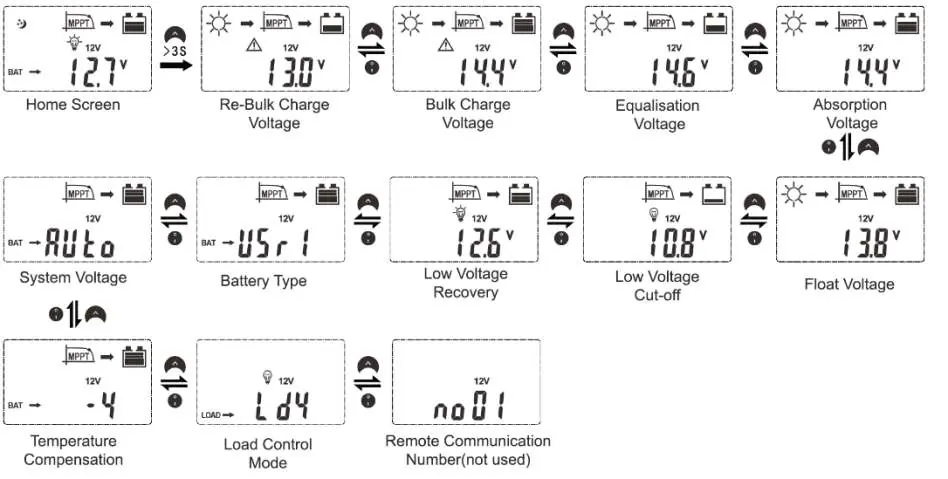
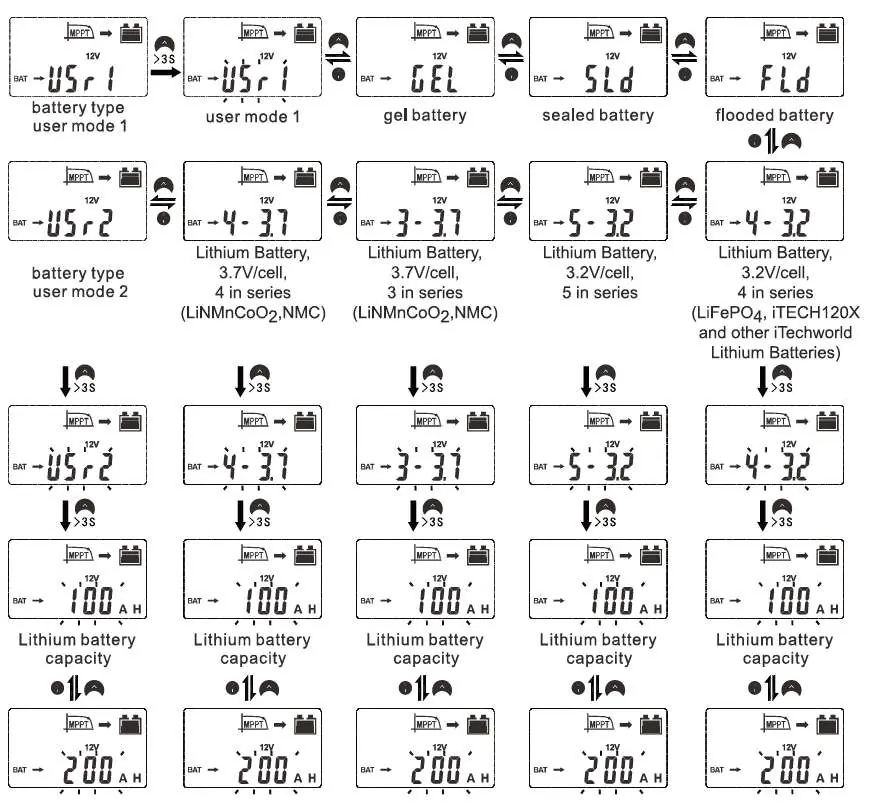
- Settings Menu: Press and hold button A for >3 seconds on the home screen to enter settings.
- Changing Parameters: Hold button A until the value flashes, adjust with A/B, then hold A for >3 seconds to save.
- Battery Selection: Navigate to the Battery Type menu. Select the profile matching your battery chemistry (Gel, Sealed, Flooded, or Lithium).
- Lithium Batteries: If using iTechworld lithium batteries (e.g., iTECH120X), you must select the 4-3.2 profile.
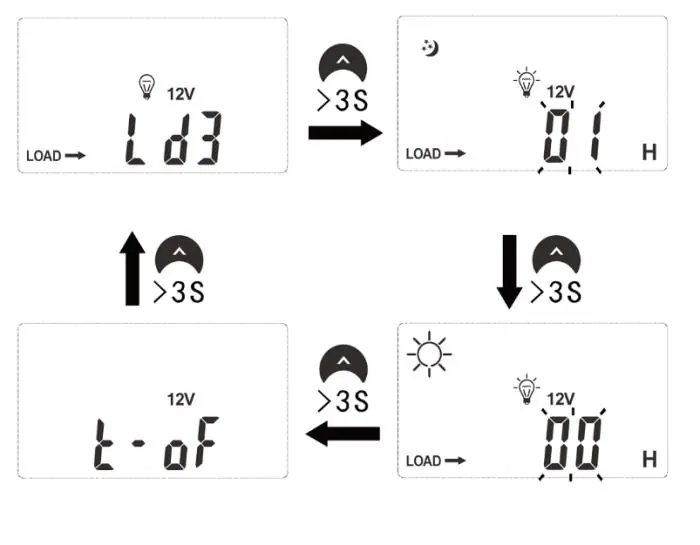
- Load Control: Various modes are available, including manual control, light control (dusk-to-dawn), and dual-time modes.
Troubleshooting
If the controller displays a fault code or is not functioning correctly, refer to the following:
- Not charging: Check if solar input is disconnected or if solar voltage is lower than battery voltage.
- No display: Battery voltage may be below 8V, or connections are incorrect.
- Over temperature (Ex5): Ensure ventilation is not blocked. The unit will restart automatically once cooled.
- Overload (Ex3): Reduce the load connected to the load output.
Specifications
Key operating parameters for the controller:
- System Voltage: 12/24VDC Auto sensing.
- Max Solar Input Power: 520W (12V system) / 1040W (24V system).
- Max Open Voltage: 100VDC.
- Rated Charge Current: 40A.
- Operating Temperature: -20°C to +55°C.
Manufacturer information
iTechworld
Practical help
Common problems
Solar charge controller is not charging battery when there is enough sunlight
Check that all solar input connections and fuses/breakers are correct. Ensure the voltage of the solar panel is higher than the battery voltage.
Nothing is displaying on the LCD
Check battery voltage and connections. The controller only turns on if the battery voltage is above 8 Volts.
Solar charge controller over temperature (Ex5)
Ensure the controller has adequate ventilation and heat sink fins are not blocked. Allow the regulator to cool down.
Overload detected (Ex3)
Reduce the load connected to the load output of the solar charge controller.
Before use
- Use flexible, multi-stranded copper wire (at least 50A rating).
- Install a battery fuse within 15cm of the battery.
- Connect the battery first to allow the controller to recognize system voltage.
- Ensure the correct battery charging profile is selected.
- Verify solar panel voltage is within the 100VDC limit.
- Ensure the controller is mounted vertically in a dry location.
Specs in practice
- System Rated Voltage
- 12/24VDC Auto sensing.
- Max Solar Input Power
- 520W for 12V systems, 1040W for 24V systems.
- Max Open Voltage
- 100VDC at the lowest temperature.
- Rated Charge Current
- 40A.
Images and diagrams
- Wiring sequence: 1. Battery, 2. Load, 3. Solar Array.
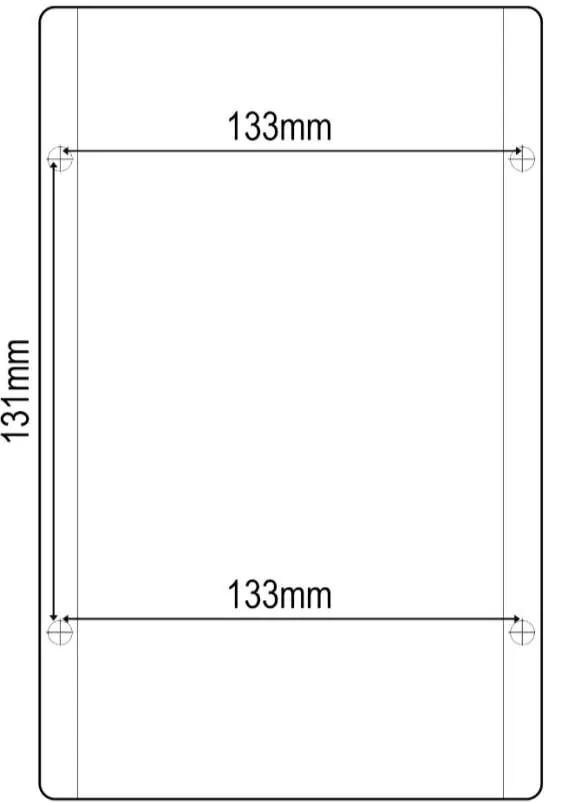
- Mounting: Use the template to mount vertically with 4 screws (max head diameter 5mm).
Model compatibility
- Compatible with Gel, Sealed Lead Acid, Flooded Lead Acid, LiFePO4, and Li(NiMnCo)O2 batteries.
- For iTechworld Lithium batteries (e.g., iTECH120X), use ONLY the 4-3.2 profile.

Manual page author
Michael Turner
Technical manual editor
Reviews PDF manuals for structure, safety notes, and practical product details so readers can find the right information quickly.