Power / Transformers & Supplies
User Manual for JOYO JAM BUDDY II Portable Electric Guitar Amp
Quick start guide and user manual for the JOYO JAM BUDDY II portable electric guitar amplifier. Learn how to use the looper, drum machine, effects, and advanced tone settings.
Table of contents
Manual images
Click an image to enlargeQuick guide from the manual
The JOYO JAM BUDDY II is a portable electric guitar amplifier featuring built-in effects, a looper, a drum machine, and Bluetooth connectivity. To get started, ensure the unit is charged using a USB Type-C charger with at least 10W (5V/2A) output. The device features 14 selectable amp models and advanced tone shaping via Post-EQ settings.

Device Overview
The top panel contains knobs for controlling volume, gain, and effects, as well as footswitches for channel switching and looper control. Key controls include:
- GUITAR.VOL / MUSIC.VOL: Adjusts input volume for guitar and music playback.
- BASS/SAVE: Adjusts bass or saves current settings.
- MID./TUNE: Adjusts mids or activates the tuner.
- TRE./D.CTRL: Adjusts treble or controls the drum machine.
- MOD./D.SPEED: Adjusts modulation effects or drum machine speed.
- AMP/CH.VOL: Selects amp models or adjusts channel volume and advanced parameters.
Amp Models and Tone Channels
The amplifier offers 14 distinct amp models ranging from clean to high-gain. You can switch between CLEAN and DRIVE channels using the footswitches. The DRIVE channel includes two sub-channels (RHYTHM and LEAD), allowing for three independent tone settings accessible via the footswitches.
Effects and Advanced Parameters
The unit features three built-in effects modules: MODULATION, DELAY, and REVERB. You can edit these by rotating the corresponding knobs. Advanced tone shaping is available via the AMPLIFIER menu, where you can adjust:
- CH.VOL: Channel volume.
- HPF/LPF: High-pass and low-pass filters.
- HIGH/MID/LOW: Post-EQ frequency adjustments.
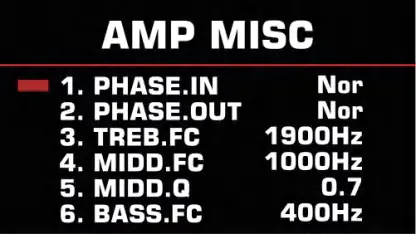
- PHASE.IN/OUT: Signal phase settings.
- TREB.FC / MIDD.FC / BASS.FC: Center frequencies for the Post-EQ.
Drum Machine and Looper
The drum machine can be activated by pressing the TRE./D.CTRL knob. The looper allows for up to 30 seconds of recording. To record, press the CHANNEL and DRIVE MODE footswitches simultaneously. Note that if the looper is active and content is recorded, the drum machine's type and speed settings will be locked to synchronize with the recording tempo.
Connectivity and Maintenance
The device supports Bluetooth for backing tracks and USB-OTG for recording to computers or mobile devices. A phone mount is included for convenience. To reset to factory settings, hold the AMP/CH.VOL knob while turning on the power switch.
Official resources from the manual
Manufacturer information
JOYO TECHNOLOGY CO., LTD
Practical help
Common problems
Looper settings are locked
If the LOOPER function is activated and content is recorded, the drum machine's TYPE and SPEED settings will be locked to synchronize with the recording tempo.
Tuner does not respond or mutes sound
When the tuner function is turned on, all enabled effects, LOOPER, and drum machine will be turned off. The unit will not respond to other operations until the tuner is exited.
Charging issues
Ensure you are using a charger with at least 10W output (5V/2A). The unit does not include a charger.
Before use
- Charge the unit using a USB Type-C cable and a compatible 10W+ adapter.
- Install the metal phone mount into the sockets if needed.
- Connect your guitar to the INPUT jack.
- Ensure the device is turned off before performing a factory reset.
Specs in practice
- Power Output
- 10W (5W x 2) via internal magnetic full-range speakers.
- Charging Interface
- USB Type-C, requires 5V/2A minimum.
Images and diagrams
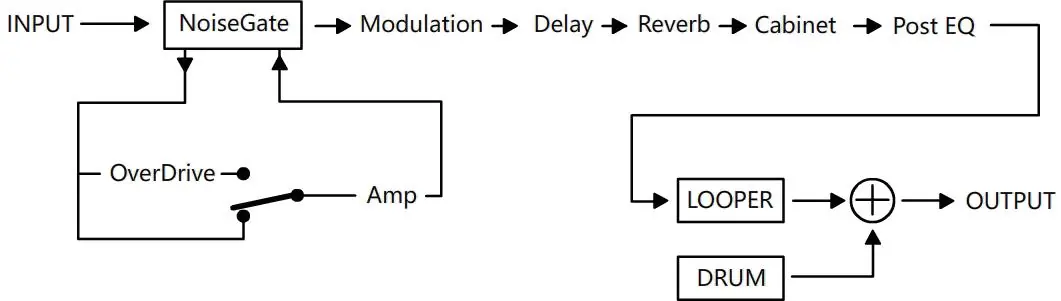
- The effects chain follows: INPUT -> NoiseGate -> Modulation -> Delay -> Reverb -> Cabinet -> Post EQ -> LOOPER/DRUM -> OUTPUT.
- The panel layout shows 19 numbered controls and indicators for easy navigation.
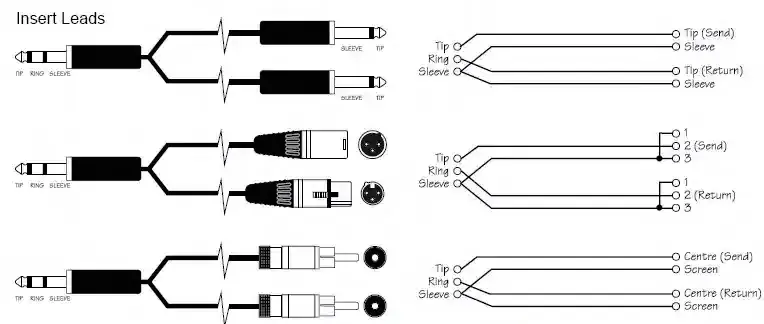
- The insert leads diagram illustrates how to connect balanced and unbalanced cables for output.
Model compatibility
- Supports USB Type-C chargers (PD/QC fast chargers compatible).
- Guitar Output Jack supports both mono 6.35mm cables and TRS-to-XLR balanced cables.

Manual page author
Emily Carter
User documentation editor
Prepares concise manual descriptions and highlights the most useful setup, operation, and maintenance information for readers.