Power / Solar Panels
User Manual for KickAss 120W/200W DC Solar Blanket
Quick guide for the KickAss 120W and 200W DC Solar Blanket. Learn how to set up, connect to power stations or controllers, use the USB/DC ports, and maintain your solar blanket.
Table of contents
Manual images
Click an image to enlargeQuick Guide
The KickAss DC Solar Blanket is a portable, foldable solar solution designed for outdoor use. It features high-efficiency N-Type TOPCon cells and a durable ETFE coating. Before use, ensure the solar blanket is placed on a stable surface, free from shade, and angled directly toward the sun. Always use a compatible solar regulator between the panel and the battery to prevent damage.
Product Overview
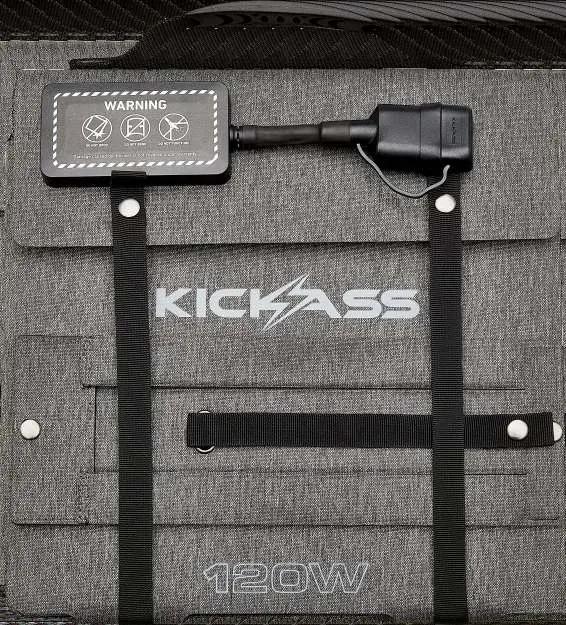
The solar blanket includes an integrated junction box with multiple output ports and adjustable kickstands for optimal positioning. It is IP67 rated for water resistance.
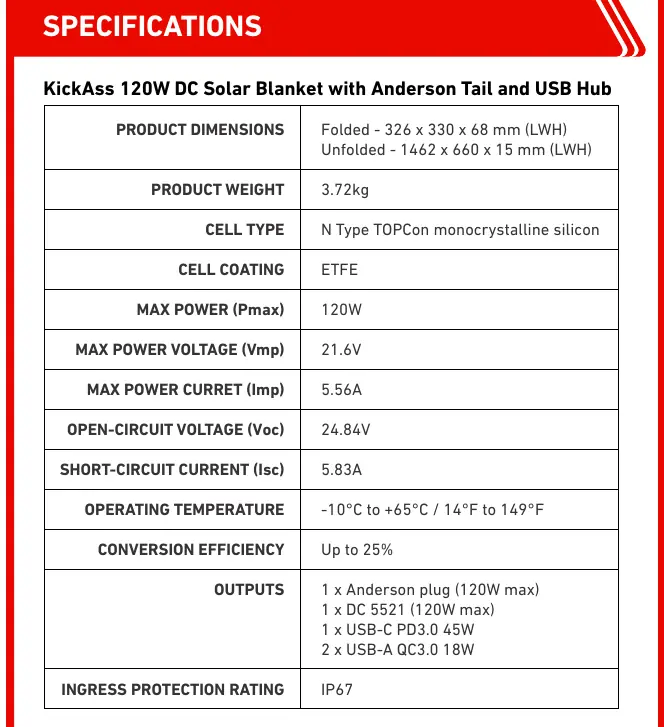
- 120W Model: Folded 326 x 330 x 68 mm, Weight 3.72kg.
- 200W Model: Folded 326 x 330 x 68 mm, Weight 5.85kg.
- Outputs: Anderson plug, DC 5521, USB-C PD, and USB-A QC3.0 ports.
Setup

- Unclip the strap snap buttons to fully unfold the panel.
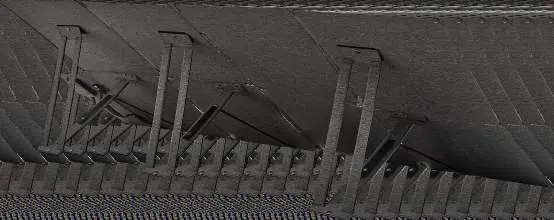
- At the rear, unclip the snap button holding the support stand.
- Attach the securing lace to the second snap button to lock the stand.
- Extend the stand and attach the Velcro end to the opposing section on the rear of the panel.
- Position the blanket in an open, shade-free area.
- Angle the panel so the solar cells face directly toward the sun.
Connections
The solar blanket must be connected to a compatible solar regulator or power station. Do not connect directly to a battery. Ensure all panels are the same model and specifications if connecting multiple units in series or parallel.
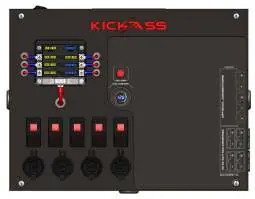
- Solar Charge Controller: Connect the Anderson tail to the input of your MPPT solar charge controller, then connect the controller to the battery.
- Power Stations: Connect the Anderson tail directly to compatible KickAss power stations or via a control hub with a DCDC charger.
Using Other Sockets
The junction box provides convenient charging for portable devices. Remove the rubber cover to access:
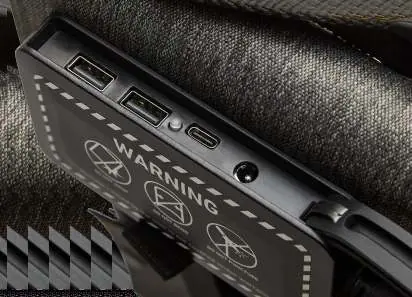
- DC5521 Port: Up to 120W (KASB120) or 200W (KASB200).
- USB-C PD Port: Fast charging (45W for 120W model, 100W for 200W model).
- USB-A QC3.0 Ports: Up to 18W for small electronic devices.
Cleaning and Maintenance
- Turn off and disconnect the panel before cleaning.
- Allow the surface to cool completely.
- Use clean water and a soft cloth, sponge, or non-abrasive brush.
- For stubborn grime, use mild soapy water only.
- Do not use abrasive pads, harsh chemicals, or high-pressure washers.
- Dry with a soft cloth or air dry.
- Inspect connectors and cables for damage after cleaning.
Troubleshooting
If you experience issues, check the following:
- No power: Check for loose, corroded, or improperly attached connectors. Ensure cables are intact.
- Low output: Ensure the panel is well-exposed to sunlight and free from shading, dirt, or debris.
- USB-C charging slow: Confirm the charging cable is rated for high output (45W or 100W) and check the device's maximum input capability.
Manufacturer information
KickAss Products
Practical help
Common problems
No power detected from the solar panel
Check for loose, corroded, or improperly attached connectors. Ensure cables are intact and fully seated.
Low solar output
Ensure the panel is well-exposed to sunlight and free from shading, dirt, or debris.
USB-C port not providing maximum output
Confirm the charging cable is rated for high output (45W or 100W) and verify the device's maximum input capability.
Before use
- Unclip strap snap buttons and fully unfold the panel.
- Unclip the support stand snap button at the rear.
- Lock the stand in place using the securing lace.
- Attach the Velcro end of the stand to the panel rear.
- Ensure the panel is placed on a stable surface.
- Verify the solar regulator is compatible with the battery type.
Specs in practice
- ETFE Coating
- Provides high resistance to heat, corrosion, and outdoor wear.
- N-Type TOPCon
- Advanced solar cell technology achieving up to 25% conversion efficiency.
Images and diagrams
- Setup steps involve unfolding, releasing the stand, securing the lace, and attaching Velcro.
- Wiring diagrams show connections to solar charge controllers and power stations.
- The junction box contains USB-A, USB-C, and DC5521 ports.
Model compatibility
- Compatible with all KickAss portable power stations and most solar generators.
- Always use a compatible solar regulator between the panel and the battery.
- When connecting multiple panels, ensure all panels are the same model and specifications.

Manual page author
Emily Carter
User documentation editor
Prepares concise manual descriptions and highlights the most useful setup, operation, and maintenance information for readers.