Home Appliances / Microwaves
User Manual for Koolmore Reserve 24-inch Microwave Drawer KM-MD-1BSS
Quick guide for the Koolmore Reserve 24-inch Microwave Drawer (KM-MD-1BSS). Includes installation requirements, operating instructions, cooking functions, safety precautions, and troubleshooting.
Quick answers from the manual
Quick answer
- The Koolmore KM-MD-1BSS is a 24-inch microwave drawer. It features 11 power levels, various auto-menu functions, and a child lock. It requires a 120V, 60Hz power supply and specific installation clearances. p. 1, 4, 12
Key actions
- Set the clock p. 12
- Start microwave cooking p. 13
- Activate child lock p. 16
First start
- Remove all packaging and check for damage. p. 11
- Plug into a grounded outlet. p. 6, 11
Show 4 more answers Show less
Problems and fixes
Oven will not start
Plug into the outlet, close the door, or check instructions.
p. 17
Arcing or sparking
Use microwave-safe cookware, do not operate empty, clean cavity.
p. 17Maintenance and reset
- Clean door and sealing surfaces p. 5, 7
Technical specifications
| Parameter | Value | Meaning | Pages |
|---|---|---|---|
| Rated Voltage | 120 VAC | Standard household power requirement | p. 4 |
| Microwave Input | 1500 W | Power consumption | p. 4 |
| Microwave Output | 1500 W | Cooking power | p. 4 |
Where to find it in the PDF
- Installation p. 10, 11
- Operation p. 12, 13, 14, 15
- Maintenance p. 17
- Warranty p. 18
Table of contents
Manual images
Click an image to enlargeQuick Guide
The Koolmore Reserve 24-inch Microwave Drawer (KM-MD-1BSS) is designed for kitchen integration. Before using, ensure the unit is properly installed, grounded, and free of packing materials. The unit features 11 power levels, various auto-menu functions (Beverage, Popcorn, Melt, Soften), and a child lock feature. Always use microwave-safe cookware and avoid metal utensils to prevent arcing.
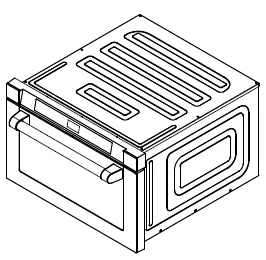
Safety Precautions
To avoid exposure to excessive microwave energy, do not operate the oven with the door open or if the door, hinges, or latches are damaged. Ensure the appliance is properly grounded. Do not use the oven for industrial or laboratory purposes. Keep the cord away from heated surfaces and do not immerse the plug or cord in water. Do not store the appliance outdoors or near water sources like sinks.
Installation
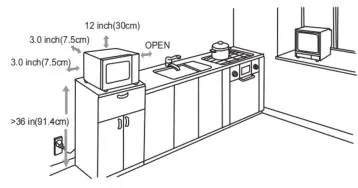
The microwave drawer requires a level surface with specific clearances. A minimum clearance of 3.0 inches (7.5cm) is required between the oven and any adjacent walls, and one side must be open. The minimum installation height is 36 inches (91.4cm). Leave at least 12 inches (30cm) of clearance above the oven. Do not install the oven over a range cooktop or other heat-producing appliances, as this may damage the unit and void the warranty.
Operation
The control panel allows for various cooking modes. To power on, plug the unit in; the screen will display WELCOME. To set the clock, press the CLOCK/KITCHEN TIMER button once, enter the time, and press the button again to finish. For microwave cooking, press TIME COOK, enter the time, press POWER to select the level (default is PL100), and press START/+30SEC. There are 11 power levels available, ranging from 0% to 100% power. The unit also includes a child lock; press STOP/CANCEL for 3 seconds in waiting state to lock or unlock the controls.
Maintenance and Troubleshooting
Clean the door and sealing surfaces with mild, non-abrasive soaps. If the oven will not start, check if the power cord is plugged in, the door is closed, or if the operation is set correctly. If arcing or sparking occurs, ensure you are using microwave-safe cookware and that the cavity is clean. For unevenly cooked food, ensure food is properly defrosted and stirred during the cooking process.
Warranty
Koolmore Supply, Inc. provides a limited warranty for three years from the date of purchase, covering manufacturing defects in material or workmanship. This warranty is valid for the original purchaser within the United States. To claim warranty service, contact [email protected] with your proof of purchase.
Practical help
Common problems
Oven will not start
Check if the electrical cord is plugged in, the door is fully closed, or if the operation settings are correct.
Arcing or sparking
Ensure you are using microwave-safe cookware only. Do not operate the oven empty. Clean the cavity of any spilled food.
Unevenly cooked foods
Ensure food is completely defrosted, use the correct power level and cooking time, and turn or stir food during cooking.
Undercooked foods
Check that ventilation ports are not restricted, use microwave-safe cookware, and ensure correct cooking time and power level.
Before use
- Remove all packing material and accessories from the carton and oven cavity.
- Examine the oven for any damage such as dents or a broken door.
- Ensure the unit is placed on a level surface with required clearances.
- Verify that the electrical outlet is properly grounded.
- Check that the voltage and frequency match the rating label.
Show more Show less
Specs in practice
- Rated Voltage
- 120 VAC, 60 Hz
- Microwave Input
- 1500 W
- Microwave Output
- 1500 W
Images and diagrams
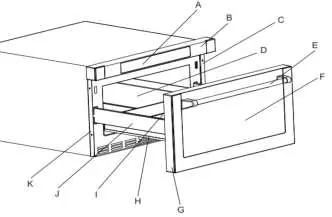
- The parts diagram identifies the Control Patch, Control Box, Mounting Plates, Cavity, Handle, Windows, Door Frame, Automatic Putter, Drawer, and Hinge Joint Board.
- A defrosting rack is included, which should only be used for defrosting functions and never for cooking.
Model compatibility
- Use only microwave-safe cookware.
- Avoid metal utensils, aluminum trays, or items with metal trim to prevent arcing.
- Do not use paper bags or wood in the microwave.

Manual page author
David Miller
Documentation analyst