Industrial / I/O Modules
User Manual for Schneider 20L Microwave Oven SMW20V
Comprehensive user guide for the Schneider 20L microwave oven (model SMW20V). Includes installation, operation, cleaning, maintenance, and troubleshooting instructions.
PDF source: Français · summary: English
Quick answers from the manual
Quick answer
- The Schneider 20L microwave oven (SMW20V) is a freestanding unit. To operate, place food in a microwave-safe container, close the door, select the power level, and set the timer. The timer knob controls cooking time up to 30 minutes. p. 15, 39, 62, 85
Key actions
- Cleaning the oven p. 21, 42, 65, 88
- Troubleshooting p. 25, 46, 69, 92
First start
- Ensure the timer is set to 0 before plugging in the power cord. p. 18, 39, 62, 85
Show 4 more answers Show less
Problems and fixes
Oven does not work
Check power cord and electrical outlet.
p. 25, 46, 69, 92
Oven does not heat
Ensure the door is closed properly.
p. 25, 46, 69, 92Maintenance and reset
- To eliminate lingering odors, heat lemon slices, red tea, or orange zest in a mug on high for 1-3 minutes. p. 21, 42, 65, 88
Technical specifications
| Parameter | Value | Meaning | Pages |
|---|---|---|---|
| Output power | 700W | Microwave power output | p. 23, 44, 67, 90 |
| Capacity | 20 L | Internal volume | p. 23, 44, 67, 90 |
Where to find it in the PDF
- Safety Instructions p. 3, 26, 47, 71
- Installation p. 12, 33, 56, 79
- Product Description p. 15, 36, 59, 82
- Operation p. 18, 39, 62, 85
- Maintenance p. 21, 42, 65, 88
- Troubleshooting p. 25, 46, 69, 92
Table of contents
Manual images
Click an image to enlargeQuick guide from the manual
This manual provides essential instructions for the safe and efficient use of your Schneider 20L microwave oven. Before using the appliance, ensure it is installed on a level surface with adequate ventilation (minimum 30cm above and 20cm on sides). Always use microwave-safe containers and never operate the oven empty.
Product description
The microwave oven consists of the following main components:
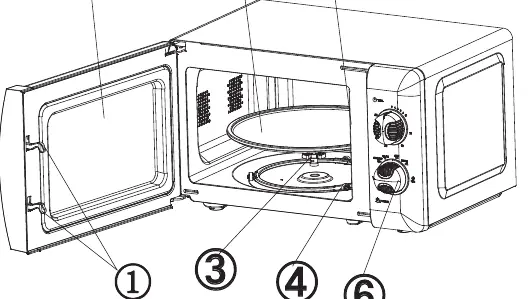
- Door lock: Ensures the oven only operates when the door is properly closed.
- Door glass: Allows for monitoring the cooking process.
- Turntable and guide ring: Supports food for even cooking.
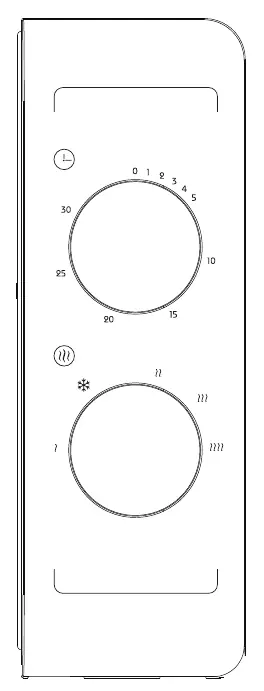
- Control panel: Features a timer knob (up to 30 minutes) and a power level knob.
- Waveguide cover: Protects the internal components; do not remove.
Installation
Follow these requirements for safe installation:
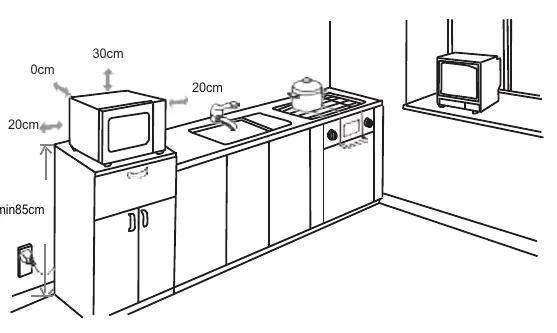
- The minimum installation height is 85 cm.
- The back of the device must be placed against a wall.
- Maintain a minimum gap of 30 cm above the oven and 20 cm between the oven and each wall.
- Do not remove the feet underneath the microwave oven.
- Ensure the oven is as far away as possible from TVs and radios to avoid interference.
Operation
To operate the microwave:
- Plug in the power cord (ensure the timer is set to 0).
- Place food in a suitable container on the turntable and close the door.
- Set the desired power level using the function/power knob.
- Set the timer. If the desired time is less than 10 minutes, turn the knob past the 10-minute mark and then back to the desired time.
- Cooking begins automatically. You can pause by opening the door at any time.
- When finished, the oven will ring and the light will turn off.
Cleaning and maintenance
Regular cleaning is essential to prevent surface deterioration and safety hazards:
- Unplug the appliance before cleaning.
- Clean the exterior with a slightly damp cloth.
- Clean the interior walls, door, and door seals with a soft, damp cloth.
- Wash the turntable, guide ring, and rotary axis with water and mild soap.
- To eliminate lingering odors, place lemon slices, red tea, or orange zest in a mug and heat on high for 1-3 minutes.
Troubleshooting
If you encounter issues, perform these checks before contacting service:
- Oven does not work: Check the power cord connection and the electrical outlet.
- Oven does not heat: Ensure the door is closed tightly.
- Turntable makes noise: Clean the turntable ring and the oven bottom.
Manufacturer information
Schneider Electric
Practical help
Common problems
Oven does not work
Check if the power cord is properly connected or try a different electrical outlet.
Oven does not heat
Ensure the door is closed properly.
Turntable makes noise
Clean the bearing surface of the pan ring casters and the oven bottom.
Before use
- Ensure the timer is set to 0 before plugging in the power cord.
- Do not block the ventilation holes.
- Place food in a suitable container.
- Ensure the turntable and guide ring are correctly positioned.
- Check that the door seals are clean and undamaged.
Show more Show less
Specs in practice
- Power levels
- 5 levels ranging from 120W (Keep warm) to 700W (Quick cooking).
Images and diagrams
- The control panel features a timer knob (up to 30 mins) and a power level knob.
- The interior includes a turntable, guide ring, and rotary axis.
Model compatibility
- Use only microwave-safe containers (glass, ceramic, heat-resistant plastic).
- Never use metal containers as they may cause sparking.

Manual page author
Emily Carter
User documentation editor