Furniture / Home Furnishing
User Guide for Leitner 00-GTA-1844 Gate Keeper
A comprehensive installation and adjustment guide for the Leitner 00-GTA-1844 Gate Keeper. This manual covers tool requirements, hardware identification, rack preparation, step-by-step installation, and safety guidelines for optimal use.
Table of contents
Quick guide from the manual
The Leitner Gate Keeper is an accessory for the ACS Forged rack system. Before installation, it is critical to ensure your rack is square. The installation process involves preparing the rack, installing mounting brackets and lock catches, and finally adjusting the gate keeper panels for a proper fit. Always ensure the rack is on level ground during measurement and adjustment.
Tools Required
- Torque wrench
- T30 Torx bit socket
- T40 Torx bit socket
- 10mm wrench
- 13mm wrench
- Tape measure
Hardware Overview
The kit includes various fasteners and spacers. Ensure you have all parts before beginning: M8x20, M8x14, M6x20, M8x25, M8x50 bolts, M8 locknuts, M6 flange nuts, drop-in nuts, and short/long spacers.
Rack Preparation
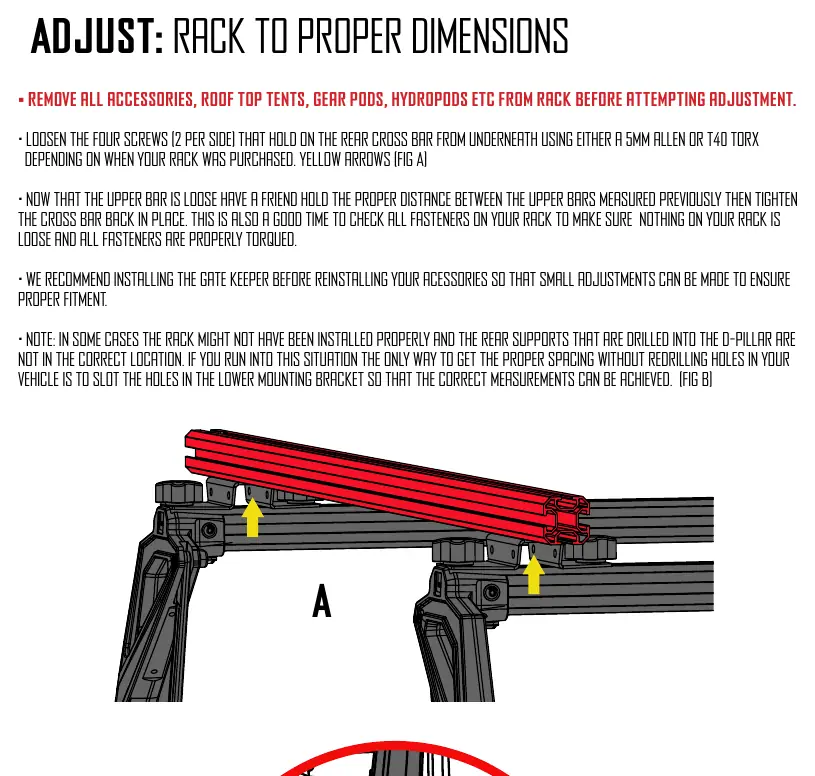
Before installing the Gate Keeper, the ACS Forged rack must be square. Park on level ground and measure the distance between the inside T-slot rails on the passenger and driver sides at the rear. Subtract 14.25 inches from this measurement to determine the required width for the top long bar extrusions. If measurements are off by more than 1/4 inch, you must adjust the rack by loosening the rear crossbar screws.
Installation Steps
Mounting Brackets: Remove the specified bolts from the rack. Install the mounting brackets using the provided M8x25 and M8x50 bolts. Use the short spacer if your rack has a support bar; otherwise, use the long spacer for Toyota Tacomas and No-Drill/No-Slide racks. Torque to 16 ft-lb.
Lock Catches: Install the lock catches on the lower extrusion rail using M8x14 bolts and TrakLok nuts. Ensure the notch on the bracket lines up with the end of the extrusion. Tighten to 16 ft-lb.
Gate Keeper Assembly: Adjust the gate keeper hinges to align with the mounting brackets. Install the assembly to the brackets using M6x20 bolts and M6 flange nuts. Tighten only enough to allow left-to-right movement for final adjustment.
Adjustments
Lock to Latch: Adjust the entire gate keeper panel left or right so the locking pawl fully engages the catch without grinding. Once aligned, tighten all remaining fasteners. Use a T30 Torx and 10mm wrench for M6 screws (10 ft-lb) and a T40 Torx and 13mm wrench for M8 screws (16 ft-lb).
Rubber Stop: Adjust the rubber stop by loosening the jam nut with a 10mm wrench. Move it inward or outward until the latch is tight without movement but still closes with reasonable pressure.
Use Guidelines
- Load Limits: 150 lbs off-road, 300 lbs on-road. Always adhere to the vehicle manufacturer's lower load limit.
- Safety: Periodically inspect all knobs, bolts, and locks for wear or corrosion.
- Driving: Never drive with the rack or locks in an open/unlocked position.
- Maintenance: Use graphite or dry lubricant on locks to ensure smooth operation.
Warranty
Leitner Designs provides a two-year warranty from the date of purchase against defects in material and workmanship under normal use. For warranty claims, contact customer service at 949-395-3049 or email [email protected].
Practical help
Common problems
Rack is not square
Measure the distance between lower rails, subtract 14.25 inches, and adjust the upper bar width accordingly.
Locking pawl does not engage or grinds
Adjust the entire gate keeper panel left or right using the slots in the upper mounting bracket.
Latch is too loose or too hard to close
Loosen the jam nut on the rubber stop and adjust the stop inward or outward.
Before use
- Verify the rack is square on level ground.
- Remove all accessories (tents, pods) before attempting rack adjustments.
- Check all fasteners for proper torque (16 ft-lb for M8, 10 ft-lb for M6).
- Ensure the load does not exceed 150 lbs off-road or 300 lbs on-road.
- Inspect all locks and knobs for signs of wear or corrosion.
Specs in practice
- Installation Time
- Approximately 1 hour.
Images and diagrams
- Assembly Overview: Identifies the left/right panels, lock catches, and mounting brackets.
- Hardware: Displays the various bolts, nuts, and spacers included in the kit.
- Rack Adjustment: Shows where to measure (A and B) to ensure the rack is square.
Model compatibility
- Toyota Tacoma models with floor-bolted supports may skip the rack adjustment step.
- If rear supports are misaligned, you may need to slot the holes in the lower mounting bracket.

Manual page author
Emily Carter
User documentation editor
Prepares concise manual descriptions and highlights the most useful setup, operation, and maintenance information for readers.