Electronics / Monitors
LG LED Monitor Owner's Manual (20MK4, 22MK4, 24MK4, 27MK4 Series)
Comprehensive owner's manual for LG LED Monitors (20MK4, 22MK4, 24MK4, 27MK4 series). Includes instructions for stand assembly, wall mounting, connecting devices, using the joystick button, OSD menu settings, and troubleshooting.
Quick answers from the manual
Quick answer
- The monitor is controlled using a single joystick button located at the bottom center. Press it to turn the monitor on/off, move it left/right for volume, and up/down to access the main menu. p. 6, 16
Key actions
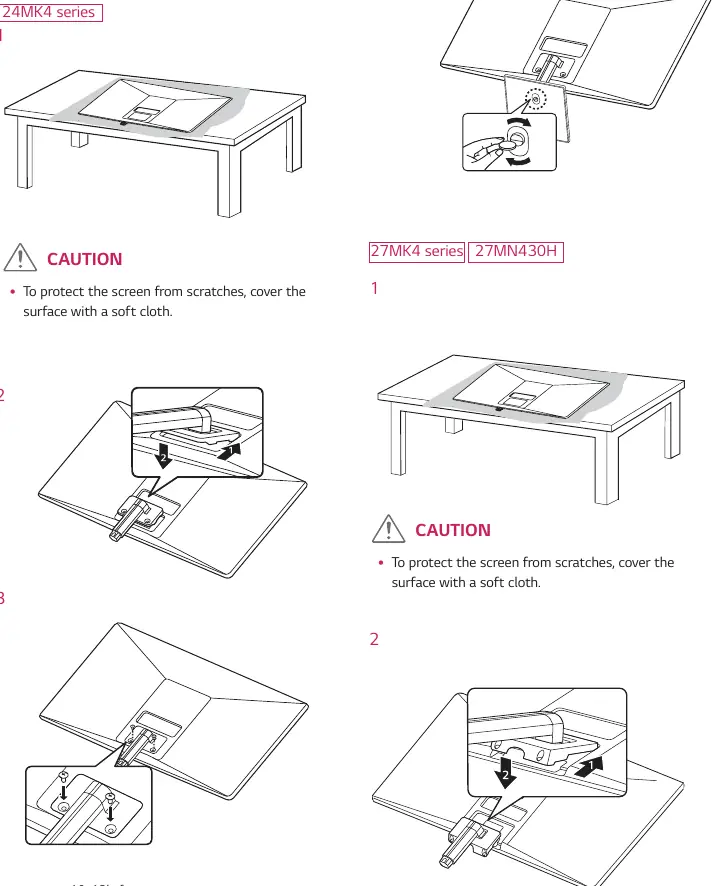
- Assemble the stand by attaching the stand body to the base and securing it to the monitor while it lies face down on a soft cloth. p. 9, 10
- Connect the monitor to a PC using an HDMI or D-SUB cable. p. 14
First start
- Place the monitor on a flat surface, attach the stand, connect the power and signal cables, and press the joystick button to turn it on. p. 9, 11
Show 4 more answers Show less
Problems and fixes
No image appears
Check power connection, signal cable connection, and PC status.
p. 21
Screen flickering
Change resolution to 1080P if currently set to 1080i.
p. 21Maintenance and reset
- Reset settings via the OSD menu: Settings > Picture Reset > Yes. p. 19
Technical specifications
| Parameter | Value | Meaning | Pages |
|---|---|---|---|
| Power Input | 19V | Operating voltage for the monitor. | p. 22, 23, 25, 27 |
| Tilt Range | -5° to 20° | Adjustable tilt angle for the screen. | p. 12, 22 |
Where to find it in the PDF
- Assembly p. 4, 9, 10, 13
- Connections p. 14, 15
- Settings p. 16, 17, 18, 19
- Specifications p. 22, 23, 24, 25
Table of contents
Manual images
Click an image to enlargeQuick guide from the manual
This manual provides instructions for the LG LED Monitor series (20MK4, 22MK4, 24MK4, 27MK4). Key operations include using the joystick button for power and menu navigation, connecting via HDMI or D-SUB, and adjusting display settings via the On-Screen Display (OSD) menu. Always use genuine components to ensure safety and performance.
Assembling and preparing
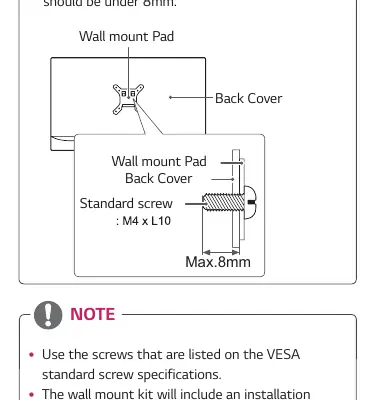
Before using the monitor, ensure all components are included. To assemble the stand, place the monitor face down on a soft cloth to prevent scratches. Attach the stand body to the stand base and secure it to the monitor. For wall mounting, ensure the wall mount bracket meets VESA standards (75x75 or 100x100 depending on the model) and use the correct screw length (under 8mm from the outer surface of the back cover).
Using the monitor
The monitor is controlled via a single joystick button located at the bottom center. Press the button to turn the monitor on, press and hold to turn it off, and move it left/right to adjust volume (HDMI only). Move the joystick up/down to access the main menu and navigate settings.
Connecting devices
- PC Connection: Connect via HDMI or D-SUB cable. The monitor supports Plug & Play.
- AV Devices: Connect via HDMI.
- Peripherals: Connect headphones to the H/P port. Straight-type headphones are recommended.
Customizing settings
Access the main menu by moving the joystick. Features include:
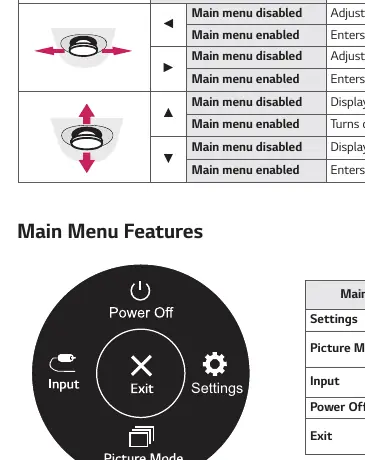
- Picture Mode: Choose from Reader, Photo, Cinema, Color Weakness, or Game modes.
- Game Adjust: Configure Response Time (Normal, Fast, Faster) and FreeSync (on supported models).
- Super Resolution+: Adjust image clarity (High, Middle, Low, Off).
- General: Adjust language, Smart Energy Saving, and OSD Lock.
Troubleshooting
If you encounter issues, check the following:
- No image: Ensure the power cord is connected and the signal cable is secure.
- Out of Range/No Signal: Check the PC's output resolution and frequency settings.
- Flickering: If using HDMI 1080i, change the resolution to 1080P.
- OSD Locked: Unlock by entering the OSD lock menu and setting it to Off.
Manufacturer information
LG Electronics
Practical help
Common problems
No image appears on the screen
Check if the power cord is connected properly and the signal cable between the PC and monitor is secure.
Screen is flickering
If the resolution is set to HDMI 1080i, change it to the recommended 1080P resolution.
Cannot control OSD menu
The OSD may be locked. Enter the OSD lock menu and change the setting to 'Off'.
Monitor is unstable without stand
Do not use the monitor panel without the stand base, as the joystick button may be damaged and the monitor may fall.
Before use
- Check that all components (stand base, stand body, cables) are included in the box.
- Place the monitor face down on a soft cloth during assembly to prevent scratches.
- Ensure the power cord and signal cables are disconnected before moving the monitor.
- Verify that the wall mount bracket meets VESA standards if mounting on a wall.
- Install the recommended Monitor Driver and OnScreen Control software from the LG website.
Show more Show less
Specs in practice
- Recommended Resolution
- The optimal resolution for the display (e.g., 1920 x 1080 @ 60Hz for most models) to ensure clear text and images.
- Response Time
- Adjusts how quickly the screen updates; 'Faster' is recommended for fast-moving content, but may cause motion blur.
Images and diagrams
- Joystick button: Located at the bottom center; used for power, volume, and OSD navigation.
- Connection panel: Located on the back; includes DC-IN, HDMI, H/P (headphone), and D-SUB ports.
- Stand assembly: Shows the orientation of the stand body and base, and the screw locations.
Model compatibility
- FreeSync requires an HDMI connection and a compatible AMD graphics card.
- Macintosh computers may require a separate D-SUB adapter.
- Wall mounts must meet VESA standards; screw length must be under 8mm from the back cover surface.

Manual page author
Michael Turner
Technical manual editor