Lighting / Stage Lighting
User Manual for Light Sky 0118-PIKE 3-in-1 Moving Head Spot Light
Quick guide for the Light Sky 0118-PIKE 3-in-1 moving head spot light. Includes installation, DMX connection, channel configuration, and maintenance instructions.
Table of contents
Manual images
Click an image to enlargeQuick Guide
The Light Sky 0118-PIKE is a professional 3-in-1 moving head spot light. This guide covers essential setup, connection, and operation procedures. Always ensure the unit is installed by a qualified operator and that the installation surface can support 10 times the fixture's weight. A safety cable capable of holding 12 times the weight must be installed.
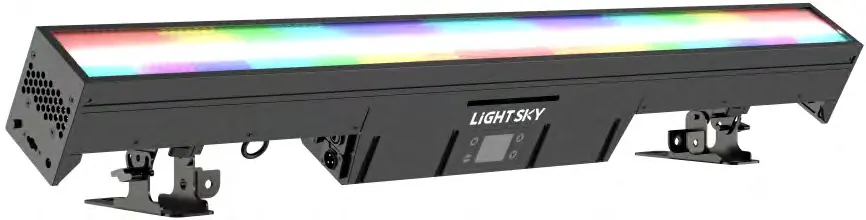
Technical Specifications
- Light Source: 672 x 0.5W RGB LED + 112 x 3W CW LED
- Beam Angle: 71.5°
- Power: 450W (AC 100-240V, 50/60Hz)
- Protection Level: IP66
- Control Protocols: DMX512, RDM, ART-NET
- Dimensions: 1000 x 93 x 225mm
- Weight: 8.8 kg
Installation and Splicing
The fixture must be installed in a well-ventilated area with at least 50cm clearance from adjacent surfaces. To splice multiple lamps together:
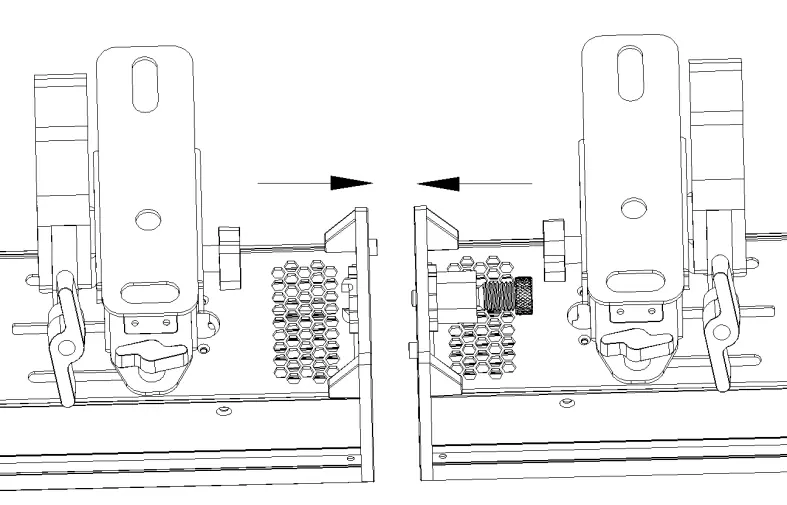

- Align the positioning pin of the lamp with the positioning hole.
- Push the lock pin toward the arrow and rotate it 90 degrees clockwise.
- Turn the hexagon nut clockwise to lock the units together.
Connection and Control
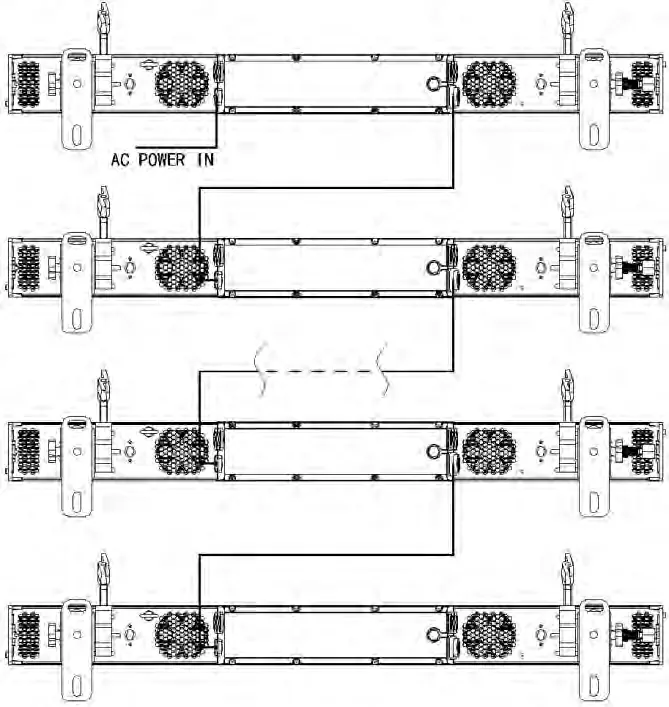
Power Supply: The bus connecting the power supply must be installed by a professional. AC100V allows connecting up to 4 lamps in series; AC220V allows up to 8 lamps in series. Ensure the ground wire is connected to the yellow-green wire.
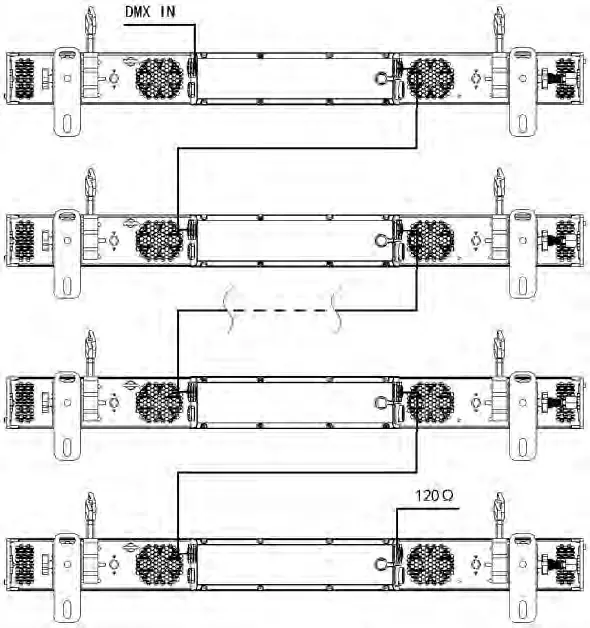
DMX 512 Connection: Connect units in a daisy chain using XLR cables. The last unit in the chain must be terminated with a 120-ohm resistor between pin 2 and pin 3. Do not use Y-cables.
Control Panel Operation
The unit features four capacitive touch buttons. To unlock, press the display prompt before touching the buttons.
- View UID/Version: Press UP in standby.
- View Errors: Press DOWN in standby.
- Change Display Direction: Press UP and DOWN simultaneously.
- DMX Address: Press ENTER, use UP/DOWN to select 001-512, then press ENTER to save.
DMX Channel Settings
The fixture supports multiple channel modes (15CH default, 07CH, 70CH, 117CH, 68CH, 65CH, 33CH, 17CH, 112CH, 39CH, 21CH). Select the desired mode via the DMX settings menu. Refer to the channel configuration tables in the full manual for specific DMX value functions (Red, Green, Blue, White, Dimmer, Strobe, Macros, etc.).
Maintenance and Cleaning
Regular cleaning is essential to ensure maximum light output and reliability. Clean the fixture immediately if dust enters to prevent damage to the optical lens. Use a soft, lint-free cloth with glass cleaning fluid. Do not use solvents. Check air inlets and outlets for debris after performances to prevent fan damage or fire hazards.
Troubleshooting
If the LED is off, check the voltage, power supply, and DMX controller status. If the light does not accept control orders, verify the DMX address, check for cable damage, ensure the signal chain is properly terminated, and consider using a signal amplifier. If the light does not move, inspect for loose internal connections or damaged electrical components.
Practical help
Common problems
LED off
Check if the voltage is suitable, verify if the LED has reached the end of its life, ensure power supply is sufficient, and check if the DMX controller is sending the 'turn on' command.
Light does not accept control orders
Verify the start address and function settings. Check for cable damage or excessive length. Ensure the signal chain is terminated and consider adding a signal amplifier.
Light does not move
Check if the power supply matches the light's voltage data. Inspect for loose internal wires, connectors, or damaged components like the transformer or PCB.
Before use
- Unpack and inspect for transportation damage.
- Ensure the installation surface can hold 10 times the fixture weight.
- Install a safety cable rated for at least 12 times the fixture weight.
- Verify the power source voltage matches the product specifications.
- Ensure at least 50cm of ventilation clearance.
- Ground the yellow/green conductor to earth.
Specs in practice
- Power Factor > 0.96
- Indicates high energy efficiency in power usage.
- Ta: -20°C to 45°C
- Operating ambient temperature range.
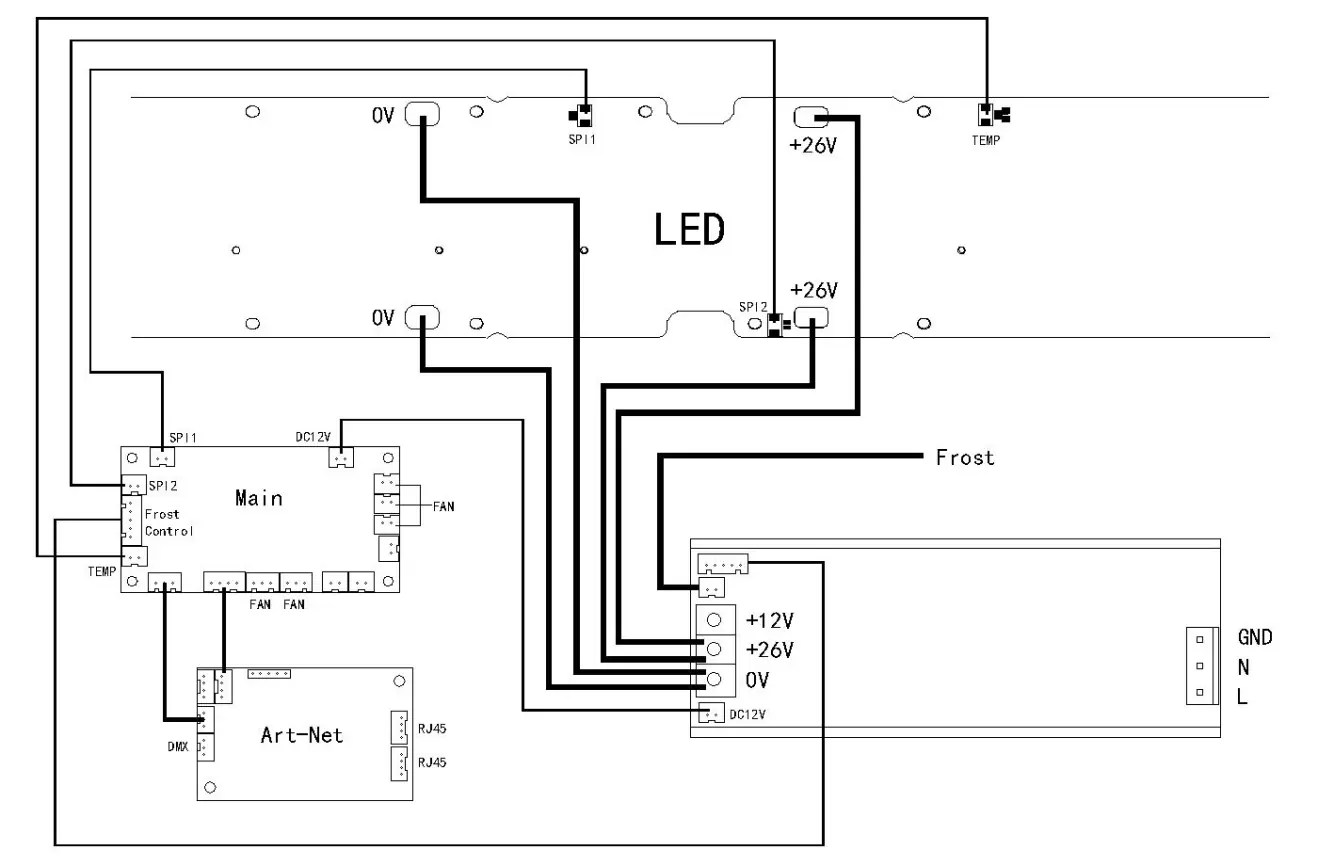
Images and diagrams
- Lamp Splicing: Shows how to align and lock multiple units together using the positioning pin and hexagon nut.
- Power Supply Connection: Illustrates how to daisy-chain power for up to 4 (100V) or 8 (220V) lamps.
- DMX 512 Connection: Demonstrates the daisy-chain signal path and the requirement for a 120-ohm terminator on the last unit.
- Electrical Connection Diagram: Provides a schematic of internal wiring for the main board, LED, and power supply.
Model compatibility
- AC100V: Max 4 lamps in series.
- AC220V: Max 8 lamps in series.
- Do not connect to any dimmer pack.
- Keep at least 1m distance from inflammable objects.

Manual page author
David Miller
Documentation analyst
Organizes user manual content into clear summaries, with attention to model details, product context, and everyday usability.