Lighting / Outdoor Landscape
Installation and User Manual for Lumena DIRECTOR Uplight Brass 240v
Comprehensive installation and maintenance guide for the Lumena DIRECTOR Uplight Brass 240v. Includes wiring instructions, lamp replacement, maintenance tips, and troubleshooting steps for this IP54 rated outdoor spotlight.
Quick answers from the manual
Quick answer
- The Lumena DIRECTOR Uplight is a Class 1, IP54 rated outdoor light. It requires a 30mA RCD protected circuit and must be connected using a waterproof junction box. Always keep the internal silica gel pack to manage condensation. p. 1, 2
Key actions
- Wiring the fitting p. 2
- Replacing the lamp p. 2
First start
- Installation p. 2
Show 4 more answers Show less
Problems and fixes
Fitting not working
Check connections, inspect for damage, replace bulb.
p. 2Maintenance and reset
- Condensation management p. 1, 2
Technical specifications
| Parameter | Value | Meaning | Pages |
|---|---|---|---|
| Voltage | 220-240V | Operating voltage | p. 1 |
| Max Wattage | 50W | Maximum bulb power | p. 1 |
| IP Rating | IP54 | Ingress protection | p. 1 |
Where to find it in the PDF
- Specifications and Warnings p. 1
- Installation and Wiring p. 2
Table of contents
Manual images
Click an image to enlargeQuick Guide
The Lumena DIRECTOR Uplight is a Class 1, IP54 rated outdoor light fitting. It requires connection to a 30mA RCD protected circuit. Always ensure the mains power is switched off before installation or maintenance. The fitting includes a silica gel pack inside the head to manage condensation; do not remove this pack.
Specifications
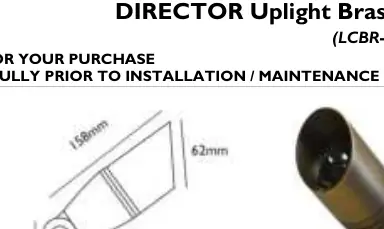
- Voltage: 220-240V
- Max Wattage: 50W
- Bulb Holder: GU10 (lamp sold separately)
- IP Rating: IP54
- Cable: 0.75mm 3 Core H05RN-F (approx. 5m)
- Material: Solid Brass / Toughened Glass
- Weight: Approx. 1.05kg
Installation
General Steps:
- Thread the cable through the mount.
- Screw the fitting onto the threaded base (clockwise). Ensure the cable spins freely to avoid damaging internal connections.
- Install the mount in the desired position.
- Adjust the spotlight angle by loosening the brass serrated clamp joint screw, adjusting the head, and tightening the screw securely. Ensure the glare shield is at the top.
Ground Spike: Dampen the ground before installation. Push the spike firmly into the ground, applying pressure only in line with the mount at the back of the head to avoid damaging the clamp joint.
Surface/Wall Mount: Use the pre-drilled holes as a guide to mark and fix the mount using appropriate screws and wall plugs (not supplied).
Wiring and Connection
Always use a waterproof junction box or a waterproof in-line connector (e.g., Tubecon). If the cable is buried, it must be laid inside armoured conduit or piping and buried at least 0.5m deep to reduce damage risk; failure to do so voids the cable warranty.
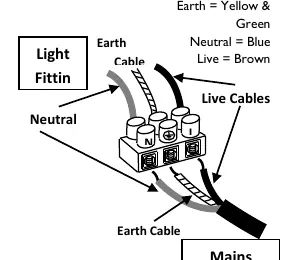
- Earth: Yellow & Green
- Neutral: Blue
- Live: Brown
Ensure all terminals are secure, no stray wires are present, and the junction box is sealed to be watertight.
Lamp Installation and Replacement
- Remove the front cap using a twist and pull action (anti-clockwise).
- Insert the GU10 lamp using a push and lock action. The bulb holder is greased; it is recommended to re-grease during every lamp change.
- Replace the front cap, ensuring o-rings are in place and the fitting is closed evenly.
Maintenance
Occasional cleaning with a soft, slightly damp cloth is recommended. Do not use abrasive cleaners or excessive water. If condensation occurs, turn off the power, remove the front plate, and wipe dry. The silica gel pouch inside the head should be replaced when the light bulb is replaced.
Troubleshooting
If the fitting does not work, ensure the power is off and check the following:
- Verify all connections are correct and secure.
- Inspect the cable and bulb holder for damage.
- Replace the LED bulb, ensuring it does not exceed the maximum wattage.
- If the issue persists after a period of time, check the fitting and junction box for water ingress or damage.
Practical help
Common problems
Fitting does not work after installation
Check that all connections are secure, inspect cable and bulb holder for damage, and ensure the LED bulb does not exceed 50W.
Water ingress or condensation
Ensure the junction box is sealed watertight. If condensation occurs, wipe the inside dry and ensure the silica gel pouch is present.
Before use
- Ensure mains power is switched off.
- Verify a 30mA RCD is fitted on the circuit.
- Check the fitting for any damage.
- Ensure the correct GU10 bulb (max 50W) is used.
- Prepare waterproof junction box or connector.
Show more Show less
Images and diagrams
- Wiring diagram illustrates connection to mains via a waterproof junction box.
- Shows color coding: Yellow/Green (Earth), Blue (Neutral), Brown (Live).
Model compatibility
- Requires GU10 lamp (sold separately).
- Compatible with Ground Spike, Surface Mount, Tree Bracket, Wall Mount, and Extension Poles.

Manual page author
David Miller
Documentation analyst