Lighting / Outdoor Landscape
Installation and User Manual for Lumena Radiata Sleeper Timber Pine Path Light
Comprehensive installation and maintenance guide for the Lumena Radiata Sleeper Timber Pine Path Light. Includes wiring diagrams, mounting instructions, technical specifications, and safety warnings.
Quick answers from the manual
Quick answer
- The Lumena Radiata Sleeper Timber Pine Path Light is a 240V outdoor light that must be root-mounted in concrete or earth. It requires a qualified electrician for installation, must be earthed (Class I), and the supplied non-armoured cable must be protected by conduit. p. 1, 2
Key actions
- Mounting the sleeper p. 2
- Wiring the fitting p. 2
Problems and fixes
Difficulty fitting G9 bulbs
Slightly bend the bulb holders forward for ease and then return to original position.
p. 2Show 3 more answers Show less
Maintenance and reset
- Cleaning p. 1
Technical specifications
| Parameter | Value | Meaning | Pages |
|---|---|---|---|
| Voltage | 220-240v 50Hz | Operating voltage | p. 1 |
| Max Wattage | 35W | Maximum bulb wattage | p. 1 |
| IP Rating | IP65 | Ingress protection rating | p. 1 |
Where to find it in the PDF
- Warnings and Specifications p. 1
- Installation and Wiring p. 2
Table of contents
Quick Guide
The Lumena Radiata Sleeper Timber Pine Path Light is a Class I outdoor lighting fixture designed for root-mounting in concrete or compact earth. This unit must be installed by a qualified electrician in accordance with IEE wiring regulations. The fitting requires a 30mA RCD protected circuit.
Safety Warnings
- Electrical Safety: This is a Class I product and must be earthed. Always switch off the mains supply before installation or maintenance.
- Installation: Must be fitted by a competent and qualified electrician.
- Wiring: The supplied 240v cable is non-armoured and must be installed inside armoured conduit.
- Operation: The unit may get warm during operation. Ensure the correct type and wattage of bulb is used.
Installation
The sleeper is designed to be root-mounted. Follow these steps for proper installation:
- Prepare a mounting hole at least 300mm deep and 300mm in diameter.
- For extra stability, attach a large wood screw into two sides of the sleeper approximately 200mm from the base to act as anchors in wet concrete.
- Connect the fitting to the power supply using a waterproof junction box.
- Ensure all connections are tight and watertight.
- Mount the sleeper into the location using supports to hold it upright. Ensure concrete or earth covers the anchor and at least 100mm above the base.
Wiring
The wiring connections are as follows:
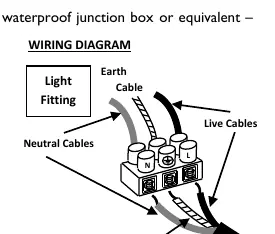
- Neutral (N): Blue
- Live (L): Brown
- Earth: Yellow & Green
Always check that connections are tight and no loose strands are left out of the connection block.
Bulb Replacement
To replace the bulbs:
- Switch off the mains supply and allow the fitting to cool.
- Remove the front plate using the two cross-head brass screws.
- Insert the G9 bulbs (push action). If you have difficulty fitting the bulbs, you may slightly bend the bulb holders forward for easier access, then return them to their original position.
- Replace the front plate, ensuring the foam seal is correctly positioned.
Maintenance
Occasional cleaning and care are recommended. Refer to the manufacturer's website for specific cleaning advice for different materials.
Technical Specifications
- Voltage: 220-240v 50Hz
- Max Wattage: 35W
- Lamp Fitting: 2 x G9 (replaceable, LED recommended)
- IP Rating: IP65
- Mounting: Root mounted in-ground (min 300-400mm depth)
- Height: 0.6m or 1.0m above ground
- Cable: 3 Core Rubber Cable (non-armoured), approx. 1.2m externally
- Materials: Radiata Pine Timber, Brass, Frosted Glass
- Wood Treatment: Pressure treated with Tanalith E (BS8417, Use Class 4)
Practical help
Common problems
Difficulty fitting G9 bulbs
Slightly bend the bulb holders forward to provide more space, then return them to their original position after insertion.
Cable protection
The supplied cable is non-armoured and must be installed inside armoured conduit to comply with wiring regulations.
Before use
- Ensure the mains supply is switched off.
- Verify the circuit has a 30mA RCD fitted.
- Check that you have identified the supply wires correctly (Neutral, Live, Earth).
- Ensure the mounting hole is at least 300mm deep.
- Verify the foam seal is in place before securing the front plate.
Show more Show less
Images and diagrams
- The wiring diagram illustrates the connection of the Mains Power cable to the Light Fitting via a connection block.
- It highlights the specific color coding: Neutral (Blue), Live (Brown), and Earth (Yellow/Green).
Model compatibility
- Compatible with G9 bulbs (LED recommended).
- Requires 240V 50Hz power supply.

Manual page author
Michael Turner
Technical manual editor