Lighting / Outdoor Landscape
Lumena Smartspike 60 Spotlight User Guide
Quick guide for the Lumena Smartspike 60 spotlight. Includes installation instructions, wiring diagrams, bulb replacement, maintenance tips, and technical specifications.
Quick answers from the manual
Quick answer
- The Lumena Smartspike 60 is an adjustable outdoor spotlight requiring professional installation. It must be earthed (Class 1) and connected to a 30mA RCD. Use a waterproof junction box and protect buried cables with armoured conduit. p. 1, 2
Key actions
- Install the spike into the ground without pushing on the head. p. 2
- Connect to mains using a waterproof junction box. p. 2
First start
- Ensure the silica gel pouch is inside the head before first use. p. 1, 2
Show 4 more answers Show less
Problems and fixes
Condensation build-up
Turn off power, remove cap, wipe dry, and replace silica gel pouch.
p. 2Maintenance and reset
- Replace silica gel pouch when changing the bulb. p. 1
Technical specifications
| Parameter | Value | Meaning | Pages |
|---|---|---|---|
| Voltage | 220-240v 50Hz | Operating voltage | p. 1 |
| Max Wattage | 35w | Maximum bulb power | p. 1 |
| IP Rating | IP65 | Ingress protection rating | p. 1 |
Where to find it in the PDF
- Warnings and Specifications p. 1
- Wiring and Installation p. 2
Table of contents
Manual images
Click an image to enlargeQuick guide from the manual
The Lumena Smartspike 60 is an outdoor spotlight designed for garden and landscape lighting. This guide covers essential installation, wiring, and maintenance procedures to ensure safe and long-lasting operation. Always ensure installation is performed by a qualified electrician in accordance with IEE wiring regulations.
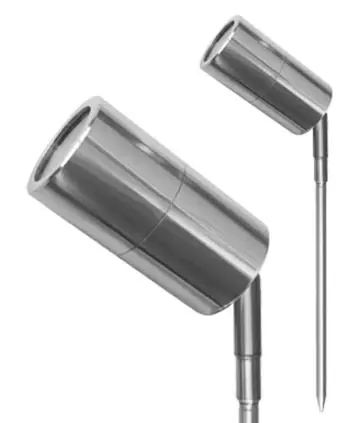
Safety and Installation
- Electrical Safety: This is a Class 1 product and must be earthed. It must be connected to a circuit with a 30mA RCD fitted.
- Installation Warning: Do not install the unit into the ground by pushing on the head of the product, as this can cause damage. Use the spike to secure it.
- Mounting: Connect the spike to the collar by screwing it clockwise. If using an extension rod, connect it between the collar and the spike. Dampen the ground before inserting the spike to the desired depth.
Wiring and Connection
Always use a waterproof junction box or Tubecon connector for mains supply connections.
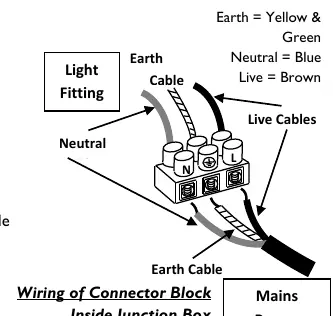
- Armoured Conduit: If the cable is buried, it must be laid inside armoured conduit or piping at a depth of at least 0.5m to prevent damage.
- Wiring Diagram: Ensure all terminals are secure with no stray wires. Connections must be watertight.
- Wiring Colors: Earth (Yellow & Green), Neutral (Blue), Live (Brown).
Lamp Installation and Replacement
- Unscrew the cap (top section) of the spotlight head.
- Insert the GU10 bulb into the greased bulb holder using a push and twist locking action.
- Ensure the silica gel pouch remains inside the head to prevent condensation. Replace the pouch if necessary.
- Check the white rubber o-ring for damage or twisting to ensure a watertight seal. Replace if damaged.
- Replace the cap and tighten securely.
Maintenance and Care
Condensation inside the fitting is inevitable due to temperature changes. The included silica gel pouch collects moisture. It is recommended to replace the silica gel when changing the bulb. If excess water is noticed, turn off the power, remove the cap, wipe dry with a soft cloth, and replace the silica pouch.
Technical Specifications
- Voltage: 220-240V 50Hz
- Max Wattage: 35W
- Bulb Holder: GU10 (LED recommended)
- IP Rating: IP65
- Cable: 3 core rubber cable 0.75mm (2m or 5m)
- Head: Adjustable
Practical help
Common problems
Condensation inside the fitting
This is normal. Ensure the silica gel pouch is inside. If excessive, turn off power, remove cap, wipe dry, and replace silica gel.
Electrical short
Ensure all connections are made in a waterproof junction box and are as watertight as possible.
Before use
- Ensure installation is performed by a qualified electrician.
- Verify the circuit has a 30mA RCD fitted.
- Use a waterproof junction box or Tubecon connector.
- Use armoured conduit if burying the cable (min 0.5m depth).
- Check that the silica gel pouch is inside the head.
Show more Show less
Images and diagrams
- The wiring diagram illustrates the connection of the light fitting to the mains power using a junction box.
- It highlights the correct wiring colors: Earth (Yellow/Green), Neutral (Blue), and Live (Brown).
Model compatibility
- Compatible with GU10 bulbs.
- Will accommodate longer than average GU10 bulbs.
- Shorter bulbs may not provide the stated beam angle.

Manual page author
Emily Carter
User documentation editor