Lighting / Outdoor Landscape
Lumena AlvaLED 10W/15W LED Spike Light User Manual
Quick guide for installing and maintaining the Lumena AlvaLED 10W/15W LED Spike Light. Includes wiring instructions, mounting steps, and technical specifications.
Table of contents
Manual images
Click an image to enlargeQuick Guide
The Lumena AlvaLED is a 240V outdoor LED spike light. This guide covers the essential installation and maintenance steps. Always ensure the unit is installed by a competent and qualified electrician in accordance with IEE wiring regulations. The fitting must be connected to a circuit with a 30mA RCD.
Specifications
- Voltage: 220–240V 50Hz
- Wattage: 10W / 15W
- IP Rating: IP65 (Dust tight and protected against water jets)
- LED Life Expectancy: 30,000 hours
- Beam Angle: 10° / 38°
- Materials: Aluminium & Tempered Glass
- Mounting: Surface Mount (U-bracket) or Spike (350mm)
Wiring and Connection
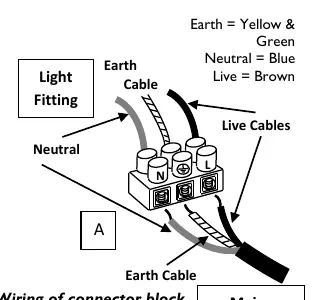
Always use a waterproof junction box or inline connector to connect the fitting to the mains power supply.
- Decide on the positioning of the spike light.
- Locate the mains electrical supply (pre-installed armoured cable).
- Connect the fitting to the mains supply via a waterproof junction box or inline connector.
- Ensure all terminals of the connector block are secure with no stray wires and that the connection is watertight.
- The cable supplied is not armoured; it must be laid inside armoured conduit or piping if buried to protect from water-logging and damage. If buried, it should be at least 0.5m below ground.
Adjusting the Spotlight Head
The head can be adjusted and set at various angles via the U-bracket.
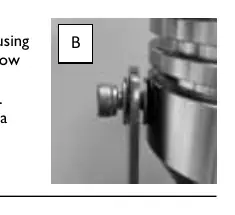
- Support the head and loosen the 2 socket screws on each side of the U-bracket using the provided socket wrench (turn anti-clockwise, 1/2 turn is sufficient).
- Angle the head to the desired position.
- Tighten the screws to secure the head in place.
Spike Mounting
- Tilt the spotlight head to create room between the head and bracket.
- Remove the socket screw and washer from the ground spike using the socket wrench.
- Place the spike underneath the U-bracket, lining up with the predrilled holes.
- Secure the spike to the bracket with the socket screw and washer.
- Dampen the ground in the installation area.
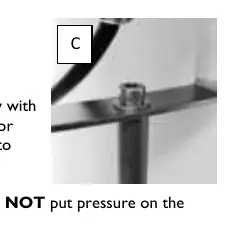
- Carefully push the spike into the ground via the U-bracket base. Do not put pressure on the spotlight head.
- Compact the earth around the spike to ensure it is firm.
Surface Mounting
- Tilt or remove the spotlight head to create room.
- Hold the bracket in position and mark the mounting location.
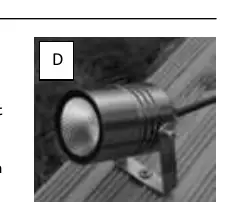
- Attach the bracket to the surface using appropriate screws/washers for the material (not supplied).
- Reattach the head if it was removed and adjust to the desired angle.
Cleaning and Maintenance
Occasional cleaning is recommended. If condensation occurs due to temperature differences, turn off the power supply on a dry day, remove the head, and wipe dry with a soft cloth. Always allow the unit to cool before maintenance.
Returns and Support
If purchased from a 3rd party, contact your supplier. For direct purchases, contact Lumena Lights Ltd at +44 1327 871161 or email [email protected].
Practical help
Common problems
Condensation inside the fitting
On a dry day, turn off the power, remove the head, and wipe dry with a soft cloth.
Fitting damaged
Cease use immediately.
Cable damage risk
If buried, the cable must be in armoured conduit at least 0.5m below ground.
Before use
- Ensure the power is switched off at the mains.
- Verify the circuit has a 30mA RCD fitted.
- Ensure the installation is performed by a qualified electrician.
- Check that the junction box or connector is waterproof.
- Ensure the cable is protected if buried.
Images and diagrams
- Wiring diagram shows the connection of Earth (Yellow/Green), Neutral (Blue), and Live (Brown) wires inside a junction box.
- Adjustment diagram shows the U-bracket screws that need to be loosened to tilt the head.
- Spike mounting diagram shows the bolt connection between the spike and the U-bracket.
- Surface mounting diagram shows the bracket fixed to a flat surface.
Model compatibility
- Recommended maximum 12-15 fittings per circuit.
- Not suitable for installation by pushing the head of the product into the ground.

Manual page author
Emily Carter
User documentation editor
Prepares concise manual descriptions and highlights the most useful setup, operation, and maintenance information for readers.