Lighting / Outdoor Lighting
User Manual for Lumena Durasol 12V Solar Panel System
Quick guide for the Lumena Durasol 12V Solar Panel System. Includes installation steps, remote control settings, indicator light meanings, and maintenance tips.
Table of contents
Manual images
Click an image to enlargeQuick Start Guide
For optimal performance, charge the battery for one full day prior to initial use. Ensure the solar panel is mounted in a sunny, south-facing position, free from obstructions and artificial light sources that could interfere with the sensor.
Specifications
- Output: 9-12v DC (Constant Voltage)
- Max Wattage: 30W
- Battery: Lithium LiFePO4 3.2v/42Ah (replaceable)
- Solar Panel: 5v / 50W Monocrystalline (Grade A)
- IP Rating: IP65
- Working Temperature: -25°C to 60°C
- Remote Control Range: Up to 3m (infrared)
Installation
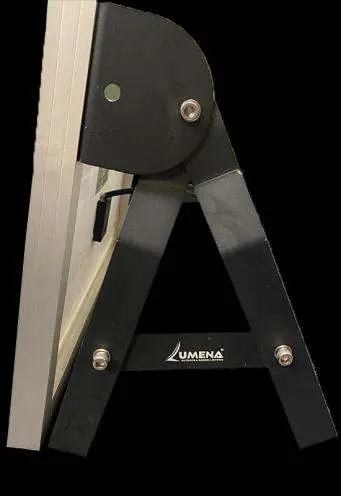
- Attach the panel mounting bar with the battery box to the solar panel using the provided M6 bolts, washers, and nuts.
- Remove the M6 bolts from the side of the mounting bar.
- Attach the two main legs of the A-frame to each side of the mounting bar.
- Secure the A-frame using the shorter center support bars and provided hardware.
- Attach the controller to the mounting bar, ensuring cables face backwards.
- Connect the battery cable (BATT) from the controller to the battery box using the plug & play connector.
- Connect the solar panel cable (PV) from the controller to the solar panel.
- Hard wire the 12v DC LED lighting circuit to the controller's LED cable (Brown = Live, Blue = Neutral) or use the optional plug & play splitter.
Settings and Remote Control
Point the remote control at the receiver on the side of the panel within a 3m range. The system features a memory function, meaning the selected mode remains active until changed. The override OFF function only applies to one switch cycle.
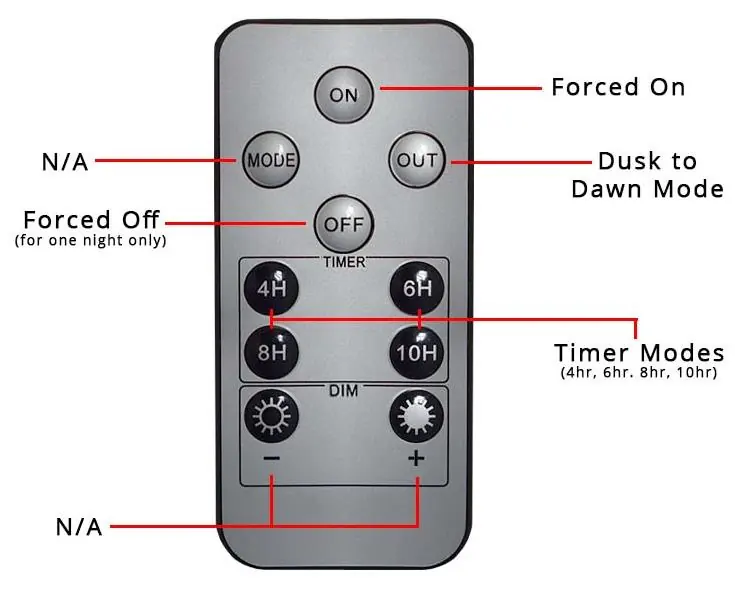
- Forced On: Manually turns the light on.
- Dusk to Dawn: Automatic operation based on light levels.
- Timer Modes: 4hr, 6hr, 8hr, 10hr settings.
- Forced Off: Turns the light off for one night only.
Indicator Lights
The system includes three indicator lights to monitor status:
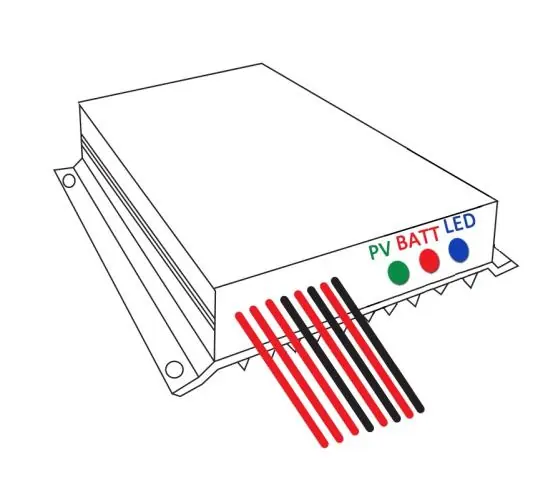
- Green (Solar Panel): Flashing indicates charging; Solid indicates inability to charge (dull weather); Off indicates Override Off mode.
- Red (Battery): Solid indicates sufficient charge; Slow flash indicates very low battery; Fast flash indicates short circuit; Off indicates fully discharged or Override Off mode.
- Blue (LED): Solid indicates LED output active; Off indicates no output or Override Off mode.
Maintenance and Storage
Clean the solar panel and receiver regularly with a soft, slightly damp cloth to maintain efficiency. Keep the panel free of debris and snow. For long-term storage, turn off and disconnect all electrical components. Maximum storage is 6 months when fully charged; recharge periodically to prevent battery damage.
Practical help
Common problems
Solar panel not charging
Ensure the panel is not behind glass or exposed to artificial light, which can force the light off.
LED not working
Check if the system is in 'Override Off' mode, check battery charge status via the red indicator light, or verify all connections are secure.
Battery low / not holding charge
Ensure the panel is in a sunny, south-facing position. Charge for a full day before use.
Before use
- Charge the battery for one full day prior to first use.
- Ensure the solar panel is mounted in a sunny, south-facing position.
- Verify there are no obstructions or artificial lights near the panel.
- Check that all connections are fully fastened and secure.
- Ensure the panel is securely mounted using pegs or anchor bolts.
Specs in practice
- Dusk to Dawn
- The light automatically turns on at sunset and off at sunrise.
Images and diagrams
- The remote control diagram illustrates the buttons for Forced On, Forced Off, Dusk to Dawn mode, and specific Timer modes (4H, 6H, 8H, 10H).
- The indicator light diagram shows the status LEDs for PV (Solar Panel), Battery, and LED output.
Model compatibility
- Optional Surface Mount Bracket available for wall or pergola mounting.
- Plug & Play version available with 3m cable and 3-way splitter.

Manual page author
David Miller
Documentation analyst
Organizes user manual content into clear summaries, with attention to model details, product context, and everyday usability.