Lighting / Outdoor Landscape
Installation Guide for Vista 2216-IK Landscape Luminaire
Comprehensive installation guide for the Vista 2216-IK low voltage landscape luminaire. Includes safety warnings, mounting instructions, wiring procedures, and technical specifications.
Quick answers from the manual
Quick answer
- The Vista 2216-IK is a low voltage landscape luminaire. Installation involves mounting the ground stake, connecting the 18-2 pigtail to the main supply using silicone-filled connectors, and adjusting the aiming and rotation using the provided screws. p. 1
Key actions
- Mounting the luminaire p. 1
- Adjusting aiming angle p. 1
Technical specifications
| Parameter | Value | Meaning | Pages |
|---|---|---|---|
| Operating Voltage | 9 - 15 volt AC | Voltage range for LED driver | p. 1 |
Show 1 more answers Show less
Where to find it in the PDF
- Installation Instructions p. 1
Table of contents
Important Safety and Installation Guidelines
Before installing the Vista 2216-IK luminaire, ensure that the electrical supply is turned off at the circuit breaker. This product is designed for use only with low voltage landscape power units that do not exceed 25 Amps and 15 Volts maximum. Installation must comply with the National Electrical Code (NEC) and local codes.
Safety Warnings:
- Do not install luminaires within 10 feet (3.05m) of a pool or spa.
- Secondary cable must not be buried more than 6 inches deep.
- The luminaire can become very hot depending on the lamp wattage used; avoid locations where small children can reach the fixture.
- Always use UL-recognized wire connectors for connections.
- Do not use extension cords on power units.
Luminaire Mounting
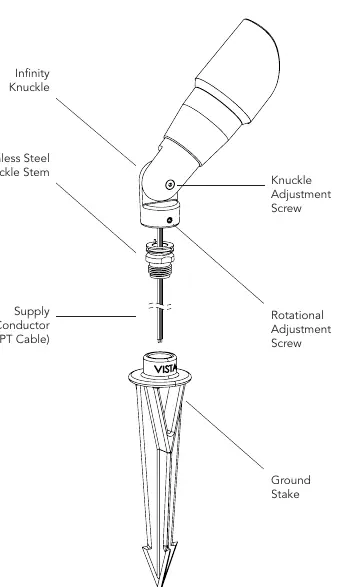
- Ensure the electrical supply is off.
- Run the wire pigtail from the luminaire through the mounting hole in the top of the ground stake.
- Thread the stainless steel knuckle stem into the threaded hole in the ground stake.
- Place the stake in the desired position and insert it into the ground until the flange of the stake is flush with the grade.
- Strip the two leads from the luminaire pigtail. Connect these leads to the main supply cable leads using the provided silicone-filled safety connectors.
Wiring and Adjustments
The luminaire is supplied with 36 inches of 18-2 cable pigtail. The wire should be protected by routing it in close proximity to the luminaire and buried to a maximum depth of 6 inches (15.2 cm).
Adjusting the Luminaire:
- Aiming Angle: Loosen the adjustable knuckle screw (do not disengage completely), hold the luminaire at the desired angle, and tighten the screw firmly.
- Rotational Direction: Loosen the rotational adjustment screw, rotate the fixture to the desired position, and tighten the screw.
Technical Specifications
The operating voltage range for this LED luminaire is 9 - 15 volts AC. The Vista electronic driver ensures the LED operates at the intended lumen output while receiving voltage as low as 10.5 volts and as high as 15 VAC, which is the U.L. allowed maximum. This helps eliminate dimness issues often attributed to voltage drop.
Practical help
Common problems
Luminaire appears dim
Ensure the voltage is within the 9-15V AC range. The electronic driver is designed to balance lumen output, but verify the input voltage at the fixture.
Heat hazard
If using high-wattage lamps, ensure the fixture is not located where small children can touch the lens or metal housing.
Before use
- Verify electrical supply is off at the circuit breaker
- Confirm power unit does not exceed 25 Amps
- Ensure installation site is at least 10 feet away from pools or spas
- Check that wire burial depth does not exceed 6 inches
- Verify use of UL-recognized wire connectors
Show more Show less
Specs in practice
- Operating Voltage
- 9-15V AC range required for proper LED driver operation
- Cable Pigtail
- 36-inch 18-2 cable provided for connection to main supply
Images and diagrams
- The diagram illustrates the assembly of the ground stake, the rotational adjustment screw, the knuckle adjustment screw, and the luminaire head.
Model compatibility
- Compatible with low voltage landscape power units up to 25 Amps and 15 Volts maximum.

Manual page author
David Miller
Documentation analyst