HVAC / Ventilation Systems
Installation and Wiring Guide for Vent-Axia NBR DMEVe Continuous Extract Fan
Quick installation and configuration guide for the Vent-Axia NBR DMEVe continuous extract fan. Includes wiring diagrams, setup instructions for the commissioning menu, and troubleshooting tips for airflow and calibration.
Table of contents
Manual images
Click an image to enlargeQuick guide from the manual
The Vent-Axia NBR DMEVe is a continuous extract fan designed for kitchens, utility rooms, bathrooms, and toilets. Installation must be performed by a suitably qualified person in accordance with current I.E.T. regulations. The fan is suitable for installation in Zones 1 & 2 and requires a local isolator switch with at least 3mm contact separation. Note that this is a Class II double-insulated product and must not be earthed.
Installation
The fan can be wall, window (100mm only), or panel mounted. Ensure the impeller rotates freely after installation.
Panel / Interior Wall Mounting
- 100mm fans: Cut a 107mm diameter hole.
- 125mm fans: Cut a 130mm hole.
- Use the built-in spirit level bubble to ensure correct alignment before drilling and fixing.
Exterior Wall Mounting
- 100mm fans: Cut a 117mm diameter hole.
- 125mm fans: Cut a 140mm hole.
- Insert the wall sleeve, sloping it slightly downwards away from the fan to prevent water ingress.
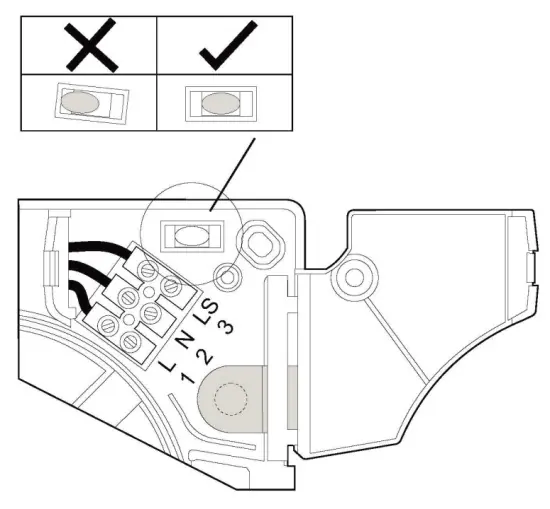
Wiring
Warning: The fan and ancillary control equipment must be isolated from the power supply during installation or maintenance. Use supply cord with a cross-sectional area between 0.75mm² and 1.5mm².
Setup and Commissioning
To configure the fan, remove the front grille to access the control buttons. Do not isolate the fan from the power supply during configuration as it requires power to operate the menu.
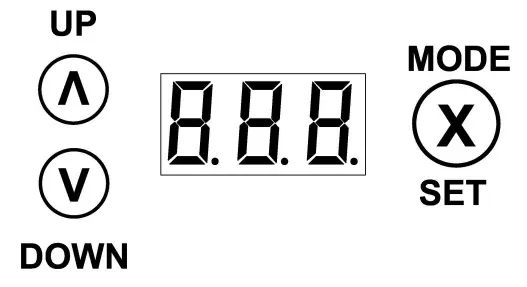
- Standard Menu: Press any button from normal runtime.
- Advanced/Engineer Menu: Hold the Up and Mode/Set buttons for 5 seconds from the standard menu.
- Prism Mode: When activated, the display mirrors characters for viewing through the prism in the fan cover.
- Calibration: In CV (Constant Volume) mode, the fan automatically calibrates after the first 15 minutes of operation.
Maintenance
The fan features sealed-for-life bearings that do not require lubrication. Periodically inspect and clean the inlets and front face with a damp cloth. Be careful not to push dirt into the airflow sensor.
Practical help
Common problems
Fan speeding up and down
This is often due to external wind conditions. If it becomes a nuisance, change the fan setting from F-2 to F-1 or F-0.
Fan moving too much or too little air
Check if the speed is set correctly. If the fan was calibrated during windy conditions, reset by changing F-2 to F-0, power cycling, and then returning to F-2.
Fan displays ERR during calibration
This is likely due to wind pressure during initial startup. Power cycle the fan when external wind conditions are calmer.
Before use
- Ensure installation is performed by a qualified person.
- Verify the mains supply voltage and frequency match the rating label.
- Ensure a local isolator switch with 3mm contact separation is installed.
- Check that the impeller rotates freely after mounting.
- Ensure the fan is not installed in areas with excessive oil, grease, or corrosive gases.
- Confirm the ambient temperature is between -5°C and 40°C.
Images and diagrams
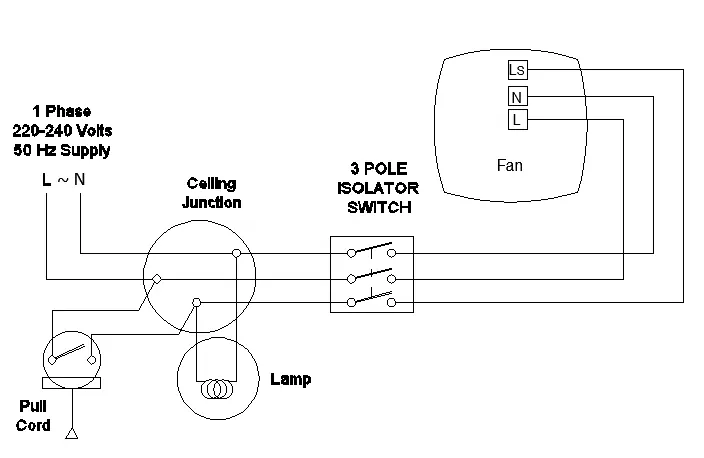
- Fig 1: Continuous trickle wiring diagram.
- Fig 2: Continuous boost 1 (no trickle) wiring diagram.
- Fig 3: Continuous trickle with boost facility wiring diagram.
- Fig 4: Grille removal and control button access.
Model compatibility
- 100mm models can be window mounted; 125mm models cannot.
- CV (Constant Volume) mode is available on Pro models only.
- Use only appropriate Vent-Axia accessories.

Manual page author
David Miller
Documentation analyst
Organizes user manual content into clear summaries, with attention to model details, product context, and everyday usability.