Electronics / TV Accessories
Installation Manual for Matchmaster 04MM-TB08 Full-Motion TV Wall Mount
Quick installation guide for the Matchmaster 04MM-TB08 full-motion TV wall mount. Includes mounting steps for wood studs and concrete walls, VESA compatibility, and adjustment instructions.
Table of contents
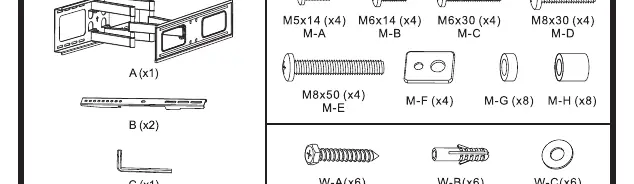
Manual images
Click an image to enlargeQuick guide from the manual
The Matchmaster 04MM-TB08 is a full-motion TV wall mount designed for screens up to 80 inches. It supports a maximum weight of 50kg (110lbs) and is compatible with VESA patterns ranging from 200x200 to 600x400. Ensure the wall structure is capable of supporting the combined weight of the mount and the TV before installation.
Safety warnings
- Do not exceed the maximum weight capacity of 50kg.
- Professional installation is recommended.
- Ensure the wall surface is capable of supporting the combined weight of the equipment and all attached hardware.
- Use the provided mounting screws and do not overtighten them.
- Keep small parts away from children to prevent choking hazards.
- Check the bracket and secure it at least every three months.
Installation
The installation process varies depending on the wall type:
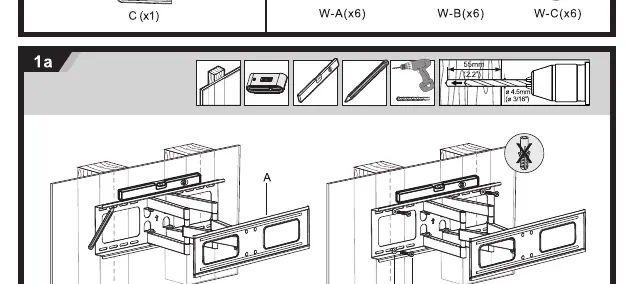
Wood stud installation
For wood stud walls, ensure the mount is centered on the stud. Drill pilot holes to a depth of 55mm (2.2 inches) using a 4.5mm (3/16 inch) drill bit. Secure the wall plate using the provided hardware.
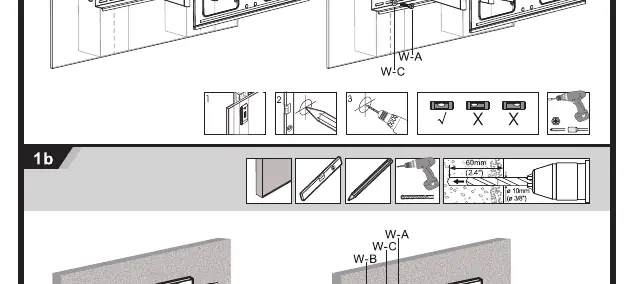
Concrete or brick installation
For concrete or brick walls, drill pilot holes to a depth of 60mm (2.4 inches) using a 10mm (3/8 inch) drill bit. Insert the appropriate wall anchors before securing the wall plate.
Attaching the TV
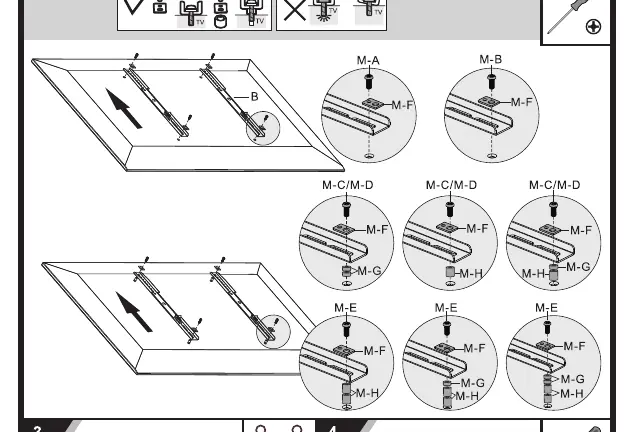
Attach the mounting brackets to the back of the TV using the appropriate screws (M5, M6, or M8) and spacers (M-F, M-G, M-H) provided in the kit. Ensure the brackets are centered and securely fastened.
Adjustments
Once the TV is hung on the wall plate and secured, you can adjust the viewing angle. The mount allows for a tilt range of +10° to -20° and a swivel range of +/- 3°. Use the provided tool (C) to tighten or loosen the adjustment screws to achieve the desired position.
Manufacturer information
Matchmaster Communications Pty Ltd
Practical help
Common problems
TV feels unstable or loose
Check that all mounting screws are tightened properly and that the wall plate is securely anchored to the wall structure.
Mounting screws do not fit the TV
The kit includes various screw sizes (M5, M6, M8). Ensure you are using the correct size for your TV's VESA mounting holes.
Wall anchors are loose in concrete
Ensure the hole was drilled to the correct depth (60mm) and diameter (10mm). Do not use oversized holes.
Before use
- Verify the TV weight is under 50kg (110lbs).
- Confirm the TV VESA pattern matches the mount (200x200 to 600x400).
- Check that the wall structure is solid (wood stud or concrete/brick).
- Ensure all parts listed in the manual are present.
- Have a drill, screwdriver, and level ready for installation.
Specs in practice
- Max Weight: 50kg (110lbs)
- The absolute maximum load the mount can safely support.
- VESA Compatibility
- The distance between mounting holes on the back of the TV. This mount supports 200x200, 300x300, 400x200, 400x400, and 600x400.
Images and diagrams
- Step 1a illustrates the wood stud installation process, highlighting the 55mm drill depth.
- Step 1b illustrates the concrete/brick installation process, highlighting the 60mm drill depth and anchor usage.
- Step 2 shows the correct combination of screws and spacers for attaching brackets to the TV.
Model compatibility
- Designed for indoor use only.
- Not suitable for mounting on metal studs or drywall without proper reinforcement.

Manual page author
Michael Turner
Technical manual editor
Reviews PDF manuals for structure, safety notes, and practical product details so readers can find the right information quickly.