Health / Medical Devices
User Manual for MicroTouch DT-190P-M1 Medical Grade Touch Monitor
Quick guide for the MicroTouch DT-190P-M1 medical-grade touch monitor. Includes setup, OSD menu navigation, mounting instructions, and troubleshooting steps.
Table of contents
Manual images
Click an image to enlargeQuick Guide
The MicroTouch DT-190P-M1 is a 19-inch medical-grade touch monitor. To get started, connect the power supply, video cable (HDMI, DP, or VGA), and the USB cable for touch functionality. The monitor is plug-and-play for most modern operating systems including Windows 7+, Linux, and Android.
Safety Instructions
- Do not expose the product to moisture to prevent fire or shock hazards.
- Do not open or disassemble the monitor.
- Ensure the AC power cord is connected to a grounded outlet.
- Disconnect the power plug if the monitor will not be used for an extended period.
- Avoid operating in extremely hot, cold, or humid environments, or near strong magnetic fields.
Installation
Ensure there is at least 10 cm of clearance around the monitor for proper ventilation. Do not block vents or cover the monitor. Use only the provided power supply. Do not move the monitor while it is connected to power or AV cables.
Product Setup
Connect the 12V DC power cable to the monitor. Use the included USB cable to connect the touch output to your computer. For video, you may use DisplayPort (DP), HDMI, or VGA. DP and HDMI are preferred as they are digital signals.
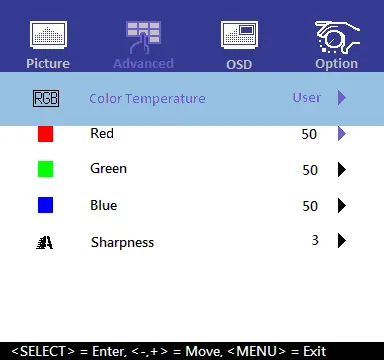
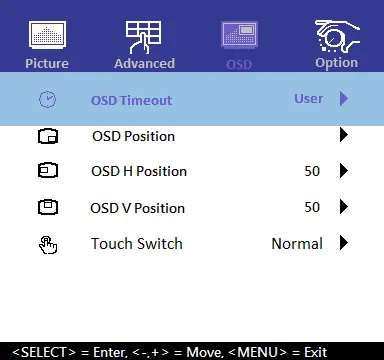
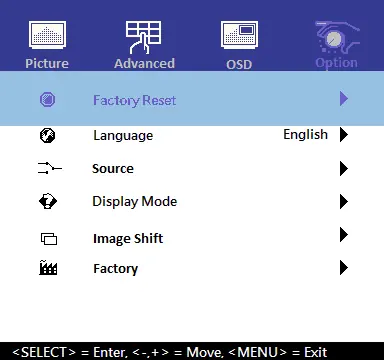
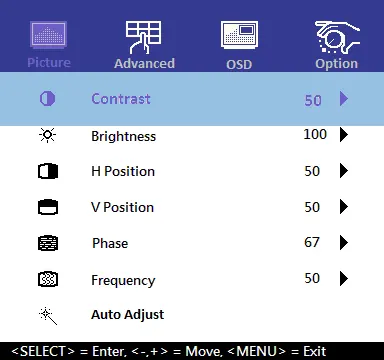
On-Screen Display (OSD)
The OSD controls are located on the right rear side of the monitor. Use the MENU button to activate the menu, and the arrow buttons to navigate and adjust settings. You can lock the OSD and power button functions by holding the Select button for 5 seconds until the Lock menu appears.
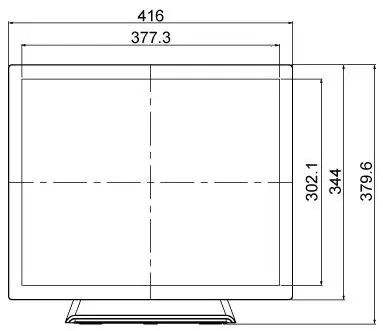
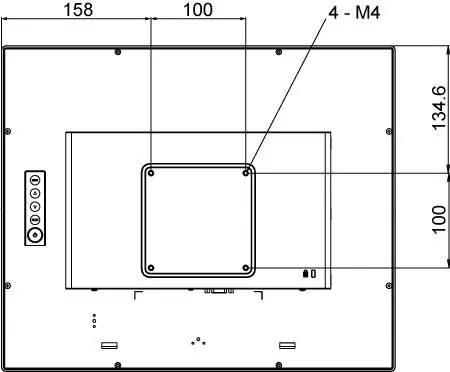
Mounting
The monitor supports a 100mm x 100mm VESA mount. When mounting, use four M4 diameter screws with an 8mm length to ensure a secure fit without damaging the internal components.
Cleaning
Turn off and disconnect the monitor before cleaning. Use a soft, dry cloth to clean ventilation areas. For the screen, use a soft cloth with a glass cleaning solution; do not spray directly onto the screen. Avoid volatile solvents, waxes, or abrasive cleaners.
Troubleshooting
- No image: Check power connections, ensure the video source is on, and verify the correct input is selected.
- Dim display: Use OSD controls to increase brightness and contrast.
- Out of Range message: Occurs with VGA; switch to HDMI or DP, or reduce resolution.
- Touch not working: Ensure the USB cable is connected, remove any protective sheets, and ensure the monitor is in an upright position.
Specifications
- Size: 19-inch TFT LCD
- Resolution: 1280 x 1024
- Video Ports: VGA, HDMI, DP
- Power: 12V DC, 5A max
- Operating Temperature: 0°C to 40°C
- Front Seal: IP54 standard
Practical help
Common problems
No image on monitor
Check that the video source is on, the correct input is selected, and all cables (power, video, USB) are securely connected.
Monitor display is dim
Use the OSD menu controls to increase the brightness and contrast settings.
Out of Range message
This typically occurs with VGA input. Switch to HDMI or DisplayPort, or reduce the computer's resolution to a supported setting.
Touch functionality not working
Ensure the USB cable is properly connected, remove any protective plastic sheets from the screen, and ensure the monitor is upright.
Before use
- Ensure the power source is a grounded 100-240V AC outlet.
- Verify the video cable (HDMI, DP, or VGA) is securely connected.
- Connect the USB cable to enable touch functionality.
- Ensure at least 10 cm of clearance around the monitor for ventilation.
- Remove any protective sheets from the screen.
Images and diagrams
- Rear view showing OSD button layout.
- Input/Output connector panel layout (DC, DP, HDMI, VGA, RJ11, USB).
- VESA mounting hole pattern dimensions.
Model compatibility
- Plug and play for Windows 7 and later.
- Compatible with Linux Kernel 3.2 and later.
- Compatible with Android 1.0 and later.

Manual page author
David Miller
Documentation analyst
Organizes user manual content into clear summaries, with attention to model details, product context, and everyday usability.