Furniture / Storage Shelving
Assembly Instructions for Millwood Pines 2-Tier Bookcase
A complete assembly guide for the Millwood Pines 2-Tier Bookcase. Includes parts list, hardware requirements, step-by-step installation instructions for cam locks, and maintenance tips.
Quick answers from the manual
Quick answer
- This document provides assembly instructions for the Millwood Pines 2-Tier Bookcase, utilizing a cam lock (eccentric screw and bolt) system. p. 1, 2, 3, 4
Key actions
- Assemble on a clean, flat surface. p. 1
- Do not fully tighten bolts until assembly is complete. p. 2
- Check and tighten all hardware every 4 months. p. 2
Problems and fixes
Missing parts
Contact the store of purchase immediately.
p. 2Maintenance and reset
- Check all bolts, screws, and knobs every 4 months. p. 2
Where to find it in the PDF
- Hardware and Tools p. 1
- Parts List and Cam Lock Instructions p. 2
- Assembly Steps 1-4 p. 3
- Assembly Step 5 p. 4
Table of contents
Manual images
Click an image to enlargeQuick Guide
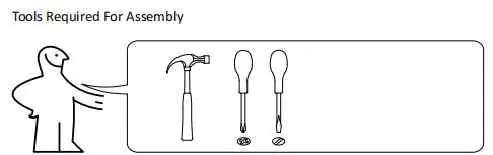
Before starting, ensure you have a clean, flat surface to work on to prevent damage. You will need a hammer and a screwdriver (Phillips and flathead) for assembly. Do not fully tighten bolts until the entire unit is assembled to ensure proper alignment.
Parts and Hardware
Verify all parts (A-H) and hardware (1-5) are present before beginning. If any items are missing, contact the store of purchase immediately.
Assembly Instructions
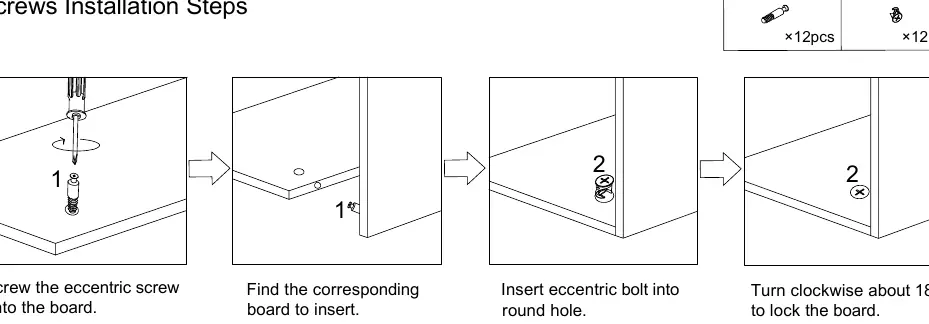
The assembly relies on an eccentric screw and bolt system (cam locks). To install: screw the eccentric screw into the board, insert the bolt into the round hole, and turn clockwise 180 degrees to lock.
Step 1-2
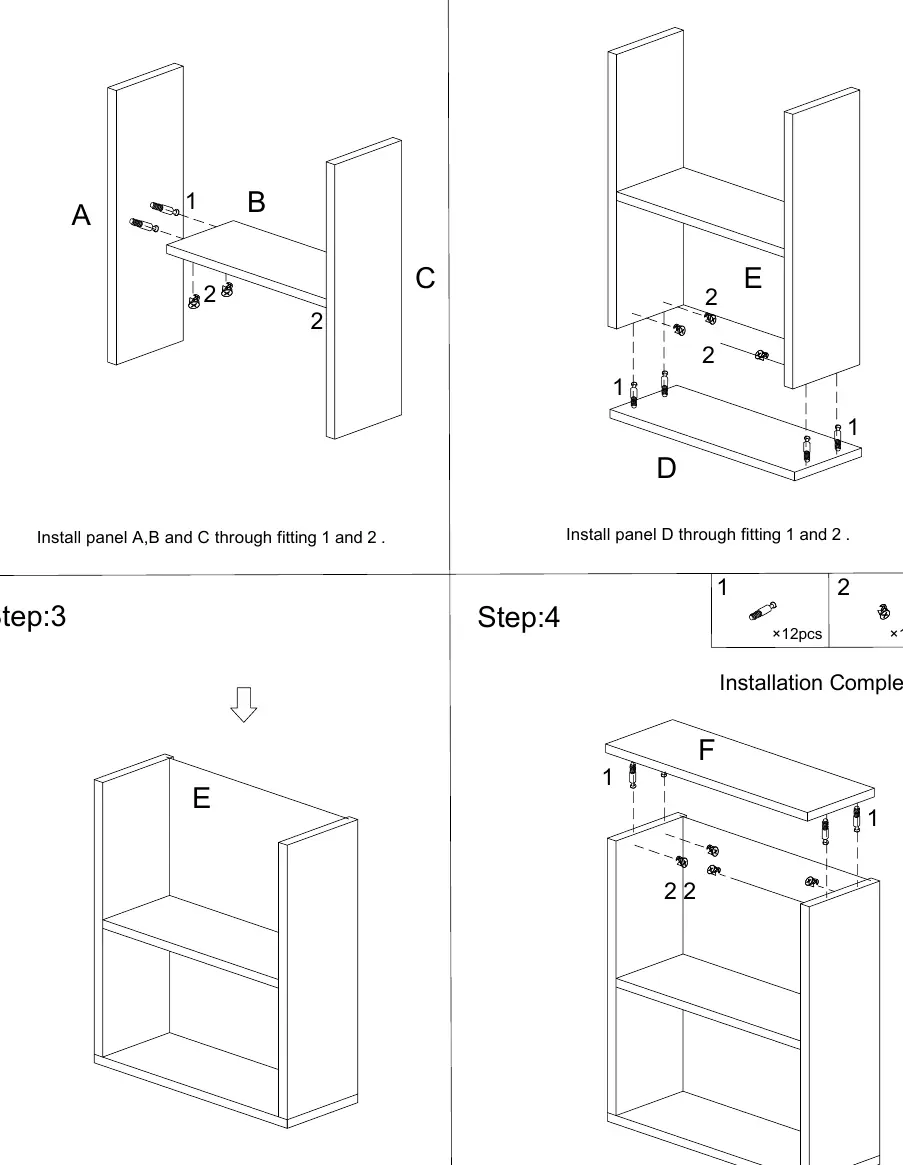
Assemble panels A, B, and C using fittings 1 and 2. Then, attach panel D to the structure using the same fittings.
Step 3-4
Install the back panel E, then attach the top panel F using fittings 1 and 2.
Step 5
Secure the final components using the remaining hardware (3 and 4) as shown in the diagram.
Maintenance and Care
Check all bolts, screws, and knobs every 4 months to ensure they remain tight and the unit is stable.
Practical help
Common problems
Missing parts or hardware
Contact the store of purchase immediately.
Loose components over time
Check and tighten all bolts, screws, and knobs every 4 months.
Before use
- Clear a clean, flat surface for assembly.
- Verify all parts (A-H) and hardware (1-5) against the lists.
- Prepare a hammer and screwdriver.
- Do not tighten bolts fully until assembly is complete.
Images and diagrams
- Eccentric screw installation: Screw the metal pin into the board.
- Cam lock installation: Insert the circular bolt into the hole and turn 180 degrees clockwise to lock the panels together.

Manual page author
Michael Turner
Technical manual editor
Reviews PDF manuals for structure, safety notes, and practical product details so readers can find the right information quickly.