Home Appliances / Vacuum Cleaners
Ozito 18V Brushless Hammer Drill Instruction Manual
Quick guide for the Ozito 18V Brushless Hammer Drill (PXBHS-100). Includes battery charging, drill bit installation, operating controls, function settings, and maintenance tips.
Table of contents
Quick guide from the manual
This document provides essential operating instructions for the Ozito 18V Brushless Hammer Drill (PXBHS-100). The tool is designed for DIY use only. Please note that the battery and charger are sold separately and are compatible with the Ozito Power X Change range.
Battery & Charging
The battery is shipped in a low charge condition and must be charged before first use. To charge, connect the charger to a mains outlet, align the battery ribs with the charger recess, and slide it on. The LED indicator will show the charging status: red indicates charging, green indicates fully charged. If both LEDs flash, the battery is defective; if both are illuminated, the battery is too hot or cold.
Battery Installation
To install, slide the battery into the base of the drill until it clicks into place. To remove, hold down the battery release button and slide the battery out.
Keyless Chuck
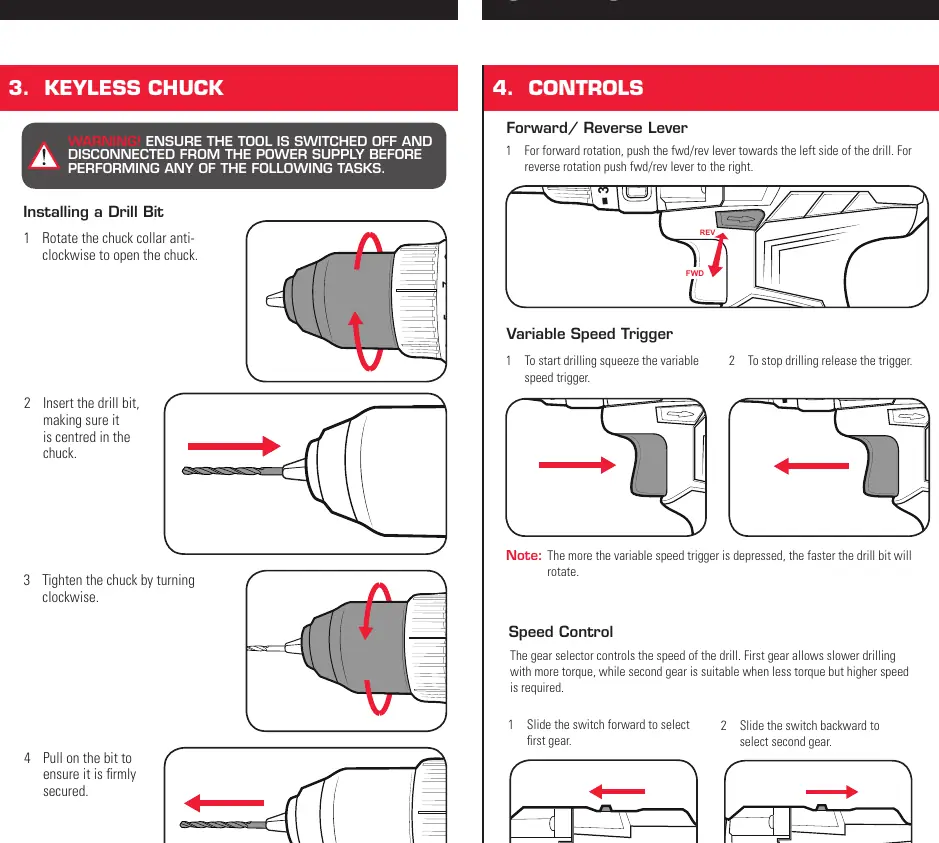
Ensure the tool is switched off before changing bits. Rotate the chuck collar anti-clockwise to open, insert the bit, and tighten by turning the collar clockwise. Always pull on the bit to ensure it is firmly secured.
Controls
- Forward/Reverse Lever: Push left for forward rotation, right for reverse.
- Variable Speed Trigger: Squeeze to start, release to stop. The speed increases with trigger pressure.
- Gear Selector: Slide forward for first gear (high torque, low speed) or backward for second gear (low torque, high speed).
Functions
Use the function collar to select the mode:
- Drilling: Align the arrow with the drill icon for wood, metal, or plastic.
- Screwdriving: Align with the screw icon. Use the torque collar to adjust settings to prevent over-tightening.
- Hammer Drilling: Align with the hammer icon for concrete or masonry.
Maintenance
Keep ventilation slots clean and free of debris. Use a cloth for cleaning; do not use solvents. Store in a dry, frost-free location out of reach of children. The tool features a battery protection system that cuts power if the tool is overloaded or the battery is low.
Manufacturer information
Ozito
Practical help
Common problems
LED lights do not illuminate on charger
Check that the charging adaptor is securely plugged into the wall outlet and the battery is firmly connected to the cradle.
Variable speed trigger is locked
Ensure the forward/reverse lever is fully pushed to the left or right. If it is in the middle, the trigger will be locked.
Drill is stripping the screw head
Start with a lower torque setting and hold the drill securely onto the screw head.
Drill has cut out during use
The battery may be depleted. Place it on the charging cradle for 3-5 hours.
Before use
- Ensure the battery is fully charged.
- Check that the function selector is set to the correct mode (Drill, Screw, or Hammer).
- Verify the forward/reverse lever is in the desired position.
- Ensure the drill bit is correctly centered and tightened in the chuck.
- Secure the workpiece in a vice or clamp.
Specs in practice
- No Load Speed
- 0-400 / 0-1,500/min (determines rotation speed based on gear selection).
Images and diagrams
- The chuck collar (1) is used to open/close the chuck for bit changes.
- The function collar (3) switches between drilling, screwdriving, and hammer modes.
- The gear selector (10) on top of the drill toggles between high-torque and high-speed modes.
Model compatibility
- Compatible with all batteries and chargers from the Ozito Power X Change range.
- Charger requires a residual current device (RCD) rated at 30mA or less.

Manual page author
Michael Turner
Technical manual editor
Reviews PDF manuals for structure, safety notes, and practical product details so readers can find the right information quickly.