Electronics / Monitors
User Manual for Philips 220E LCD Monitor
Comprehensive user manual for the Philips 220E LCD Monitor. Includes setup instructions, OSD menu navigation, troubleshooting, technical specifications, and warranty information.
Quick answers from the manual
Quick answer
- The Philips 220E is a 21.5-inch LCD monitor. For best performance, ensure your display settings are set to 1920 x 1080 at 60Hz. p. 25, 35
Key actions
- Connect the monitor to your PC using the VGA or DVI cable. p. 38
- Use the Auto button to automatically adjust screen settings. p. 34
First start
- Connect the power cord, connect the signal cable, and turn on both the computer and the monitor. p. 38, 39
Show 4 more answers Show less
Problems and fixes
No picture
Check power cord and power button.
p. 10Maintenance and reset
- Press the MENU button, then select 'Reset' to recall original factory settings. p. 5
Technical specifications
| Parameter | Value | Meaning | Pages |
|---|---|---|---|
| Screen size | 21.5" | Diagonal display size | p. 25 |
| Resolution | 1920 x 1080 | Native resolution | p. 25 |
Where to find it in the PDF
- Safety and Troubleshooting p. 2, 3, 10, 11
- Installation p. 34, 35, 37, 38
- Product Information p. 25, 26, 27, 28
Table of contents
Manual images
Click an image to enlargeQuick guide from the manual
This guide provides essential information for setting up and using your Philips 220E LCD Monitor. For optimal performance, ensure your display settings are configured to 1920 x 1080 at 60Hz. If you encounter issues, the monitor features an Auto button to automatically adjust screen position, phase, and clock settings.
Safety and Maintenance
- Keep the monitor away from direct sunlight and heat sources.
- Ensure ventilation holes are not blocked to prevent overheating.
- Use only the approved power cord provided by Philips.
- Clean the screen with a soft, dry cloth; avoid organic solvents like alcohol or ammonia.
- Do not apply excessive pressure to the LCD panel.
Installation
To set up your monitor:
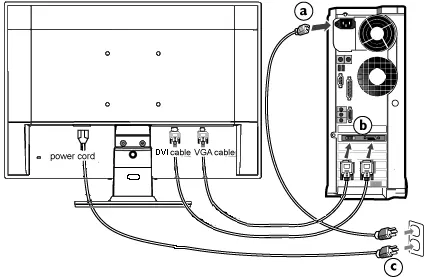
- Connect the power cord firmly to the back of the monitor.
- Turn off your computer and unplug its power cable.
- Connect the monitor signal cable (VGA or DVI) to the video connector on your computer.
- Plug the power cords of both the monitor and computer into a nearby outlet.
- Turn on your computer and monitor.
To remove the base for VESA mounting, remove the 3 screws on the base assembly. The monitor supports a 100mm x 100mm VESA-compliant interface.
On-Screen Display (OSD)
Press the MENU/OK button on the front of the monitor to access the OSD menu. Use the arrow keys to navigate and adjust settings such as:
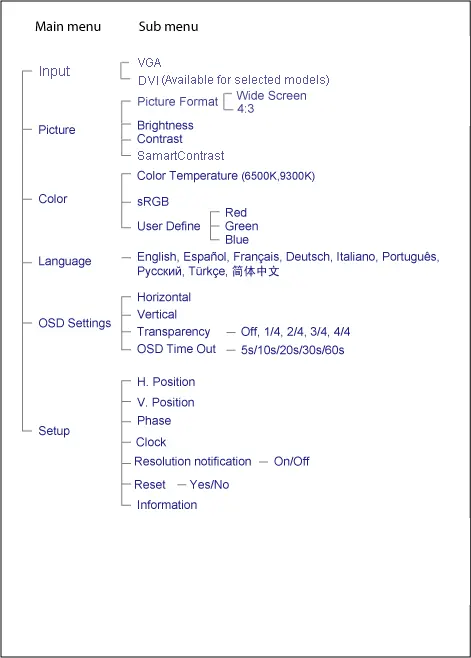
- Input: Select between VGA and DVI (on selective models).
- Picture: Adjust Brightness, Contrast, and SmartContrast.
- Color: Choose color temperature (6500K, 9300K) or User Define.
- OSD Settings: Adjust OSD position, transparency, and timeout.
- Setup: Adjust H. Position, V. Position, Phase, and Clock.
Troubleshooting
If you experience issues, try these steps:
- No Picture (Power LED not lit): Check power cord connection and ensure the power button is in the ON position.
- No Picture (Power LED amber/yellow): Ensure the computer is on, the signal cable is connected, and check for bent pins on the cable.
- Display position incorrect: Press the Auto button or adjust via OSD settings.
- Image vibrates: Ensure the VGA cable is properly connected to the graphics board or PC.
Technical Specifications
- Screen Size: 21.5" visual.
- Resolution: 1920 x 1080 pixels.
- Refresh Rate: 60Hz recommended.
- Power Supply: 100-240 VAC, 50/60 Hz.
Manufacturer information
Philips
Practical help
Common problems
No picture (Power LED not lit)
Check that the power cord is plugged into the outlet and the back of the monitor. Ensure the power button is in the ON position.
No picture (Power LED is amber or yellow)
Ensure the computer is turned on, the signal cable is properly connected, and check for bent pins on the cable.
Display position is incorrect
Press the Auto button or adjust the image position using the Phase/Clock settings in the OSD menu.
Image vibrates on the screen
Check that the VGA cable is properly connected to the graphics board or PC.
Before use
- Ensure the power plug and outlet are easily accessible.
- Keep the monitor away from direct sunlight and heat sources.
- Ensure the computer is turned off before connecting cables.
- Use only the approved power cord provided by Philips.
- Verify the monitor is placed in a well-ventilated area.
Show more Show less
Specs in practice
- Refresh Rate
- 60Hz is the optimal frequency for LCD monitors to ensure a stable, flicker-free image.
Images and diagrams
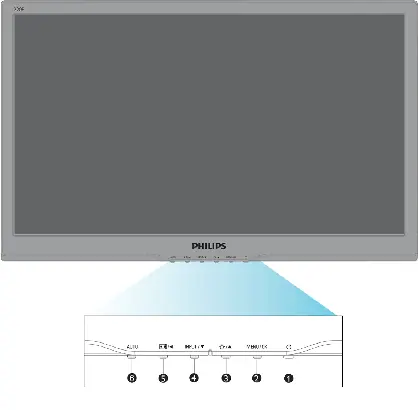
- Front view: Shows power, menu, brightness, input, and auto buttons.
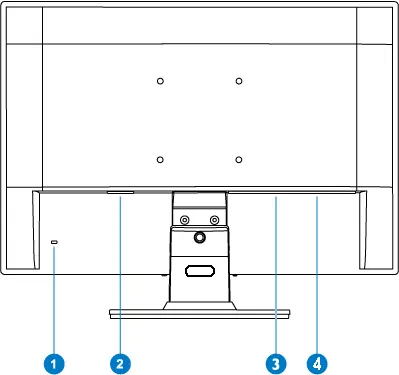
- Rear view: Shows Kensington lock, AC power input, DVI, and VGA ports.
- Wiring diagram: Illustrates how to connect power and signal cables to the PC.
Model compatibility
- Plug-and-Play compatible with Windows 95, 98, 2000, XP, and Vista.
- DVI input is available on selective models only.

Manual page author
David Miller
Documentation analyst