Electronics / Monitors
User Manual for Philips 22E1N1100LA Monitor
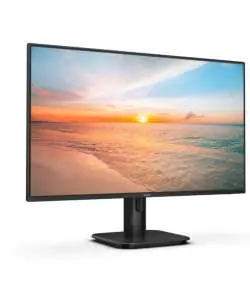
Quick guide for the Philips 22E1N1100LA monitor. Includes setup instructions, OSD menu navigation, image optimization settings, technical specifications, and troubleshooting tips.
Quick answers from the manual
Quick answer
- The Philips 22E1N1100LA is a 21.5-inch monitor. To set it up, attach the base, connect the power and signal cables (HDMI/VGA), and use the rear joystick button to navigate the OSD menu for settings and image optimization. p. 5, 6, 7
Key actions
- Assemble the base p. 5
- Navigate OSD menu p. 7
First start
- Connect power and signal cables, then turn on the computer and monitor. p. 6
Show 4 more answers Show less
Problems and fixes
No picture
Check power connections and ensure the power button is ON.
p. 23Maintenance and reset
- Reset OSD settings p. 25
Technical specifications
| Parameter | Value | Meaning | Pages |
|---|---|---|---|
| Panel Size | 21.5 inch | Physical screen size | p. 14 |
| Resolution | 1920 x 1080 | Native resolution | p. 14 |
Where to find it in the PDF
- Installation p. 5
- OSD Menu p. 7
- Technical Specifications p. 14
Table of contents
Manual images
Click an image to enlargeQuick guide from the manual
This guide provides essential information for setting up and operating your Philips 22E1N1100LA monitor. For detailed warranty and regulatory information, please refer to the full documentation.
Safety and Maintenance
- Environment: Keep the monitor away from oil, direct sunlight, and heat sources. Operate within 0°C~40°C temperature and 20%~80% humidity.
- Cleaning: Use a slightly damp cloth. Never use organic solvents like alcohol or ammonia.
- Burn-in Prevention: Always activate a moving screensaver or periodic screen refresh when leaving the monitor unattended to prevent image sticking.
Installation
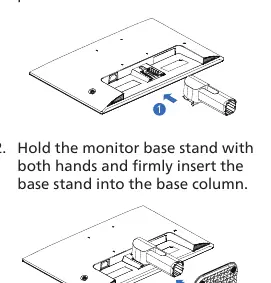
- Base Assembly: Place the monitor face down on a soft surface. Slide the base column into the monitor until it clicks. Attach the base stand to the column.
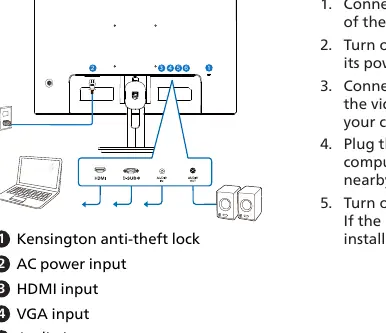
- Connecting to PC: Connect the power cord to the monitor. Connect the signal cable (HDMI or VGA) to your computer. Plug the power cord into a nearby outlet.
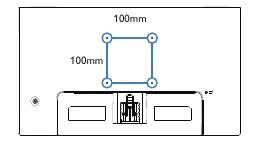
- VESA Mounting: The monitor supports a 100mm x 100mm VESA mount. Use M4 screws for installation.
Operating the Monitor
The monitor features a single toggle button on the rear side that acts as a joystick for the On-Screen Display (OSD) menu:
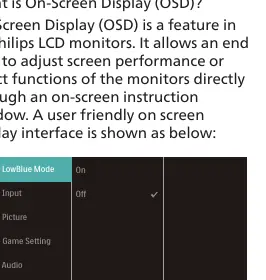
- Toggle Up/Down/Left/Right: Navigate the OSD menu.
- Press: Confirm selection or access the menu.
- Power: Press to switch on; hold for 3 seconds to switch off.
Image Optimization
Use the SmartImage feature to optimize display settings for different content types:
- EasyRead: Improves text readability.
- Office: Enhances text and reduces eye strain.
- Photo/Movie/Game: Adjusts contrast, color, and sharpness for specific media.
- LowBlue Mode: Reduces harmful shortwave blue light.
Technical Specifications
- Panel: 21.5" VA, 1920 x 1080 resolution.
- Refresh Rate: Up to 75Hz (VGA) or 120Hz (HDMI).
- Connectivity: 1x HDMI 1.4, 1x VGA, Audio In/Out.
- Power: 100-240VAC, 50/60Hz.
Manufacturer information
Philips
Practical help
Common problems
No picture (Power LED not lit)
Ensure the power cord is securely connected to the outlet and the monitor. Check that the rear power button is in the ON position.
No picture (Power LED is white)
Ensure the computer is on and the signal cable is properly connected. Check for bent pins on the cable.
Image is not centered
Use the 'Auto' function in the OSD Main Controls or adjust Phase/Clock settings (VGA mode only).
Vertical flicker
Use the 'Auto' function or adjust Phase/Clock settings in the OSD menu.
Before use
- Ensure the monitor is placed on a stable, flat surface.
- Verify the power supply matches the monitor requirements.
- Check that all cables (power, HDMI/VGA) are firmly connected.
- Ensure the PC is turned off before connecting the signal cable.
- Check for bent pins on the signal cable connectors.
Show more Show less
Specs in practice
- Native Resolution
- 1920 x 1080 pixels for optimal performance.
- Refresh Rate
- Up to 120Hz via HDMI for smoother motion.
Images and diagrams
- The rear joystick button controls power and OSD navigation.
- The base assembly requires clicking the column into the monitor and attaching the stand.
- Rear ports include HDMI, VGA, Audio In, and Audio Out.
Model compatibility
- Compatible with Windows 11/10 and Mac OS X.
- Adaptive Sync is compatible with specific AMD Radeon graphics cards.
- Auto function is only applicable in VGA-Analog mode.

Manual page author
David Miller
Documentation analyst