Electronics / Monitors
User Manual for Philips 22E2N1100 / 22E2N1100L Monitor
Quick guide for the Philips 22E2N1100 and 22E2N1100L monitors. Includes setup instructions, OSD menu navigation, image optimization settings, and troubleshooting tips.
Quick answers from the manual
Quick answer
- The Philips 22E2N1100/22E2N1100L is a 21.5-inch LCD monitor. This manual covers installation, OSD menu navigation, image optimization (SmartImage), and troubleshooting. p. 1, 7, 9
Key actions
- Install the stand p. 7
- Connect to PC p. 8
- Access OSD menu p. 9
First start
- Connect power and signal cables, turn on PC, then turn on the monitor. p. 8
Show 4 more answers Show less
Problems and fixes
No image
Check power and signal cable connections.
p. 26
Auto button inactive
Only works in VGA mode.
p. 26Maintenance and reset
- To reset to factory settings: Press Menu/OK button > Setup > Reset. p. 28
Technical specifications
| Parameter | Value | Meaning | Pages |
|---|---|---|---|
| Resolution | 1920 x 1080 | Native resolution | p. 17 |
| VESA | 100 x 100mm | Mounting interface | p. 17 |
| Tilt | -5 / +20 degrees | Tilt angle | p. 17 |
Where to find it in the PDF
- Installation p. 7, 8
- OSD Menu p. 9, 10
- Technical Specs p. 17, 18, 19
Table of contents
Manual images
Click an image to enlargeQuick Guide from the Manual
This manual provides essential information for setting up and using your Philips 22E2N1100 or 22E2N1100L monitor. It covers physical installation, connection to a PC, OSD menu navigation, and image optimization features.
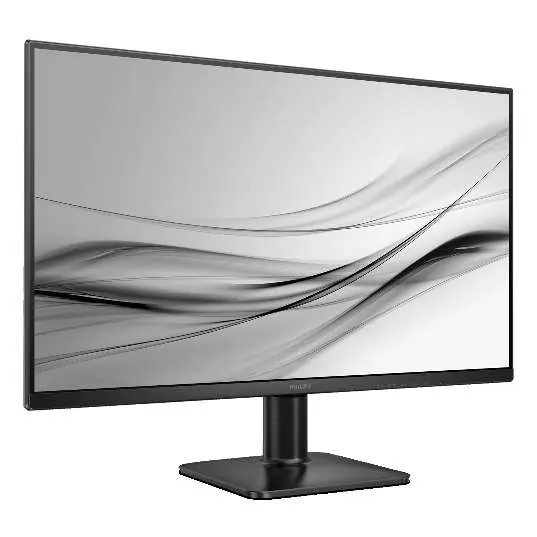
Safety Precautions
- Avoid direct sunlight and heat sources.
- Do not block ventilation slots.
- Use only the provided power cord and specified power supply.
- Do not touch the LCD screen with fingers when moving the monitor; hold it by the frame.
- If the monitor gets wet, dry it immediately with a soft cloth.
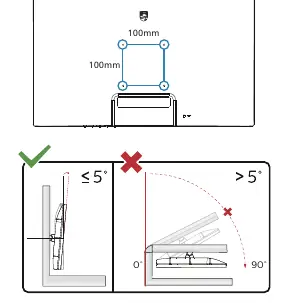
- Do not tilt the monitor downwards by more than -5 degrees to avoid damage.
Installation
Stand Assembly
- Place the monitor face down on a soft, flat surface.
- Slide the base into the stand column until it clicks into place.
- Insert the stand assembly into the monitor until it locks.
VESA Mounting
The monitor supports a 100mm x 100mm VESA mount. Use M4 mounting screws. Contact the manufacturer for wall mount installation.
Connections
To connect to a PC:
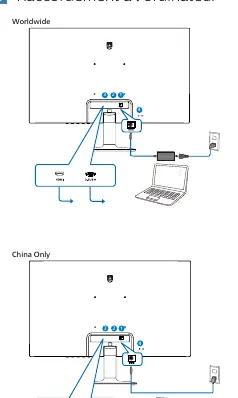
- Connect the power cord firmly to the back of the monitor.
- Turn off your PC and disconnect its power cable.
- Connect the signal cable (HDMI or VGA) to the video connector on the back of your PC.
- Plug the power cables of the PC and monitor into a wall outlet.
- Turn on your PC and monitor.
OSD Menu & Controls
The OSD (On-Screen Display) menu allows you to adjust monitor settings. Use the buttons on the front panel to navigate:
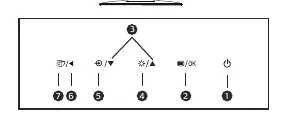
- Power Button: Turns the monitor on/off.
- Menu/OK: Opens the OSD menu and confirms selections.
- Up/Down: Adjusts the OSD menu.
- Brightness: Adjusts brightness levels.
- Input: Changes the input signal source.
- SmartImage: Accesses preset modes (EasyRead, Office, Photo, Movie, Game, Economy, LowBlue Mode, D-Mode).
Image Optimization
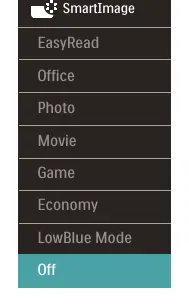
SmartImage
SmartImage provides presets to optimize display settings based on content. You can cycle through modes like Office, Photo, Movie, and Game to adjust brightness, contrast, and color saturation in real-time.
SmartContrast
This technology dynamically analyzes content and adjusts backlight intensity to optimize contrast for better visual clarity and energy efficiency.
Troubleshooting
- No Image (Power LED off): Check if the power cable is connected properly and the power button is on.
- No Image (Power LED white): Check if the PC is on and the signal cable is connected.
- Auto button not working: This function only works in VGA-Analog mode.
- Image not centered: Use the 'Auto' function in the OSD menu or adjust Phase/Clock (VGA only).
Technical Specifications
- Resolution: 1920 x 1080 (Native).
- Refresh Rate: Up to 75Hz (VGA) / 120Hz (HDMI).
- Tilt: -5 / +20 degrees.
- Power: 100-240VAC, 50/60Hz.
Manufacturer information
Philips
Practical help
Common problems
No image on screen
Check if the power cable is securely connected and the monitor is turned on. Verify the signal cable is connected to the PC.
Auto button does not work
The Auto function is only available in VGA-Analog mode.
Image is not centered
Use the 'Auto' function in the OSD menu or adjust Phase/Clock settings (VGA only).
Before use
- Ensure the monitor is placed on a flat, stable surface.
- Verify the power source matches the monitor's requirements (100-240VAC).
- Check that all cables (power, HDMI/VGA) are securely connected.
- Ensure the PC is set to the native resolution of 1920 x 1080.
Show more Show less
Specs in practice
- Adaptive Sync
- Technology that eliminates screen tearing and stuttering by synchronizing the GPU and monitor refresh rates.
Images and diagrams
- Stand assembly instructions showing how to attach the base to the column and the column to the monitor.
- Rear port identification showing Power, VGA, HDMI, and Kensington lock locations.
- OSD button layout on the front panel.
Model compatibility
- Compatible with Windows 11/10 and Mac OSX.
- Adaptive Sync requires a compatible AMD graphics card.

Manual page author
Michael Turner
Technical manual editor