Electronics / Monitors
Philips 243B9 LCD Monitor Quick Start Guide
Quick start guide for the Philips 243B9 LCD monitor. Includes setup instructions, connection diagrams, OSD menu navigation, and stand adjustment details.
Quick answers from the manual
Quick answer
- The Philips 243B9 is an LCD monitor. Setup involves connecting the power adapter and the appropriate video cable (HDMI, VGA, or USB-C) to your computer, then adjusting the stand to the desired tilt angle. p. 1
Key actions
- Connect the monitor to power and your computer using the provided cables. p. 1
- Adjust the monitor tilt between -5 and 90 degrees. p. 1
First start
- Connect the AC/DC adapter, connect the video cable (HDMI/VGA/USB-C), and power on the device. p. 1
Show 1 more answers Show less
Where to find it in the PDF
- Quick Start Guide p. 1
Table of contents
Manual images
Click an image to enlargeQuick guide from the manual
This guide provides the essential steps to set up and operate your Philips 243B9 LCD monitor. It covers the initial connection of cables, stand adjustment, and basic OSD menu navigation.
Package Contents
Ensure your package includes the following items:
- Monitor and stand
- AC/DC adapter
- VGA cable
- HDMI cable
- Audio cable
- DisplayPort (DP) cable
- USB C-C cable
- USB C-A cable
Connections
The monitor supports multiple input types. Connect your computer to the monitor using the appropriate cable:
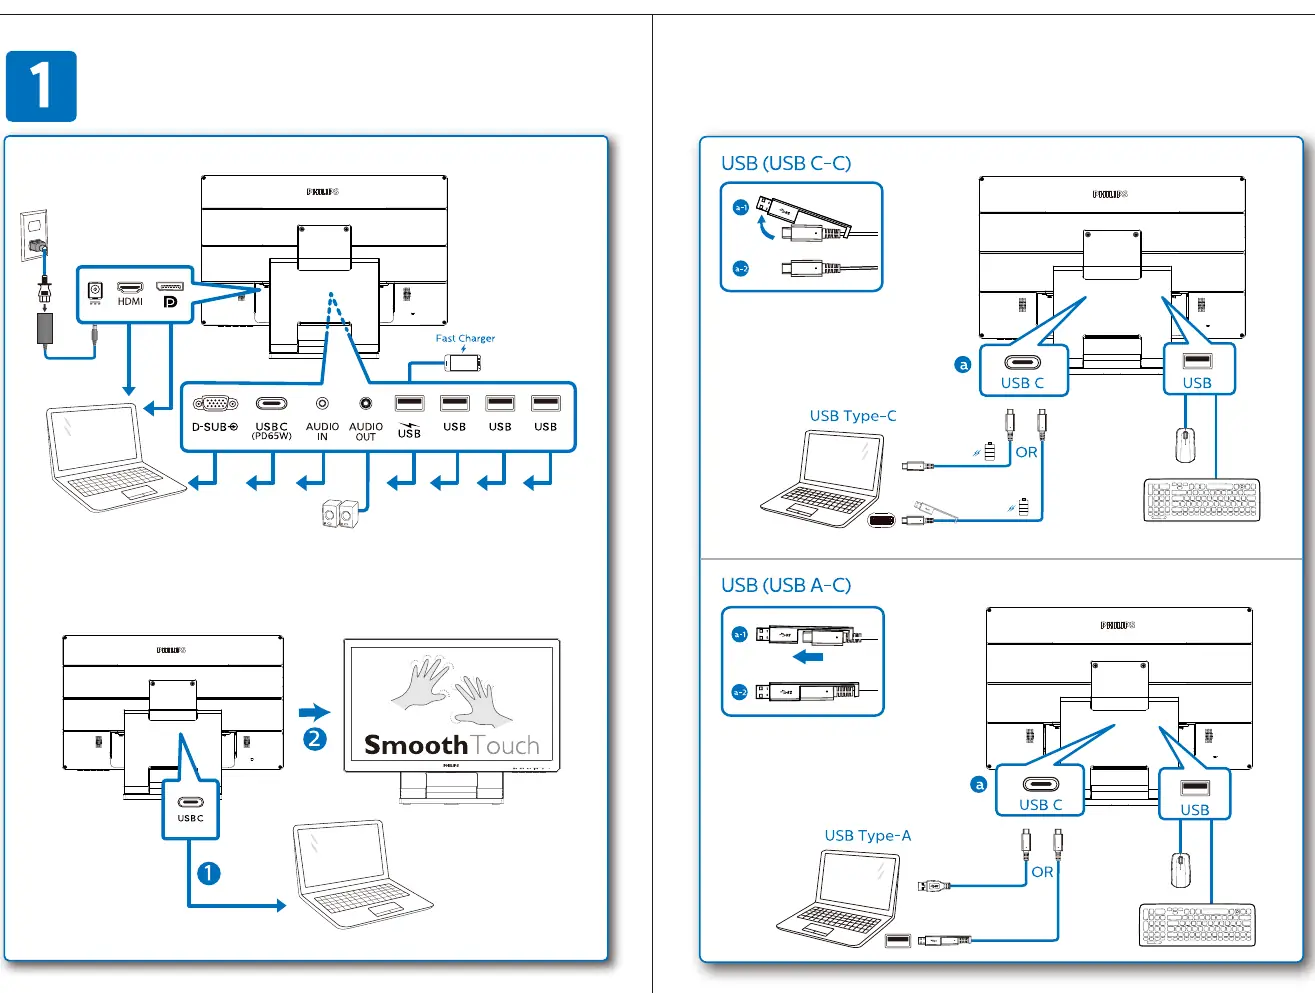
- HDMI: Connect via HDMI cable.
- VGA (D-SUB): Connect via VGA cable.
- USB-C: Connect via USB-C cable. The monitor supports USB-C to USB-C or USB-C to USB-A connections for data and video.
- Audio: Connect audio cables to the Audio In/Out ports as needed.
Stand Adjustment
The monitor stand allows for ergonomic adjustments:
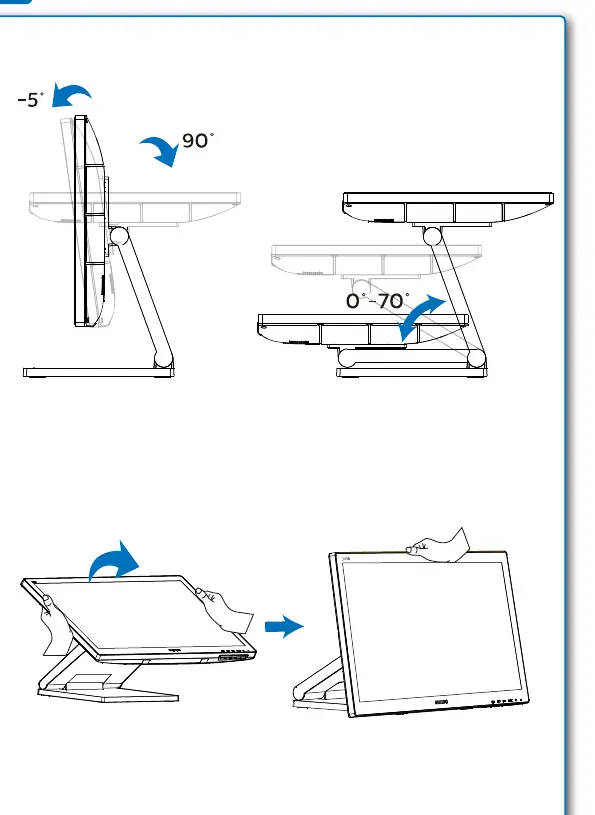
- Tilt: The screen can be tilted from -5 degrees to 90 degrees to suit your viewing angle.
OSD Menu Navigation
Use the physical buttons on the monitor to access and navigate the On-Screen Display (OSD) menu:
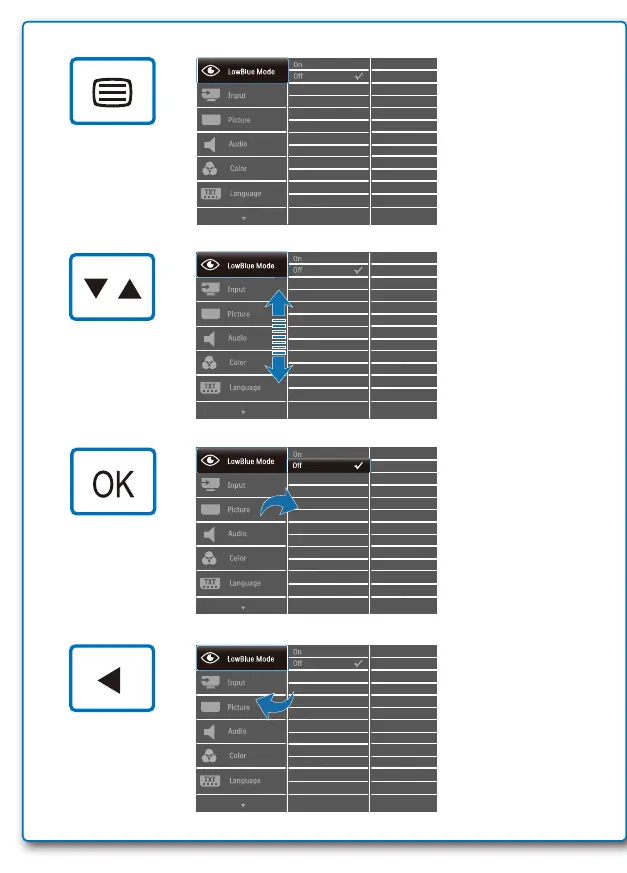
- Menu Button: Opens the main OSD menu.
- Navigation Buttons: Use the arrow buttons to move through menu options (e.g., SmartImage, Input, Color, Language).
- OK Button: Confirms your selection.
Manufacturer information
Philips
Practical help
Common problems
No display on screen
Ensure the power adapter is connected and the monitor is turned on. Verify that the video cable (HDMI, VGA, or USB-C) is securely connected to both the monitor and the computer.
USB-C connectivity issues
Ensure you are using the provided USB-C cable and that your computer's USB-C port supports video output.
Before use
- Unpack all components and verify the cable list.
- Place the monitor on a stable, flat surface.
- Connect the AC/DC power adapter.
- Connect the desired video cable (HDMI, VGA, or USB-C) to your computer.
- Power on the monitor.
Show more Show less
Images and diagrams
- The connection diagram illustrates how to plug in the power adapter and various video cables (HDMI, VGA, USB-C) to the rear ports.
- The stand adjustment diagram shows the tilt range of -5 to 90 degrees.
- The OSD menu diagram demonstrates how to use the buttons to navigate settings like SmartImage and Input selection.
Model compatibility
- Supports USB-C connectivity for video and data transmission.

Manual page author
Emily Carter
User documentation editor