Electronics / Monitors
User Manual for Philips 243S7 LCD Monitor
Quick guide for the Philips 243S7 LCD monitor. Includes setup instructions, OSD menu navigation, SmartImage settings, technical specifications, and troubleshooting tips.
Quick answers from the manual
Quick answer
- The Philips 243S7 is a 23.8-inch LCD monitor. This manual provides instructions for assembly, connection, OSD menu operation, and troubleshooting. p. 1, 7, 8
Key actions
- Install base stand p. 7
- Connect to PC p. 8
- Adjust OSD settings p. 8, 9
First start
- Connect power and signal cables, then turn on the monitor and computer. p. 8
Show 4 more answers Show less
Problems and fixes
No Picture
Check power and signal cable connections.
p. 20
Image not centered
Use Auto function or adjust Phase/Clock.
p. 20Maintenance and reset
- Use 'Reset' in the OSD Setup menu to recall factory settings. p. 22
Technical specifications
| Parameter | Value | Meaning | Pages |
|---|---|---|---|
| Panel Size | 23.8 inch | Display size | p. 14 |
| Resolution | 1920 x 1080 @ 60Hz | Optimum resolution | p. 14 |
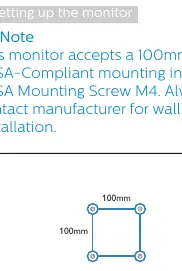
| VESA Mount | 100 x 100 mm | Mounting interface | p. 14 |
| Tilt | -5 / +20 degrees | Tilt range | p. 14 |
Where to find it in the PDF
- Installation p. 5, 7
- OSD Menu p. 8, 9
- Technical Specifications p. 14, 15
- Troubleshooting p. 20, 21
Table of contents
Manual images
Click an image to enlargeQuick guide from the manual
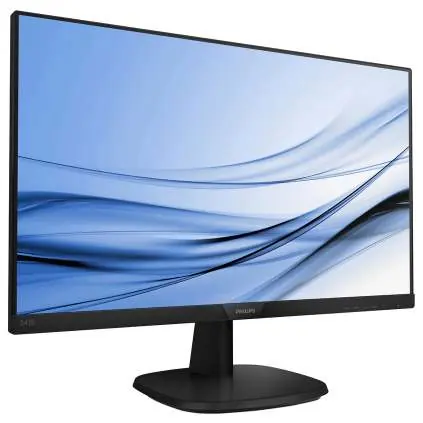
The Philips 243S7 is a 23.8-inch LCD monitor designed for optimal performance at a native resolution of 1920 x 1080 @ 60Hz. This guide covers the essential setup, operation, and maintenance procedures to ensure the best viewing experience and longevity of your device.
Safety and Maintenance
To ensure the safety and longevity of your monitor, please follow these guidelines:
- Cleaning: Use a slightly damp cloth to clean the screen. Do not use organic solvents like alcohol or ammonia-based liquids.
- Environment: Keep the monitor away from direct sunlight, heat sources, and oil. Maintain an operating temperature of 0-40°C and humidity of 20-80% RH.
- Burn-in Prevention: Always activate a moving screen saver or periodic screen refresh application when the monitor is unattended to prevent "burn-in" or "ghost imaging."
- Handling: Do not apply excessive pressure to the LCD panel. When moving the monitor, grasp the frame, not the screen.
Installation
Follow these steps to set up your monitor:
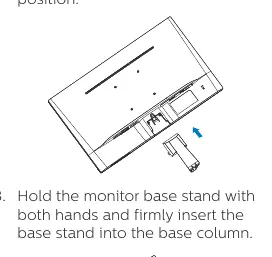
- Base Stand Assembly: Place the monitor face down on a soft, smooth surface. Attach the base column to the monitor until it clicks into position. Firmly insert the base stand into the base column.
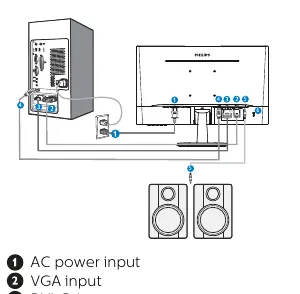
- Connecting to PC: Connect the power cord to the monitor. Turn off your computer and connect the signal cable (VGA, DVI, or HDMI) to the video connector on your computer. Plug the power cords into a nearby outlet and turn on both the monitor and the computer.
Operating the Monitor
The monitor features an On-Screen Display (OSD) menu for adjusting settings:
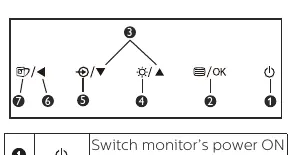
- Control Keys: Use the buttons on the front bezel to navigate the OSD menu and confirm selections.
- SmartImage: Press the SmartImage button to toggle between presets like EasyRead, Office, Photo, Movie, Game, Economy, and LowBlue Mode.
- OSD Menu: Allows adjustment of picture settings (brightness, contrast, sharpness), color temperature, language, and OSD settings.
Technical Specifications
- Panel Size: 23.8 inches (60.5 cm)
- Native Resolution: 1920 x 1080 @ 60Hz
- VESA Mount: 100mm x 100mm (M4 screws)
- Tilt: -5 to +20 degrees
- Power Supply: Built-in, 100-240V AC, 50-60Hz
Troubleshooting
If you encounter issues, try these common solutions:
- No Picture (LED not lit): Check if the power cord is properly connected and the power button is ON.
- No Picture (LED is White): Ensure the computer is on and the signal cable is securely connected. Check for bent pins on the cable.
- Image not centered: Use the "Auto" function in the OSD menu or adjust Phase/Clock settings (VGA mode only).
- Image vibrates: Ensure the signal cable is securely connected to the graphics board or PC.
Manufacturer information
Philips
Practical help
Common problems
No Picture (Power LED not lit)
Check if the power cord is plugged into the outlet and the back of the monitor. Ensure the power button is in the ON position.
No Picture (Power LED is White)
Ensure the computer is turned on, the signal cable is properly connected, and there are no bent pins on the cable.
Image is not centered
Use the 'Auto' function in the OSD Main Controls or adjust Phase/Clock in the Setup menu (VGA mode only).
Image vibrates on screen
Check that the signal cable is securely connected to the graphics board or PC.
Before use
- Check package contents for all cables and stand components.
- Place the monitor face down on a soft, smooth surface to avoid scratches.
- Attach the base column and stand securely.
- Connect the power cord and signal cable (VGA, DVI, or HDMI).
- Ensure the power outlet is easily accessible.
Show more Show less
Specs in practice
- Native Resolution
- 1920 x 1080 @ 60Hz is the recommended resolution for optimal performance.
Images and diagrams
- Front view buttons: Power, OSD Menu/OK, Brightness, Input, and SmartImage.
- Rear connections: AC power, VGA, DVI-D, HDMI, and HDMI audio out.
- Base assembly: Steps to attach and detach the stand.
Model compatibility
- Compatible with Windows 7, 8, 8.1, 10, and Mac OSX.
- Auto function is only applicable in VGA-Analog mode.

Manual page author
Michael Turner
Technical manual editor