Electronics / Monitors
User Manual for Philips 243V5 Monitor
Quick guide for the Philips 243V5 monitor. Includes installation steps, OSD menu navigation, technical specifications, power management, and troubleshooting tips.
PDF source: BG · summary: English
Quick answers from the manual
Quick answer
- The Philips 243V5 is an LCD monitor. To set it up, attach the stand, connect the power and signal cables (VGA, DVI, or HDMI), and power on the computer. Use the OSD menu buttons to adjust settings like brightness, contrast, and input source. p. 7, 8, 9
Key actions
- Adjusting OSD settings p. 9, 10
- Troubleshooting no image p. 24
First start
- Connect power and signal cables, then turn on the computer. p. 8
Show 4 more answers Show less
Problems and fixes
No image
Check power and signal cable connections.
p. 24
Image not centered
Use Auto function in OSD.
p. 24Maintenance and reset
- Use 'Reset' in the OSD menu to restore factory settings. p. 26
Technical specifications
| Parameter | Value | Meaning | Pages |
|---|---|---|---|
| Resolution | 1920 x 1080 @ 60Hz | Optimal resolution | p. 14, 17 |
| Brightness | 250 cd/m² | Screen brightness | p. 14 |
Where to find it in the PDF
- Installation p. 7, 8
- Operation p. 9, 10
- Technical Specs p. 14, 15, 16, 17
- Troubleshooting p. 24, 25, 26, 27
Table of contents
Manual images
Click an image to enlargeImportant Information
This user manual provides essential information for operating your Philips 243V5 monitor. Please read all safety instructions before use to avoid electric shock or mechanical hazards. Keep the monitor away from direct sunlight, heat sources, and moisture. Use only the provided power cable.
Installation
Follow these steps to set up your monitor:
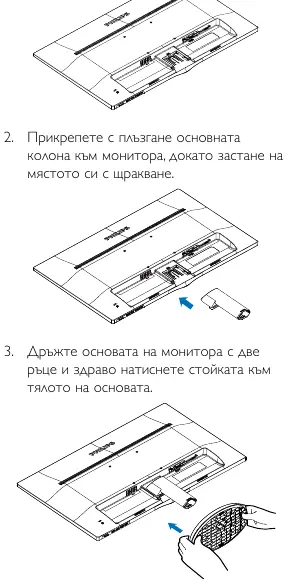
- Stand Assembly: Place the monitor face down on a soft surface to avoid scratches. Attach the base column to the monitor until it clicks into place. Press the base firmly onto the column.
- Connecting to PC: Connect the power cable to the monitor. Turn off your computer and disconnect its power cable. Connect the signal cable (VGA, DVI, or HDMI) to the video connector on the back of your computer. Connect the power cables of both the computer and monitor to a nearby outlet.
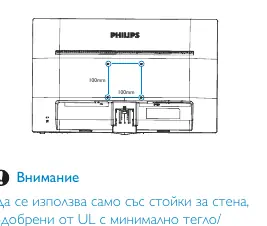
- VESA Mounting: The monitor supports VESA mounting (100mm x 100mm). Use only UL-approved wall mounts with a minimum weight capacity of 3.5 kg.
Operation
Use the buttons on the front panel to navigate the On-Screen Display (OSD) menu:
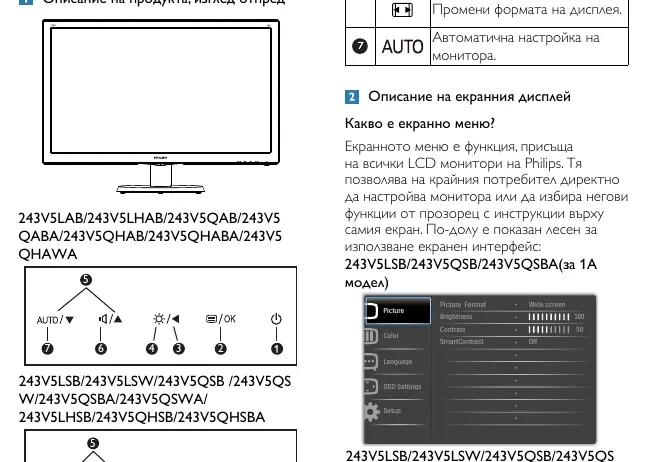
- Power Button: Turns the monitor on or off.
- Menu/OK: Accesses the OSD menu and confirms selections.
- Back/Return: Returns to the previous OSD level.
- Brightness: Adjusts the screen brightness.
- Up/Down: Navigates through the OSD menu.
SmartContrast: This technology dynamically analyzes screen content and optimizes contrast for better image quality, especially for gaming or video.
Troubleshooting
If you encounter issues, try these common solutions:
- No Image: Check if the power cable is connected and the power button is ON. Ensure the computer is on and the signal cable is properly connected.
- Image Not Centered: Use the 'Auto' function in the OSD menu or adjust Phase/Clock settings (VGA only).
- Vertical/Horizontal Lines: Use the 'Auto' function or adjust Phase/Clock settings in the OSD menu.
- Ghosting/Burn-in: Always activate a moving screensaver or screen refresh application when leaving the computer unattended.
Technical Specifications
The monitor features a 1920 x 1080 resolution at 60Hz. It includes various input options depending on the specific model, such as VGA, DVI, and HDMI. The monitor is compatible with Plug & Play (DDC/CI, sRGB, Windows 8/7, Mac OSX).
Manufacturer information
Philips
Practical help
Common problems
No image (indicator off)
Check power cable connection and ensure the power button is ON.
No image (indicator white)
Check if the computer is on and the signal cable is properly connected.
Image not centered
Use the 'Auto' function in the OSD menu or adjust Phase/Clock settings (VGA only).
Vertical/Horizontal lines
Use 'Auto' function or adjust Phase/Clock settings in the OSD menu.
Before use
- Ensure the monitor is placed on a stable surface.
- Check that the power cable is connected to a grounded outlet.
- Verify the signal cable (VGA/DVI/HDMI) is securely connected to the PC.
- Ensure the computer is turned on.
Show more Show less
Specs in practice
- Native Resolution
- 1920 x 1080 @ 60Hz for optimal performance.
- SmartContrast
- Dynamically optimizes contrast for better image quality.
Images and diagrams
- The OSD menu structure allows navigation through Input, Picture, Audio, Color, Language, OSD Settings, and Setup.
- The rear panel shows various input ports (HDMI, DVI, VGA) depending on the specific model.
Model compatibility
- Compatible with VESA wall mounts (100mm x 100mm).
- Supports Plug & Play (DDC/CI, sRGB, Windows 8/7, Mac OSX).

Manual page author
Emily Carter
User documentation editor