Electronics / Monitors
User Manual for Philips 24B2U3601 Business Monitor
Comprehensive user guide for the Philips 24B2U3601 Business Monitor. Includes assembly instructions, OSD settings, connectivity, power delivery, daisy-chain setup, and troubleshooting.
Quick answers from the manual
Quick answer
- The Philips 24B2U3601 is a 23.8-inch business monitor with a native resolution of 2560 x 1440. It supports USB-C power delivery up to 90W, daisy-chaining, and various image optimization modes. p. 1, 23
Key actions
- Assemble the base p. 7
- Connect to PC p. 8
- Adjust OSD settings p. 10
First start
- Connect power and signal cables, then turn on the monitor and PC. p. 8
Show 4 more answers Show less
Problems and fixes
No picture
Check power connection, power button status, and signal cable connection.
p. 30Maintenance and reset
- Use the 'Reset' function in the 'Setup' menu to restore factory settings. p. 32
Technical specifications
| Parameter | Value | Meaning | Pages |
|---|---|---|---|
| Native Resolution | 2560 x 1440 @ 60 Hz | Optimal display resolution. | p. 23 |
| Power Delivery | Up to 90W | Charging power via USB-C1. | p. 23 |
| Refresh Rate | 48 Hz - 120 Hz | Vertical refresh rate range. | p. 23 |
Where to find it in the PDF
- Installation p. 7
- Technical Specifications p. 23, 24
Table of contents
Manual images
Click an image to enlargeQuick guide from the manual
This monitor is designed for optimal performance at a native resolution of 2560 x 1440 @ 60Hz. To ensure the best experience, please use the provided cables and follow the installation steps. The monitor features advanced connectivity, including USB-C with Power Delivery up to 90W, and supports daisy-chaining for multi-monitor setups. Always activate a screen saver or periodic screen refresh to prevent burn-in.
Installation
To install the base, place the monitor face down on a soft surface to avoid scratching. Attach the base to the stand, tighten the screw at the bottom, and attach the stand to the VESA mount area until the latch locks. For VESA wall mounting, remove the base assembly by pressing the release button, sliding the base out, and removing the hinge. The monitor supports a 100mm x 100mm VESA interface.
Connectivity
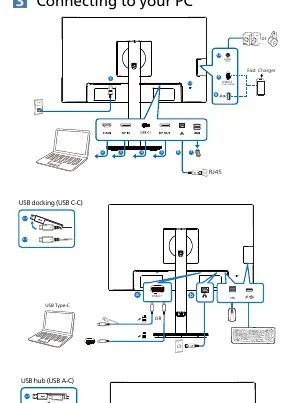
The monitor includes HDMI, DisplayPort, and USB-C inputs. To connect to a PC, plug in the power cord and the appropriate signal cable. For daisy-chaining, ensure your PC's GPU supports DisplayPort MST (Multi-stream transport). You can use the DisplayPort or USB-C1 port for daisy-chaining. Note that the maximum number of monitors supported depends on your GPU performance.
Operation
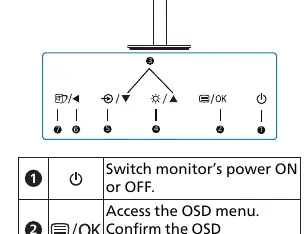
Use the control buttons on the front bezel to access the On-Screen Display (OSD) menu. The OSD allows you to adjust settings like brightness, contrast, color, and input source. The monitor includes SmartImage presets (EasyRead, Office, Photo, Movie, Game, Economy, D-Mode) to optimize display performance for different content. Smart Power technology allows for flexible power delivery up to 90W via the USB-C1 port, depending on the brightness level.
Troubleshooting
If you encounter issues, check that all cables are securely connected and the computer is turned on. For image problems, adjust the brightness and contrast in the OSD. If the screen shows 'Cannot display this video mode', set the resolution to 2560 x 1440. If you get lost in the OSD menu, use the 'Reset' function in the 'Setup' menu to restore factory settings.
Technical Specifications
The monitor features a 23.8" IPS panel with a native resolution of 2560 x 1440. It supports a refresh rate of up to 120Hz. Connectivity includes HDMI 2.1, DisplayPort 1.4, USB-C (upstream with up to 90W PD), and a USB hub. The monitor is compatible with Windows 11/10 and Mac OS X.
Manufacturer information
Philips
Practical help
Common problems
No picture (Power LED not lit)
Ensure the power cord is plugged into the outlet and the back of the monitor. Check that the power button is in the ON position.
No picture (Power LED is White)
Ensure the computer is turned on and the signal cable is properly connected. Check for bent pins on the cable.
Image appears blurred or distorted
Set the PC's display resolution to the monitor's native resolution of 2560 x 1440.
Burn-in or ghost image
Always activate a moving screen saver or periodic screen refresh application when the monitor is unattended.
Before use
- Ensure the monitor is placed on a stable surface.
- Connect the power cord firmly to the monitor and a power outlet.
- Connect the signal cable (HDMI, DP, or USB-C) to your PC.
- Verify that your PC's resolution is set to 2560 x 1440.
- If using daisy-chaining, ensure your GPU supports MST.
Show more Show less
Specs in practice
- Native Resolution
- 2560 x 1440 @ 60Hz for optimal image quality.
- Power Delivery
- Up to 90W via USB-C1 port to charge compatible devices.
- Refresh Rate
- Supports up to 120Hz for smooth motion.
Images and diagrams
- Base assembly: Shows how to attach the stand and base.
- Port layout: Identifies all input/output ports on the back.
- Control buttons: Explains the function of each button on the front bezel.
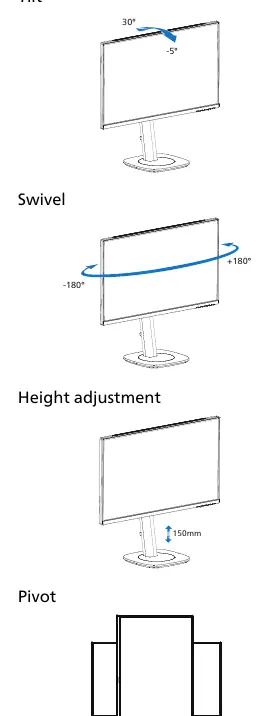
- Physical adjustments: Shows tilt, swivel, height, and pivot ranges.
Model compatibility
- Compatible with Windows 11/10 and Mac OS X.
- Daisy-chaining requires GPU support for DisplayPort MST.
- USB-C Power Delivery depends on PC capabilities.

Manual page author
David Miller
Documentation analyst