Electronics / Monitors
User Manual for Philips 24B2U4301 Business Monitor
Quick guide and user manual for the Philips 24B2U4301 Business Monitor. Includes setup instructions, OSD settings, Smart Power, PowerSensor, and troubleshooting.
Quick answers from the manual
Quick answer
- The Philips 24B2U4301 is a business monitor supporting 1920x1080 resolution at 120Hz, USB-C power delivery up to 96W, and features like PowerSensor and SmartImage. p. 25, 26
Key actions
- Assemble the stand p. 7
- Connect to PC p. 8
- Adjust OSD settings p. 10, 11
First start
- Connect power and signal cables, then turn on the monitor and computer. p. 8
Show 4 more answers Show less
Problems and fixes
No image
Check power and signal cable connections.
p. 32Maintenance and reset
- To reset to factory settings, go to Setup > Reset in the OSD menu. p. 11, 34
Technical specifications
| Parameter | Value | Meaning | Pages |
|---|---|---|---|
| Resolution | 1920 x 1080 @ 120Hz | Maximum supported resolution and refresh rate. | p. 25 |
| Power Delivery | 96W | Max power via USB-C1. | p. 25, 26 |
Where to find it in the PDF
- Installation p. 7, 8
- OSD Settings p. 10, 11
- Technical Specs p. 25, 26
Table of contents
Manual images
Click an image to enlargeQuick Guide
The Philips 24B2U4301 is a high-performance business monitor. This guide covers essential setup, operation, and maintenance procedures to ensure optimal performance.
Assembly and Installation
- Stand Assembly: Place the monitor face down on a flat surface using the protective cover. Attach the base to the stand, tighten the screw at the bottom, and snap the stand into the VESA mount area.
- VESA Mounting: To remove the stand, place the monitor face down, press the release button to detach the base, remove the VESA cover, and unscrew the hinge. The monitor supports 100mm x 100mm VESA mounts with M4 screws.
Connections
The monitor features various ports on the rear panel:
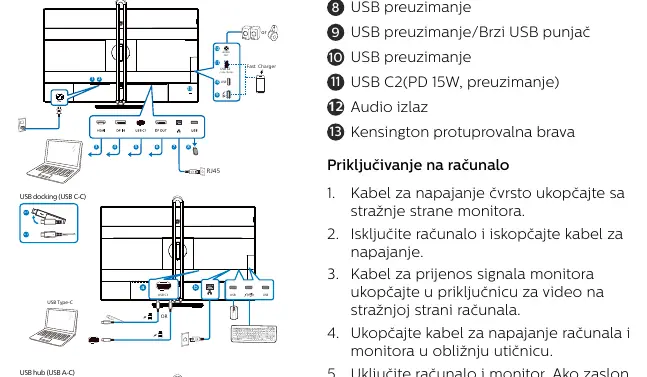
- Video Inputs: HDMI 1.4, DisplayPort 1.4, and USB-C1 (supports DP Alt mode).
- USB Hub: Includes USB-C1 (PD 96W), USB-C2, and three USB-A ports (one with fast charging).
- Network: RJ-45 Ethernet port.
- Audio: Audio output jack.
OSD Menu and Controls
Use the buttons on the front bezel to navigate the On-Screen Display (OSD) menu:
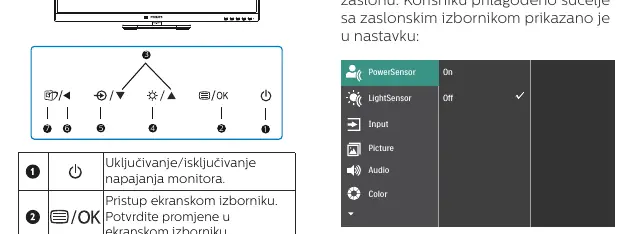
- Power Button: Turns the monitor on/off.
- Menu/OK: Accesses the OSD menu and confirms selections.
- Up/Down: Navigates the menu.
- Brightness: Adjusts brightness levels.
- Input: Switches input sources.
- SmartImage: Quick access to display presets (EasyRead, Office, Photo, Movie, Game, Economy, Off).
Smart Features
- Smart Power: Dynamically adjusts power delivery via USB-C1 based on brightness settings (up to 96W).
- PowerSensor: Uses infrared sensors to detect user presence and automatically reduces power consumption by up to 80% when the user is away.
- SmartImage: Optimizes display settings for different content types in real-time.
- Adaptive Sync: Provides smooth, tear-free gaming performance for compatible graphics cards.
Troubleshooting
- No Image: Check if the power cable is connected and the monitor is turned on. Ensure the signal cable is properly connected to the computer.
- Image Blurry/Unclear: Adjust contrast and brightness in the OSD menu. Ensure the resolution is set to the native 1920 x 1080.
- Image Retention: Always use a screen saver or periodic screen refresh if displaying static content for long periods.
Technical Specifications
- Panel Size: 23.8 inches (60.5 cm).
- Resolution: 1920 x 1080 @ 120Hz (max).
- Power Delivery: Up to 96W via USB-C1.
- Operating Conditions: Temperature 0°C to 40°C, Humidity 20% to 80% RH.
Manufacturer information
Philips
Practical help
Common problems
No image (LED off)
Check if the power cable is securely connected to the monitor and wall outlet. Ensure the power button is in the ON position.
No image (LED white)
Ensure the computer is turned on and the signal cable is properly connected. Check for bent pins on the cable connector.
Image blurry or unclear
Adjust contrast and brightness in the OSD menu. Ensure the resolution is set to the native 1920 x 1080.
Before use
- Place the monitor away from direct sunlight and heat sources.
- Use the provided power cable.
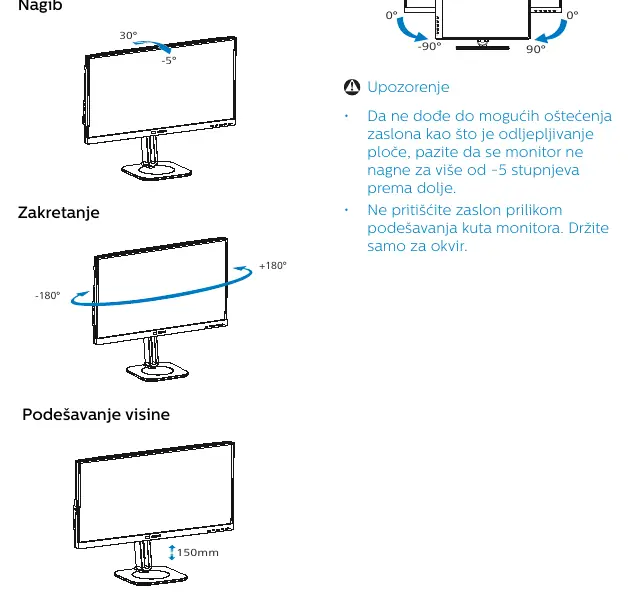
- Ensure the monitor is not tilted more than -5 degrees downwards.
- Turn off the computer before connecting cables.
- Keep the screen away from oil or liquids.
Show more Show less
Specs in practice
- USB-C Power Delivery
- Provides up to 96W power delivery via USB-C1 for charging laptops.
Images and diagrams
- Page 7: Stand assembly instructions.
- Page 8: Connection ports layout.
- Page 10: OSD control buttons description.
- Page 12: Physical adjustments (tilt, swivel, height).
- Page 13: VESA mount removal.
Model compatibility
- Compatible with Windows 11/10.
- Supports AMD Adaptive Sync.
- USB-C PD requires a compatible host device.

Manual page author
David Miller
Documentation analyst