Electronics / Monitors
Philips 243V7 V-Line Monitor User Manual
Comprehensive user guide for the Philips 243V7 V-Line monitor. Includes setup instructions, OSD menu navigation, SmartImage settings, technical specifications, and troubleshooting tips.
PDF source: Deutsch · summary: English
Quick answers from the manual
Quick answer
- The Philips 243V7 is a 23.8-inch IPS monitor. Setup involves attaching the stand, connecting the power and signal cables (VGA, DVI, HDMI, or DP), and adjusting settings via the OSD menu. p. 6, 8, 9
Key actions
- Attach the stand p. 8
- Connect signal cables p. 9
- Unlock OSD p. 30
First start
- Connect power and signal cables, then turn on the computer and monitor. p. 8, 10
Show 4 more answers Show less
Problems and fixes
No image
Check power and signal cable connections.
p. 26
OSD locked
Hold OSD button for 10 seconds.
p. 30Maintenance and reset
- Use the 'Reset' option in the OSD Setup menu to restore factory defaults. p. 12, 28
Technical specifications
| Parameter | Value | Meaning | Pages |
|---|---|---|---|
| Resolution | 1920 x 1080 | Native resolution at 60Hz | p. 17, 20 |
| Panel Size | 23.8 inch | Screen size | p. 17 |
Where to find it in the PDF
- Safety and Maintenance p. 3, 4, 5
- Installation p. 6, 8, 9
- OSD Menu p. 10, 11, 12
- Technical Data p. 17, 18, 19
Table of contents
Manual images
Click an image to enlargeQuick Guide
This guide provides essential information for setting up and operating your Philips 243V7 V-Line monitor. For optimal performance, use the native resolution of 1920 x 1080 at 60 Hz.
Safety and Maintenance
- Power: Use only the provided power cable. Ensure the power outlet is easily accessible.
- Cleaning: Use a soft, dry cloth. Do not use alcohol or ammonia-based cleaners.
- Protection: Avoid placing heavy objects on cables. Do not expose the display to direct sunlight or oil.
- Ventilation: Keep ventilation openings clear to prevent overheating.
Installation
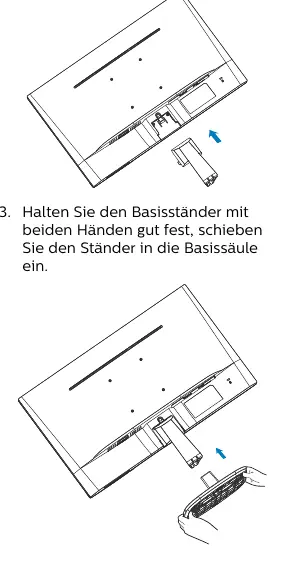
Stand Assembly
- Place the monitor face down on a soft surface to prevent scratches.
- Slide the base onto the monitor until it clicks into place.
- Hold the base stand firmly and slide the stand into the base column.
Connecting to PC
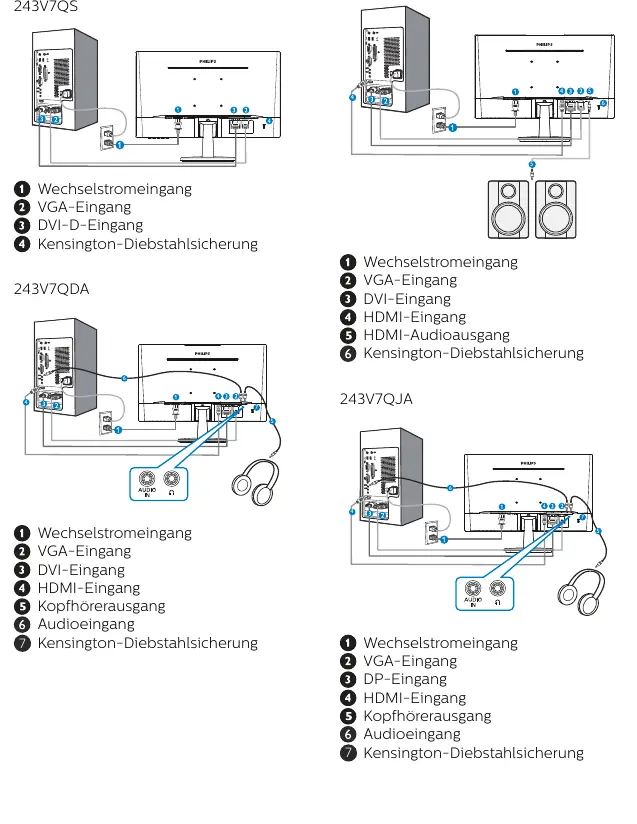
Connect the power cable to the back of the monitor. Connect the signal cable (VGA, DVI, HDMI, or DisplayPort depending on your model) to the video output on your computer. Ensure all cables are securely connected before powering on.
Monitor Operation
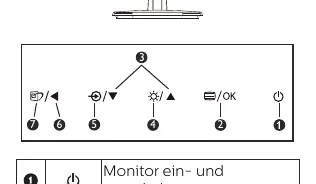
OSD Menu
Use the buttons on the front bezel to navigate the On-Screen Display (OSD) menu. The OSD allows you to adjust settings such as brightness, contrast, input source, and color temperature.
SmartImage
SmartImage optimizes settings for different content types. Options include: EasyRead (for text), Office, Photo, Movie, Game, Economy, and LowBlue Mode.
Adjustments
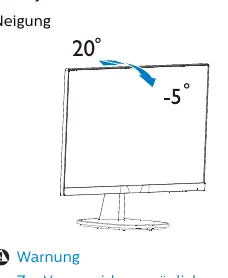
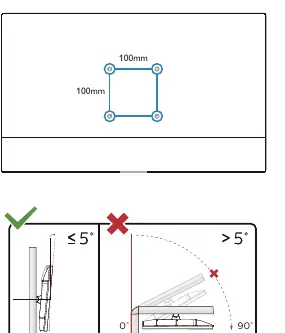
- Tilt: The monitor can be tilted from -5 to +20 degrees. Do not press against the screen while adjusting; hold the bezel.
- VESA Mount: The monitor supports 100x100 mm VESA standard mounts.
Troubleshooting
- No Image (LED off): Check if the power cable is connected and the power button is on.
- No Image (LED white): Ensure the computer is on and the signal cable is properly connected.
- OSD Locked: Hold the OSD button for 10 seconds to unlock.
- Image Distorted: Set the computer resolution to the native 1920 x 1080.
Manufacturer information
Philips
Practical help
Common problems
No image (LED off)
Check power cable connection and ensure the power button is pressed.
No image (LED white)
Check signal cable connection and ensure the computer is powered on.
OSD menu locked
Hold the OSD button for 10 seconds to unlock.
Image is blurry or distorted
Set the computer display resolution to the native 1920 x 1080.
Before use
- Ensure the power cable is securely connected.
- Verify the signal cable (VGA/DVI/HDMI/DP) is connected to the PC.
- Ensure the computer is turned on.
- Place the monitor on a stable surface.
- Remove any protective film from the screen.
Show more Show less
Specs in practice
- Native Resolution
- 1920 x 1080 at 60 Hz for the best image quality.
Images and diagrams
- The OSD buttons are located on the front bottom right of the monitor.
- The stand assembly requires sliding the base into the column until it clicks.
- The rear ports vary by model (VGA, DVI, HDMI, DP, Audio).
Model compatibility
- Compatible with Windows 7/8/8.1/10 and Mac OSX.
- Some models require a cable adapter for Mac systems.

Manual page author
David Miller
Documentation analyst