Tools / Saws
User Manual for PowerSmart 20V Cordless Circular Saw PS76410A
Quick guide for the PowerSmart 20V Cordless Circular Saw (PS76410A/PS76410A-HW). Includes assembly, blade installation, operation, adjustments, and troubleshooting.
Quick answers from the manual
Quick answer
- The PowerSmart 20V Cordless Circular Saw (PS76410A) is a battery-powered tool for cutting wood. It features adjustable cutting depth and angle, and requires a 20V PowerSmart battery and charger. p. 1, 3
Key actions
- Install/Remove Blade p. 10, 11
- Adjust Depth p. 12
First start
- Charge the battery fully before first use, as it is shipped in a low charge condition. p. 11, 14
Problems and fixes
Tool will not start
Check battery charge, installation, temperature, or switch.
p. 15Maintenance and reset
- Clean ventilation openings and saw blade holder regularly. Remove battery before maintenance. p. 14
Technical specifications
| Parameter | Value | Meaning | Pages |
|---|---|---|---|
| Voltage | 20V | Rated voltage | p. 3 |
Where to find it in the PDF
- Technical Data p. 3
- Assembly p. 10
- Operating Instructions p. 11, 12
Table of contents
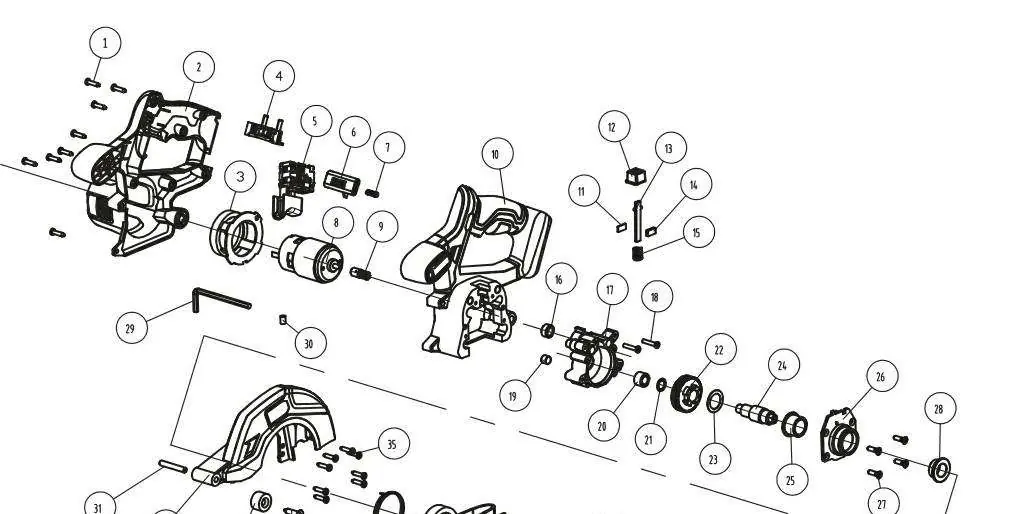
Manual images
Click an image to enlargeQuick guide from the manual
This manual provides essential information for the safe operation and maintenance of the PowerSmart 20V Cordless Circular Saw. Before using the tool, ensure the battery is fully charged and that you have read all safety instructions. If you encounter any issues, contact customer support at 1-800-791-9458 or [email protected].
Technical Specifications
- Rated Voltage: 20 V
- No Load Speed: 0-3800 rpm
- Blade Diameter: 5-1/2 inch, 18 Teeth
- Arbor: 1/2 inch
- Cutting Capacity: 1-3/5 inch at 90°, 1-2/5 inch at 45°
- Battery: 20V Lithium-ion, 2.0 Ah (Model PS76020B)
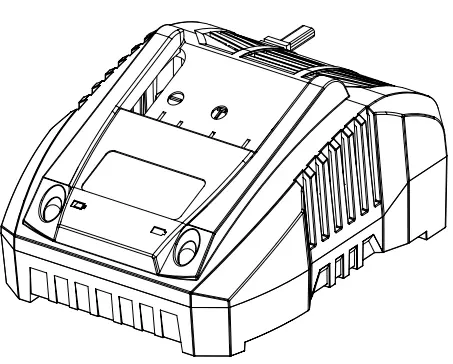
- Charger: Model PS76018C (Charge time approx. 1.3 hours)
Assembly and Setup
Installing the Saw Blade:
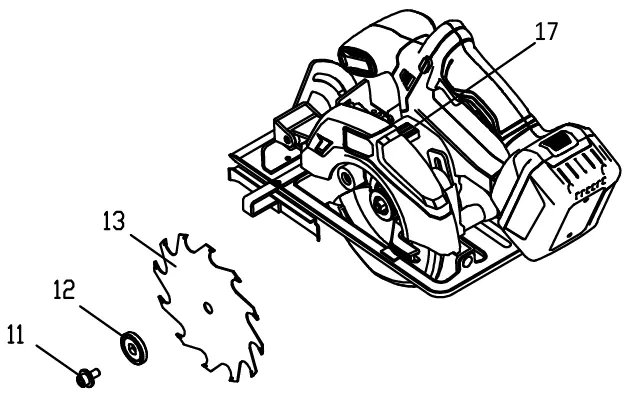
- Remove the battery pack before performing any work.
- Depress the spindle lock button (17) and remove the blade clamp bolt (11) and outer flange (12).
- Fit the saw blade inside the lower guard and onto the spindle.
- Ensure the saw teeth and the arrow on the blade point in the same direction as the arrow on the lower guard.
- Reinstall the outer flange and tighten the blade clamp bolt.
- Verify the blade rotates freely by hand.
Operating Instructions
Starting and Stopping:

- To start: Depress the lock-off button (1) and then the switch trigger (18). Allow the blade to reach full speed before guiding it into the workpiece.
- To stop: Release the switch trigger. Allow the blade to come to a complete stop before removing the saw from the workpiece.
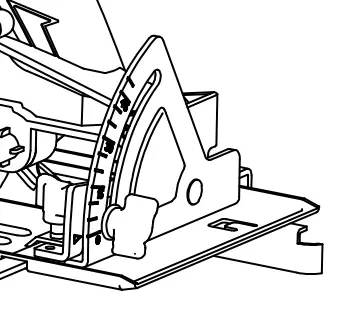
Adjustments:
- Depth Adjustment: Loosen the lock lever (19), set the base plate to the desired depth, and tighten the lever.
- Angle Adjustment: Loosen the lock knob (15), adjust the shoe to the desired angle (0°-45°), and tighten the knob.
- Parallel Cut: Loosen the parallel guide knob, slide the guide to the desired width, and tighten the bolt.
Maintenance
Always remove the battery before cleaning or inspecting the tool. Keep ventilation openings clean and free of debris. Clean the saw blade holder with compressed air or a soft brush. Do not use solvents on plastic parts. If the battery performance decreases significantly, it may be time for a replacement.
Troubleshooting
If the tool will not start, check if the battery is charged, properly installed, or if the battery temperature is too extreme. If the battery will not charge, ensure the charger is plugged into a working outlet and the battery is fully inserted.
Practical help
Common problems
Tool will not start
Check if the battery is charged, installed correctly, or if the battery temperature is too hot/cold. Check for a damaged switch.
Battery will not charge
Ensure the charger is plugged into a power outlet and the battery is fully inserted into the charger.
Before use
- Charge the battery fully before first use.
- Ensure the saw blade is properly fitted and the clamp bolt is tightened.
- Check that the lower guard moves freely and closes instantly.
- Wear eye protection and appropriate safety gear.
- Secure the workpiece to a stable platform.
Specs in practice
- No Load Speed
- 0-3800 rpm, the speed of the blade when not cutting.
- Cutting Capacity
- Maximum depth of cut: 1-3/5 inch at 90° and 1-2/5 inch at 45°.
- Blade Diameter
- 5-1/2 inch blade with 18 teeth.
Images and diagrams
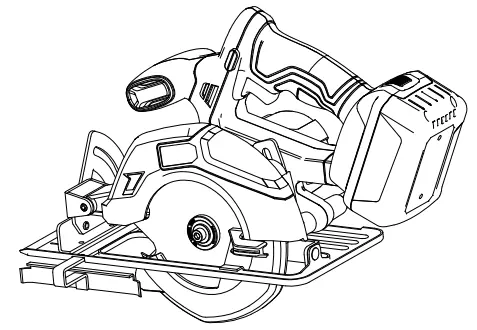
- Fig 1: Overview of saw components including lock-off button and trigger.
- Fig 2: Blade installation sequence showing spindle lock and flange.
- Fig 7: Depth adjustment mechanism.
- Fig 8: Angle adjustment mechanism.
Model compatibility
- Use only PowerSmart battery (Model# PS76020B).
- Use only PowerSmart charger (Model# PS76018C).

Manual page author
Emily Carter
User documentation editor
Prepares concise manual descriptions and highlights the most useful setup, operation, and maintenance information for readers.